

Events: Entry Limits and Closures
When and how participants can register varies from event to event. Whether an event has limited capacity or a fixed registration closing date, having flexible registration options helps organizations allocate places more effectively, reduce manual administration, and provide a better registration experience for participants.
This article explains the different types of entry limits and registration closures available for online and offline events, how they work, and how to configure them.
What are entry limits and closures?
Entry limits and closures control when registrations are available for an event. They help manage event capacity by limiting the number of registrations accepted or automatically closing registrations at a specified date and time.
Entry limits automatically close registrations once the configured capacity has been reached, while registration closures stop registrations at a scheduled date and time. When registrations close, a closed message can be displayed to participants or, where supported, they can be redirected to another webpage.
Where entry limits and closures can be applied
Entry limits and closures can be configured in different locations depending on the type of event and how registrations are managed.
Online events
Online events support two options for configuring entry limits and registration closures.
Event-level: Online event-level settings control registration availability across the entire online event. Entry limits can be configured for individuals, teams, and organizations, while registration closures apply to the online event as a whole.
Registration form-level: Registration form-level settings allow individual registration forms within the same online event to have their own entry limits and registration closure settings. This provides greater flexibility when different registration forms need to be managed independently, such as Charity Place and Own Place registrations.
Offline events
Entry limits for offline events are only available for the Registration entry type. RSVPs do not support entry limits.
Configuring entry limits
Online events
Entry limits can be configured at either the event level or registration form level for online events.
How event-level and registration form-level entry limits work together
Registration form-level entry limits build on the existing event-level entry limits. Event-level limits continue to control the maximum number of registrations across the entire event, while registration form-level limits allow individual registration forms to have their own capacity.
If both an event-level limit and a registration form-level limit are configured, the lower limit will always apply.
For example:
|
Event-level limit |
Registration form-level limit |
Outcome |
|
100 |
50 |
Registration form closes at 50. Event remains open until 100 registrations are reached. |
|
50 |
100 |
Registration form closes at 50 because the event limit is reached first. |
|
100 |
No Limit |
Registration form remains open until the event reaches 100 registrations. |
This allows individual registration forms to close independently while ensuring the total event capacity is still respected.
Tip! Registration forms without a form-level entry limit will continue using the remaining event-level capacity.
Event-level
Online event-level entry limits can be configured for individuals, teams, and organizations at event level.
To set event-level entry limits:
- 1
- Navigate to Fundraising > Events > View Online Events.
- 2
- Click the Edit icon next to the event to update.
- 3
- Under Online Event Options, select Entries & Fees.
- 4
- Select the relevant tab and configure the appropriate entry limits:
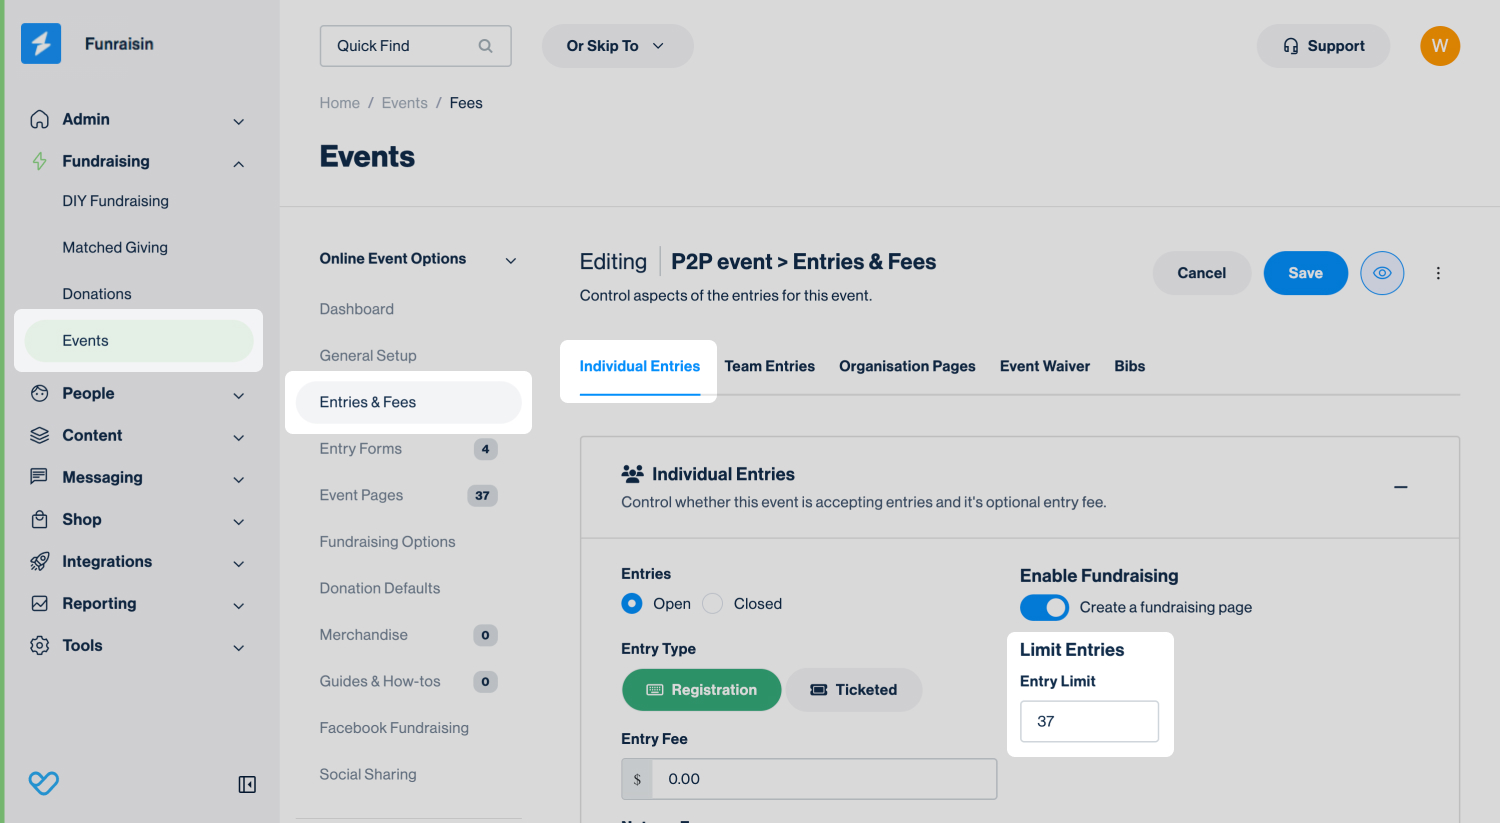
- Individuals:
- Select the Individual Entries tab.
- In the Entry Limits field, enter the maximum number of individual entries allowed.
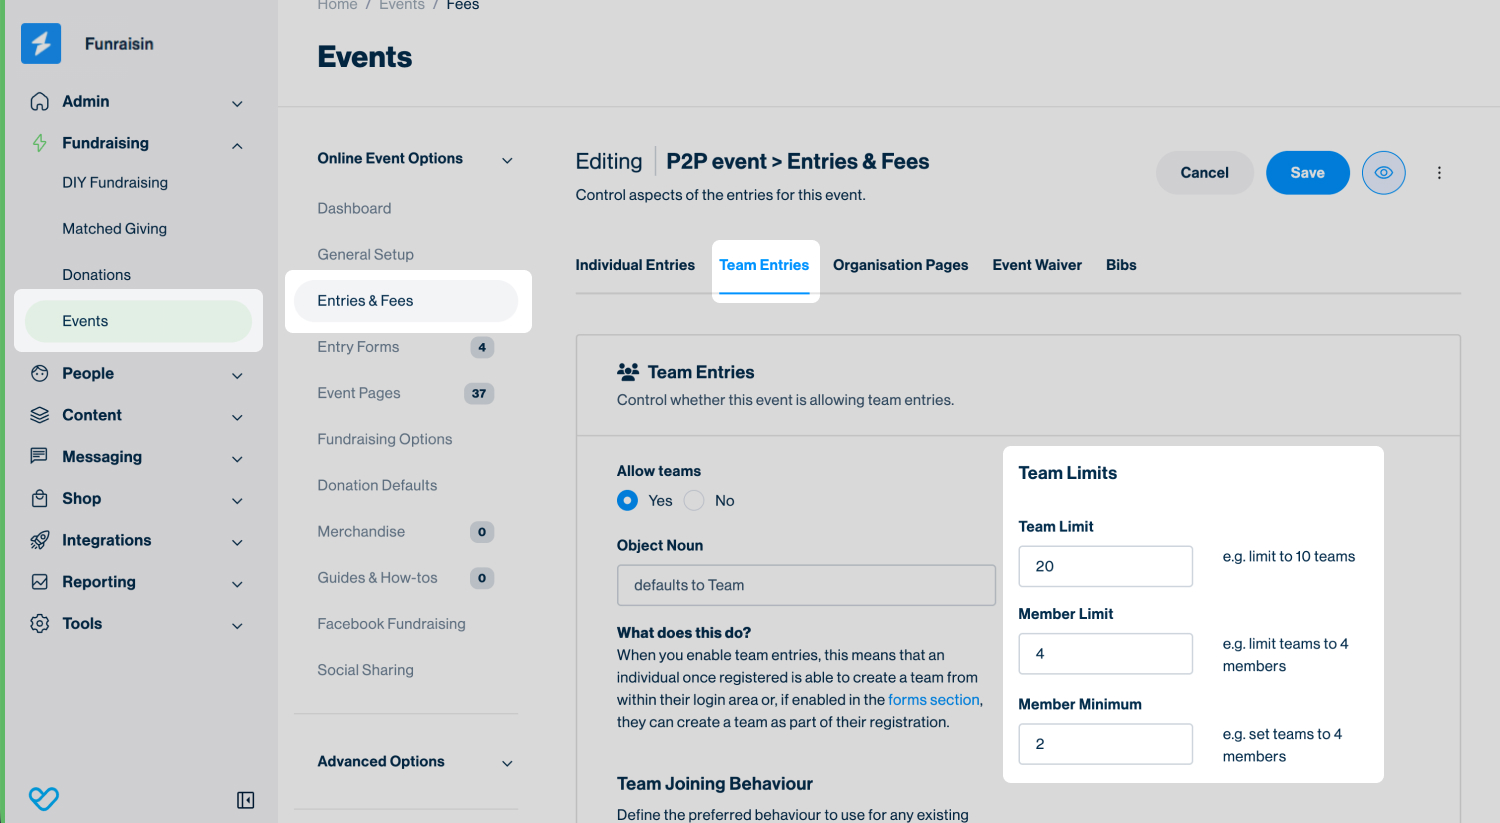
- Teams:
- Select the Team Entries tab.
- In the Team Limit field, enter the maximum number of teams allowed.
- (Optional) Configure team member limits:
- Member Limit: Sets the maximum number of members that can join a team (for example, 4 members).
- Member Minimum: Sets the minimum number of members required for a team.
- Organizations:
- Select the Organization Pages tab.
- In the Org Page Limit field, enter the maximum number of organization pages allowed.
- (Optional) Configure organization member limits:
- Member Limit: Sets the maximum number of members that can join an organization (for example, 4 members).
- Member Minimum: Sets the minimum number of members required for an organization.
- Individuals:
- 5
- Click Save.
Registration form-level
To set a registration form entry limit:
- 1
- Navigate to Fundraising > Events > View Online Events.
- 2
- Click the Edit icon next to the event to update.
- 3
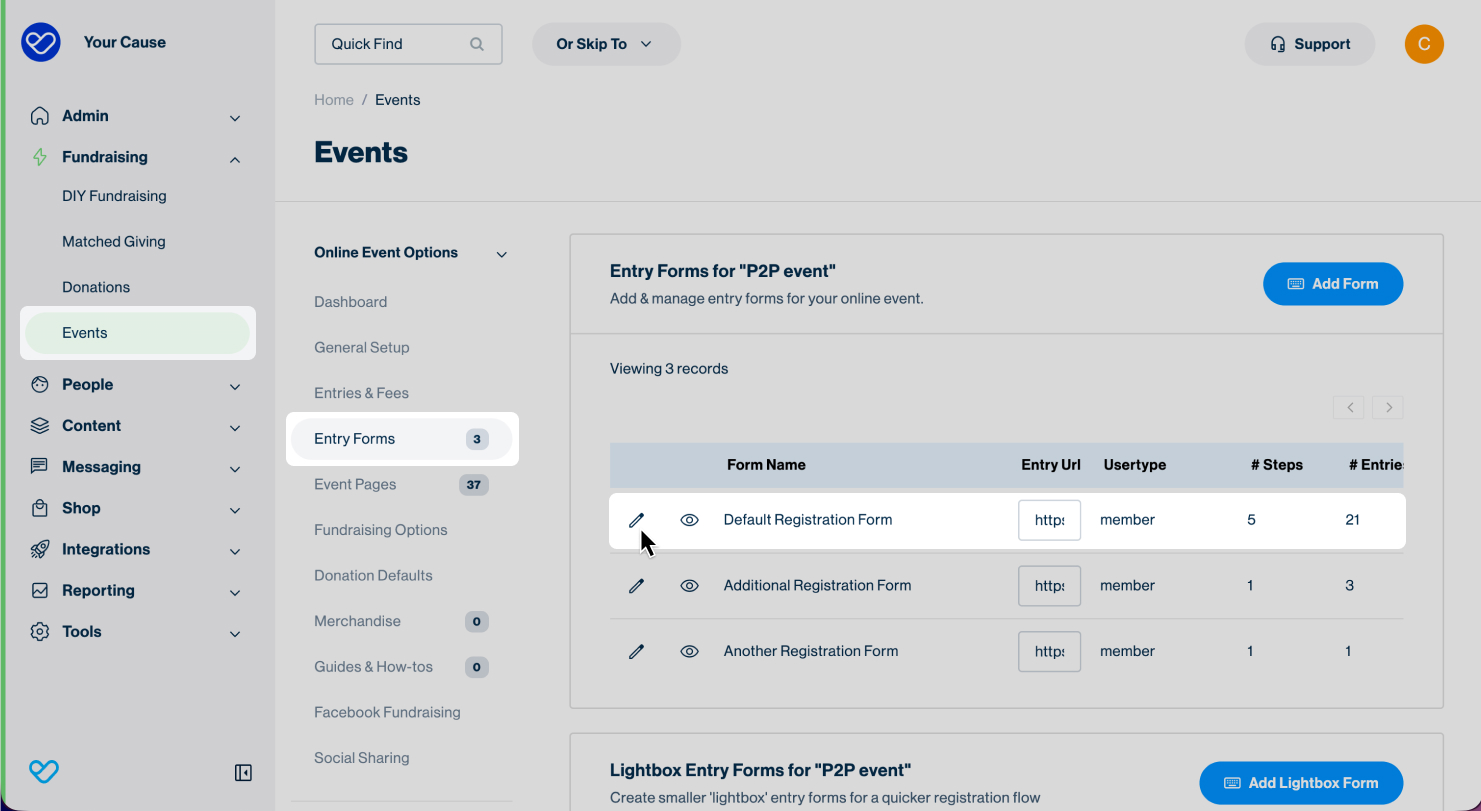
- Under Online Event Options, select Entry Forms.
- 4
- Click the Edit icon next to the registration form to update.
- 5
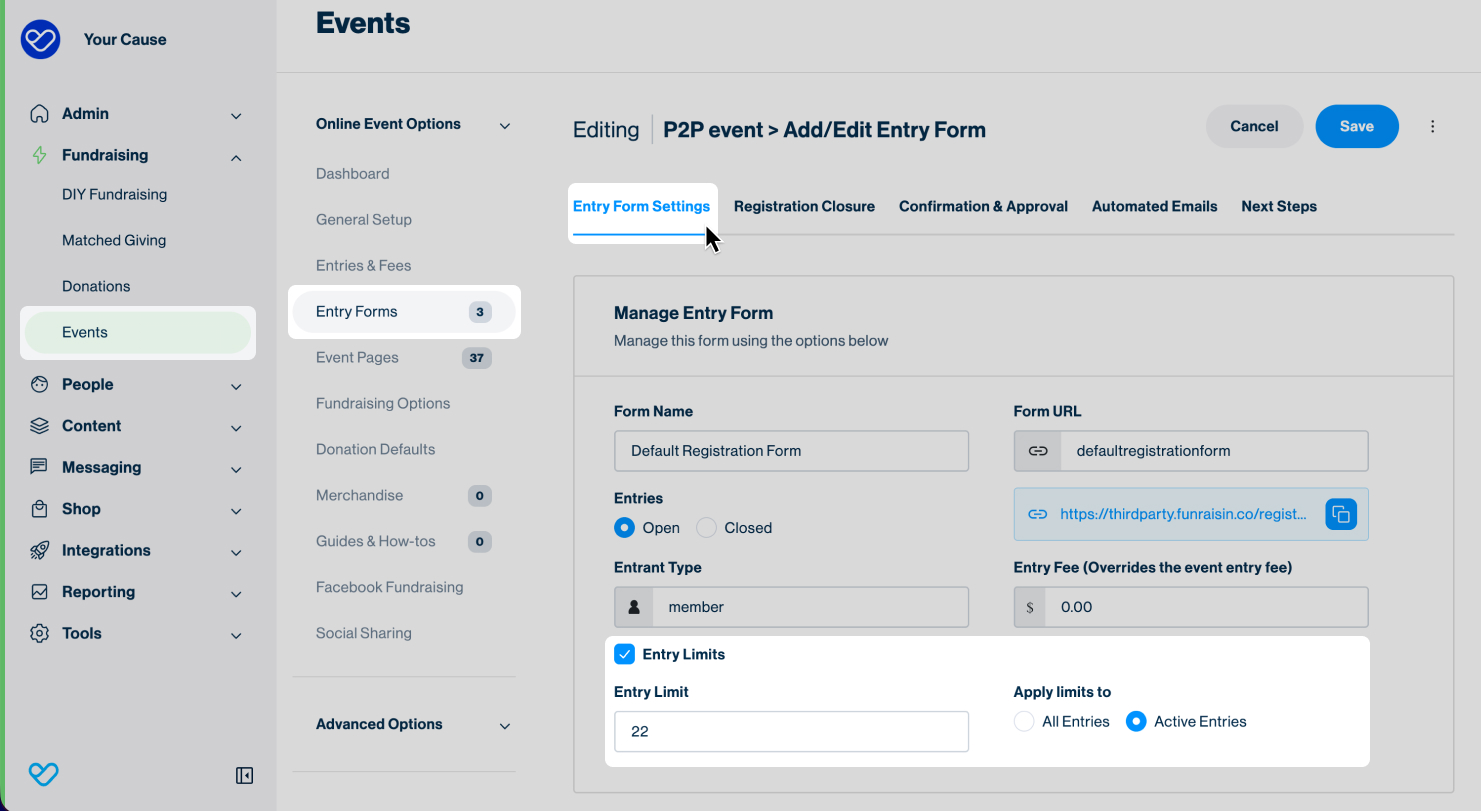
- Go to the Entry Form Settings tab and enable Entry Limits in the Manage Entry Form section.
- 6
- Enter the maximum number of entries allowed for the registration form.
- 7
- From Apply Limits To, choose how the entry limit should be calculated. Unlike event-level entry limits, which always count all entries, registration form-level entry limits can be based on either all entries or active entries:
- All Entries: Counts all registrations where an entry record has been created, including registrations that have not yet been completed. This matches the behavior of event-level entry limits.
- Active Entries: Counts only registrations that have successfully completed the registration process.
- 8
- Click Save.
Offline events
To set an offline event entry limit:
- 1
- Navigate to Fundraising > Events > View Offline Events.
- 2
- Click the Edit icon next to the event to update.
- 3
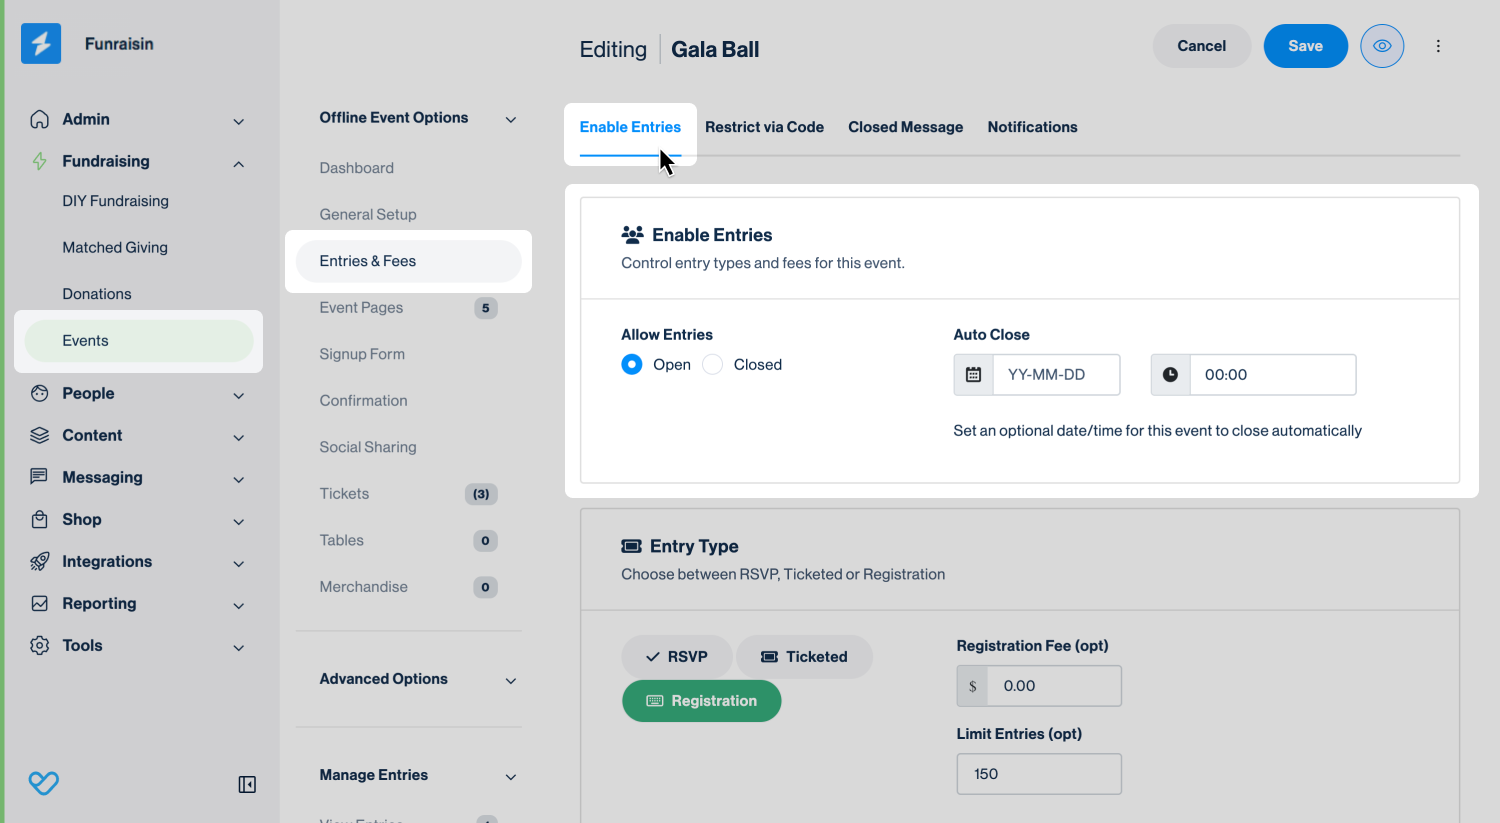
- Under Offline Event Options, select Entries & Fees.
- 4
- Select the Enable Entries tab.
- 5
- In the Entry Type section, enter the maximum number of registrations allowed in the Limit Entries field.
- 6
- Click Save.
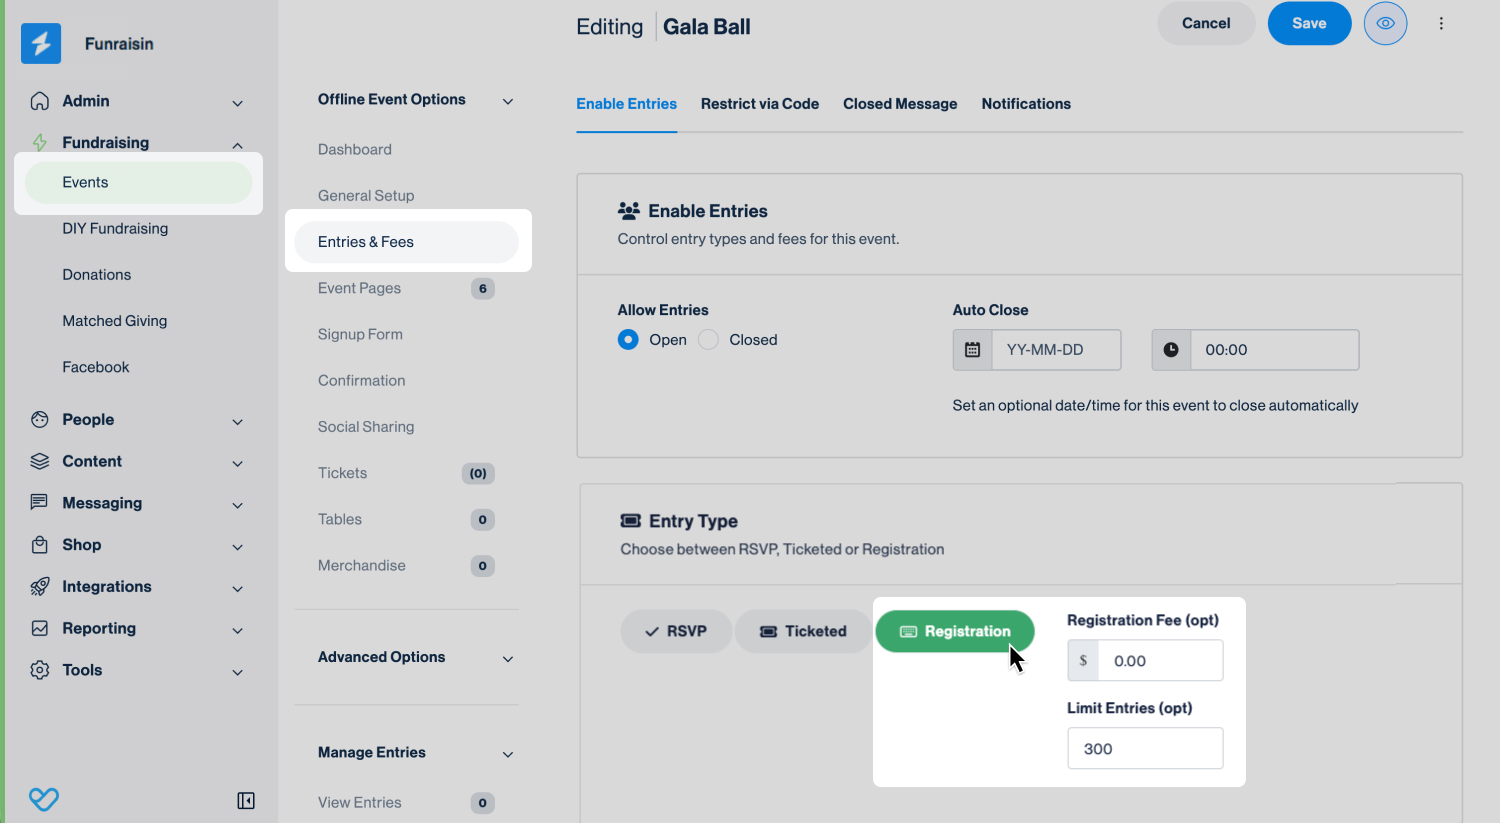
Tip! Entry limits for online and offline event Ticketed Entry are configured within the Tickets settings. For more information on ticketing, see the support article: Ticketing: Entry Types & Ticket Packages.
Configuring registration closures
Online Event-level
To configure registration closure at event level:
- 1
- Navigate to Fundraising > Events > View Online Events.
- 2
- Click the Edit icon next to the event to update.
- 3
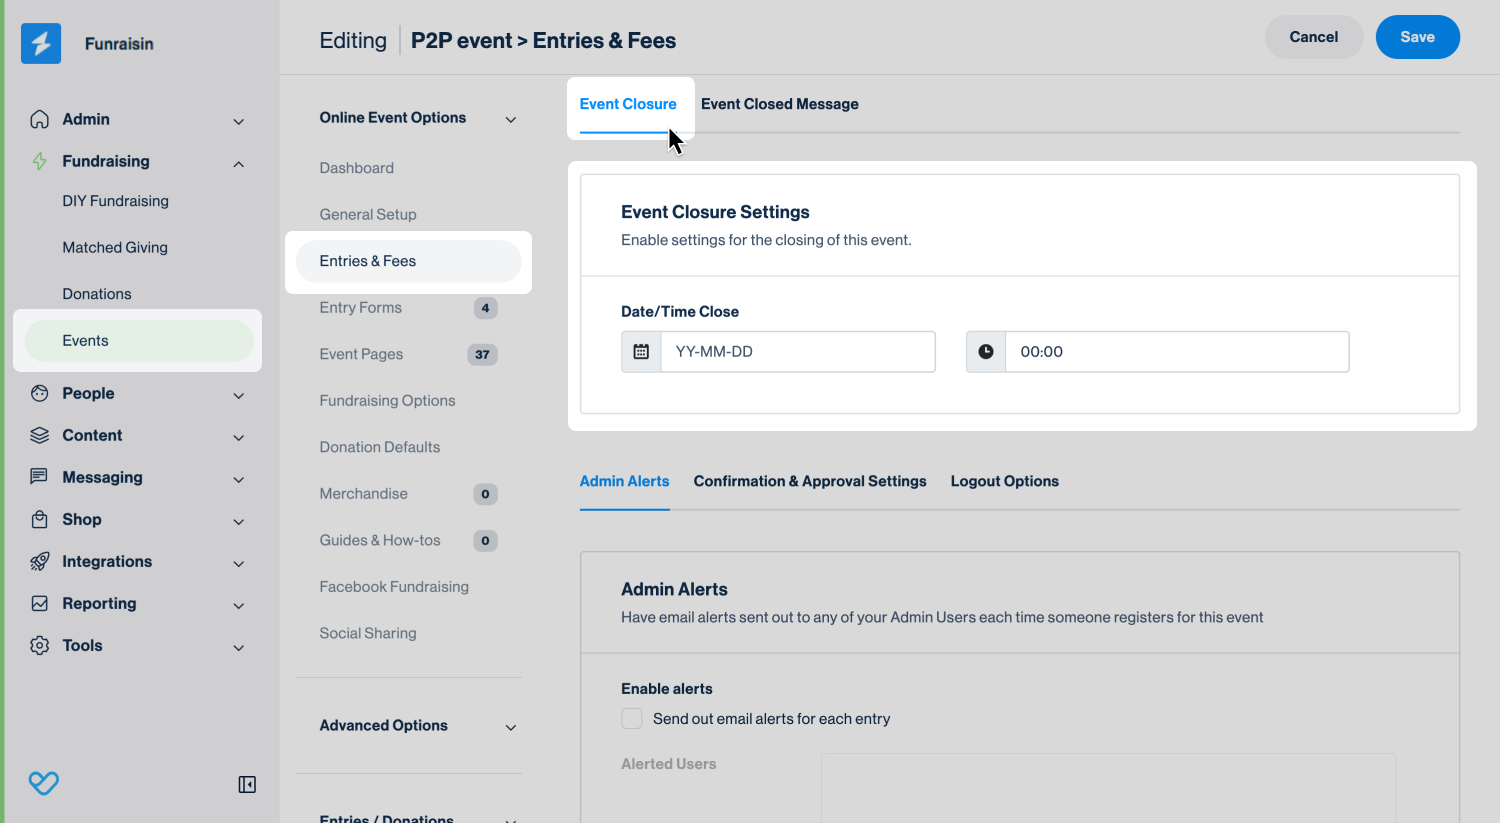
- Under Online Event Options, select Entries & Fees.
- 4
- Select the Individual Entries tab, and scroll down to the Event Closure Setting section.
- 5
- Select the Event Closure tab, then configure the close date and time.
- 6
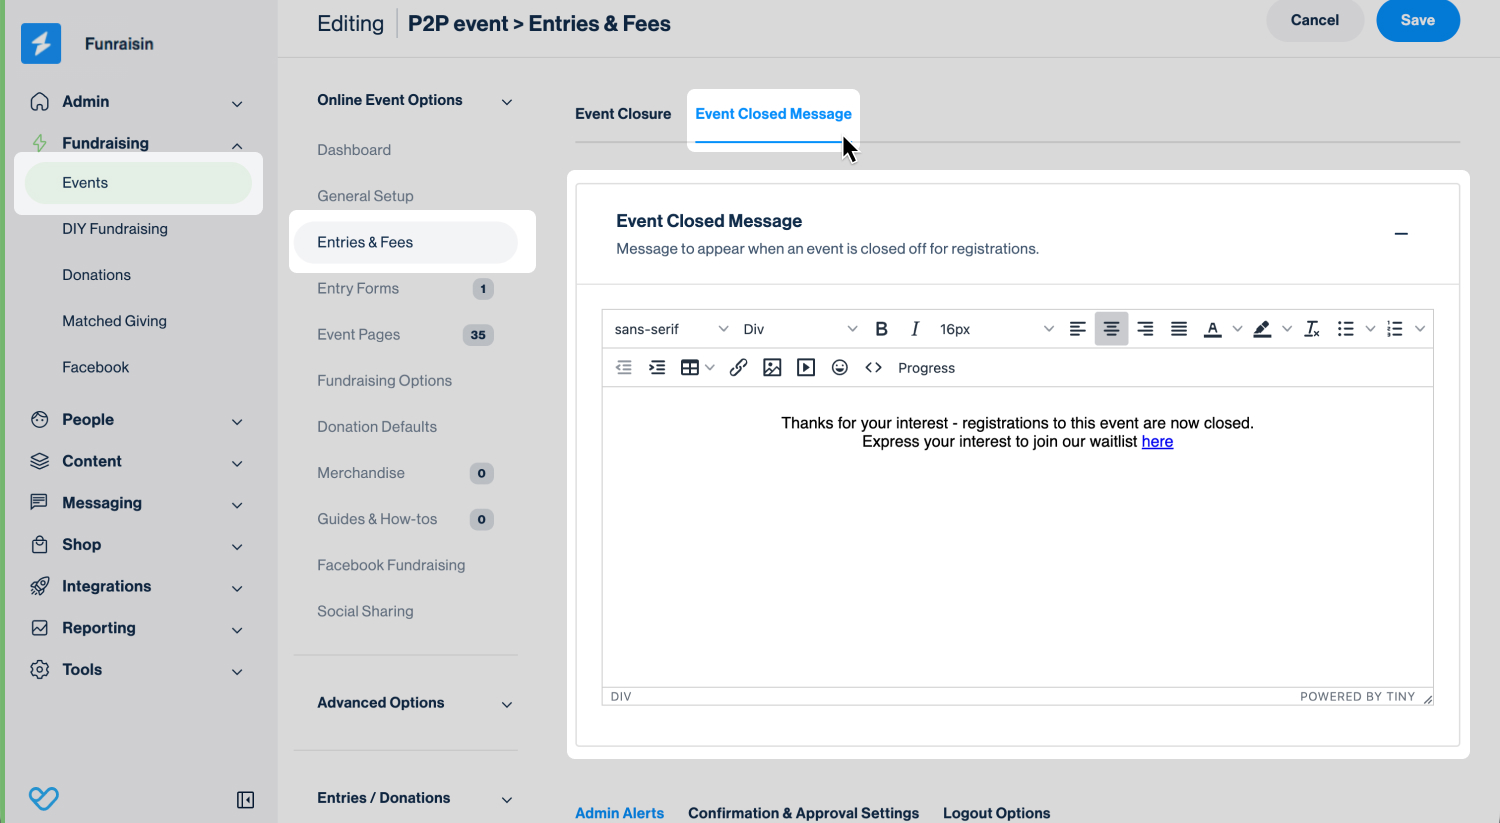
- Next, select the Event Closed Message tab, and enter the message to be displayed when the event registration closes.
- 7
- Click Save.
Registration form-level
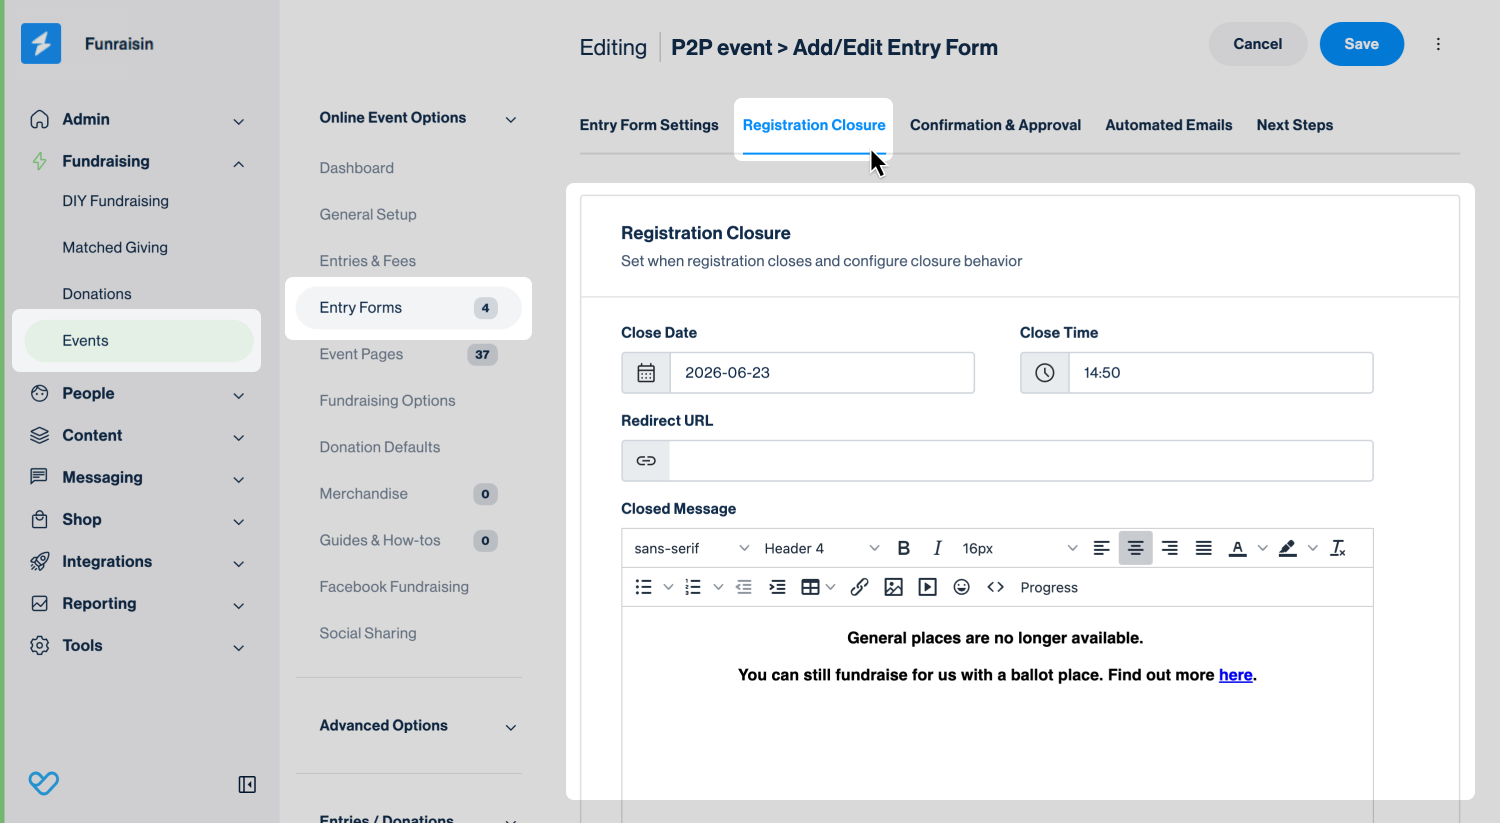
Registration form-level closures support an additional Redirect URL option, allowing participants to be redirected to another webpage instead of displaying the configured Closed Message.
To configure a closure for a registration form:
- 1
- Navigate to Fundraising > Events > View Online Events.
- 2
- Click the Edit icon next to the event to update.
- 3
- Under Online Event Options, select Entry Forms.
- 4
- Click the Edit icon next to the registration form to update.
- 5
- Go to the Registration Closure tab and configure the following settings:
- Closed Date: Select the date the registration form will close.
- Closed Time: Select the time the registration form will close on the selected date.
- Redirect URL: Enter the URL participants should be redirected to when the registration form closes. This applies whether the registration form closes because the Entry Limit has been reached or the configured Closed Date and Closed Time have been reached. When a Redirect URL is configured, it takes precedence over the Closed Message.
- Closed Message: Enter the message displayed when the registration form closes. This applies whether the registration form closes because the Entry Limit has been reached or the configured Closed Date and Closed Time have been reached. The Closed Message is only displayed when a Redirect URL has not been configured.
- 6
- Click Save.
Offline events
To configure registration closure for an offline event:
- 1
- Navigate to Fundraising > Events > View Offline Events.
- 2
- Click the Edit icon next to the event to update.
- 3
- Under Offline Event Options, select Entries & Fees.
- 4
- Select the Enable Entries tab.
- 5
- In the Enable Entries section, configure the auto-close date and time.
- 6
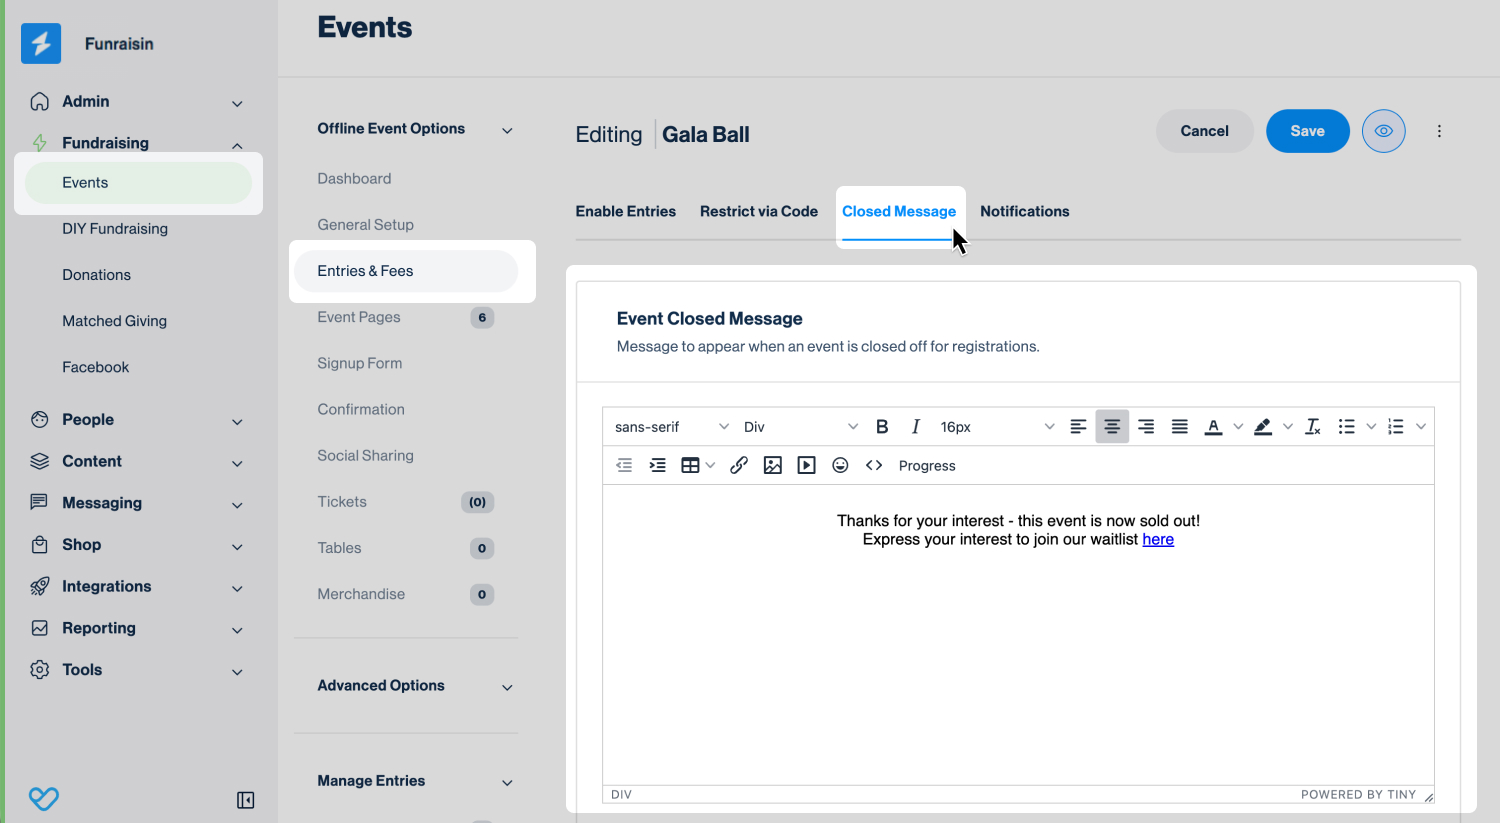
- Next, select the Closed Message tab and enter the message to be displayed when the event registration closes.
- 7
- Click Save.
Still need help? Check out our other Events support articles or reach out to the Funraisin Support team by logging a ticket through the Support Module in your platform.
Last updated: 1 Sep 2026
