Adding an Offline Donation
Add offline donations for money that has been received off the platform, e.g. a cash donation. Offline donations can be assigned to fundraisers, teams and events.
Offline donations (or sometimes called manual donations) are considered those that have been given directly to fundraisers or the charity and not made on the platform.
Common offline donation methods are donations given to the charity in cash, bank transfers and donations via cheque.
This article will provide steps on adding an offline donation to:
- An event - the donation will appear against the event as a whole, and not an individual fundraiser or team.
- A fundraiser - the donation will appear on an individual's fundraising page and contribute to the overall event total.
- An appeal - the donation will contribute to your appeals page. (This could be a crowdfunding or donation page.)
NOTE: Due to caching, Offline donations can take up to 15 minutes to show on a fundraiser's page.
Option 1: Adding an offline donation to an event
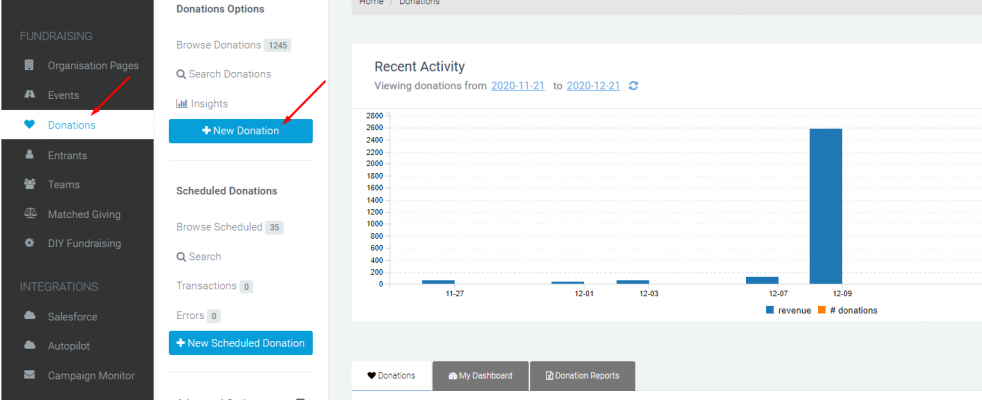
Head to the Donations Module and click the blue New Donation button.
Under Donation Details enter the donation amount.
Leave Sponsored Donation unticked (unless you want to assign the donation to a specific fundraiser - more instructions for doing this can be found below).
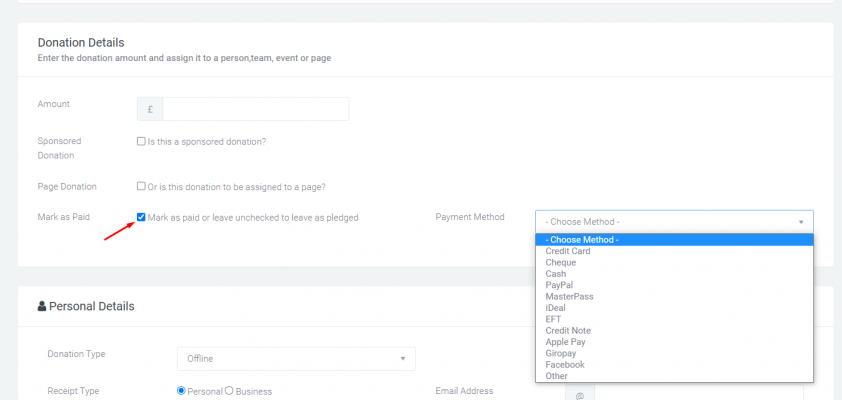
To ensure the donation contributes to your total, click Mark as paid, and then a Payment Method box will appear. Select how you received the donation from the dropdown (this is for your records only, it won’t be publicly visible). We recommend using the payment type Other to make sure that these donations stand out in reporting.
Now scroll down to Personal Details. Enter the mandatory fields First Name, Last Name and Email Address (along with any other information about the donation you’d like to include).
Ensure you've ticked Check this box to return to this page after saving at the top of the page and then click Save.
Your donation has now been added to the platform, and a donation record created. We'll now go into assigning it to the event.
You should now be in your new donation record. If not, click to edit the donation record, then in your middle navigation head to Donation Details. From there, choose the event from the Event dropdown and click Save.
Option 2: Adding an offline donation to a fundraisers page
It’s easy to assign a sponsored donation to a fundraiser. Head to the Donations Module, and click the New Donation blue button.
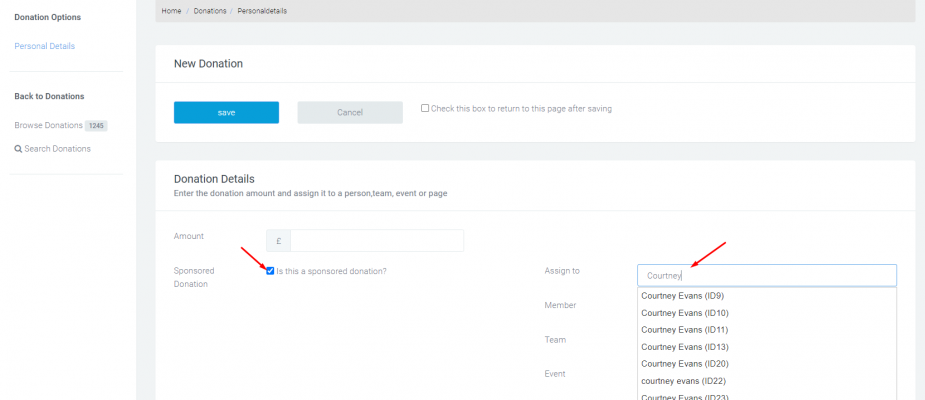
Enter the donation amount and tick Sponsored Donation?
The Assign To field will appear, start typing the name of the fundraiser the donation should be assigned to. When you have confirmed the fundraiser’s name, the Member and Event fields will automatically populate.
You may also optionally choose a team the donation should be assigned to in the dropdown.
To ensure the donation contributes to your total, click Mark as paid, and then a Payment Method box will appear. Select how you received the donation from the dropdown (this is for your records only, it won’t be publicly visible). We recommend using the payment type Other to make sure that these donations stand out in reporting.
Next, scroll down to Personal Details and fill out mandatory information under Personal details (First name, Last name, email) and then click Save.
Option 3: Adding an offline donation to an appeal
Go to the Donations Module, and click the New Donation blue button. Under Donation Details enter the donation amount and leave Sponsored Donation unticked.
Instead, tick Page Donation. This will provide you the option to choose specific pages to assign the donation to. Choose the name of the appeal page you want the donation to go towards.
To ensure the donation contributes to your total, click Mark as paid, and then a Payment Method box will appear. Select how you received the donation from the dropdown (this is for your records only, it won’t be publicly visible). We recommend using the payment type Other to make sure that these donations stand out in reporting.
Now scroll down to Personal Details. Enter the mandatory fields First Name, Last Name and Email Address (along with any other information about the donation you’d like to include), and click Save.
A donation record will be created and a donation assigned to that appeal.
Bulk import donations
You're also able to bulk import offline donations. To do this head to the Donations Module. In your middle navigation scroll down and click on Import Donations.
There you'll see a button to Download Template. This will provide you with a CSV file of a few donation records from your Funraisin platform for you to see the format required.
Add your donations in the same format to this CSV file (remember to remove the sample donations in the template before uploading to avoid duplicates). Certain fields are mandatory, and these will be clearly indicated.
Within Upload CSV, browse to upload your new CSV file with the donations.
Note: remember to keep all of the fields from the template in the import file and in the same order as set in the template. If you want to not include any data for a column, leave the value blank.
Bulk Processing Payments
If you’d like these donations to appear on the site as paid donations (for example to be visible on fundraisers profile pages), tick the Mark as Paid box.
Bulk Sending Tax Receipts
You can also choose to send the tax receipts to all records on your CSV file by ticking the ‘Send tax receipts’ checkbox.
Sending the Sponsor a Receipt
This does not happen automatically for Offline Donations. Offline Donations can send an email to the Sponsor only.
After you've saved the donation, edit the donation record and you can check the Send Receipt box and save - this will send the receipt to the sponsor.
If you’d like further help, please pop in a support ticket from your admin, and our team will assist you.


