

Ticketing - Entry Types & Ticket Packages
Create unique entry types and ticket packages for your online ticketed events.
Ticket packages are the tickets your entrants can purchase. These could be individual tickets, such as Adult and Child, or bundles, such as Family or Teams. We use entry types to build up these packages and define the information to be collected about each ticket holder.
Key Terms:
Entry Types: The building blocks used to create ticket packages. Define what information you want to collect about each individual ticket holder, whether they create a fundraising page and if their account is managed by someone else.
Ticket packages: The tickets your entrants can choose to purchase, which can be individual tickets or bundles of two or more. Entry types are assigned to ticket packages to define what details are collected about each ticket holder.
Ticketholder record: The record created on the platform for each of your ticket holders. This contains details inputted by the ticket purchaser.
This article will take you through the steps on how to set up your Entry Types and Ticket Packages and then assign them to display within your registration flow.
We have additional ticketing support articles on the following:
Once you’ve set your event as ticketed, you will have a new option, within your white middle navigation, Tickets (0). Click here to begin setting up your ticket packages.
Details on how to set your event to ticketed are found here.
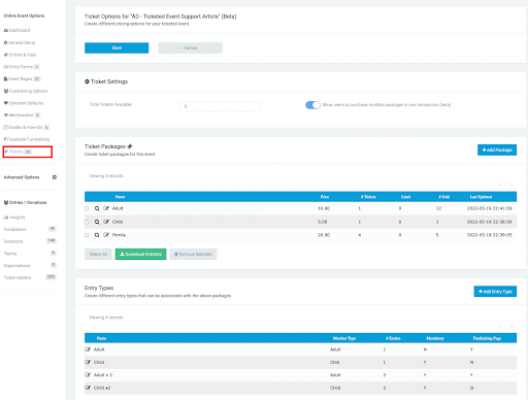
Ticket packages are what your entrants will choose from when signing up to register.

Entry Types
Entry Types are the building blocks of your ticket packages. For example, a Family Ticket Package may be built up using Adult and Children Entry Types.
They are where you define the data that you want to collect on each of your ticket holders, and you’d likely want to collect different details for adult ticket holders compared to child ticket holders. This data will be collected on the Multi-Entry step of the registration flow.
Click on +Add Entry Type to begin, which will bring up the below pop-up.
(Don't want to collect information about each ticket holder? Click here.)
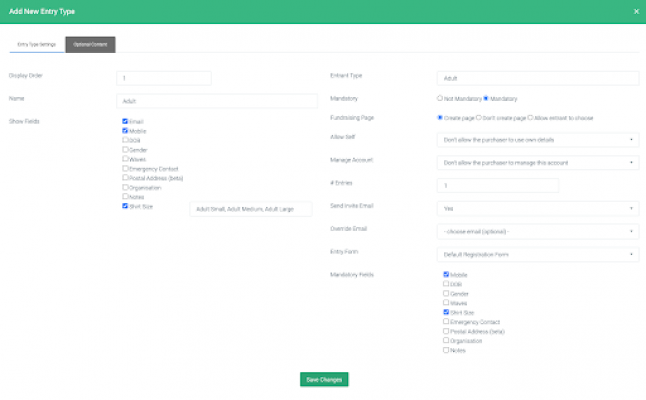
Let’s go through the settings in detail:
Display Order
If you have a Ticket Package with multiple Entry Types, (e.g Family ticket), then when you get to the Multi-Entry step within the reg flow, you will need to input the details of each ticket holder. Defining the order here will allow you to choose how they appear on this page. So, your Adult tickets can appear first on the list, followed by the children.
Name
This is the name of the Entry Type. E.g. Adult or Two Children. This name is just for admin use.
Show Fields
These are the data fields you wish to capture for each ticket holder.
Entrant Type
For your reporting, this defines what entrant type the ticket relates to. E.g. Adult, Child, Student.
Mandatory
When you get to your Multi-Entry step of reg, if not set to Not Mandatory, then the ticket purchaser can tick a box, I’m not sure yet, and not enter the details of the ticket holder. If Mandatory, then they will need to enter unique details for each ticket holder. We would always suggest you set this to Mandatory.
Note: If set to Not Mandatory, and the purchaser ticks I’m not sure yet, then no ticket record will be created for those tickets.

Fundraising Page
Define whether the ticket holders will get a fundraising page. If they do, then they’ll also create a Member record. (This is further explained in this support article.)
Allow Self
If set to Yes, this allows the ticket holder to use their own details for any of the tickets they are purchasing. So whilst they may purchase four tickets, they may put their name against all four ticket records.
Manage Account
If set to Yes, this allows the ticket purchaser to manage the person they are registering. This is most commonly set to Yes on child or pet entry types. It allows the ticket purchaser to create a fundraising page for the child/pet, but they are in control of the page, and no email address is supplied.
# Entries
This defines how many entries are associated with the particular Entry Type. If your Entry Type was Two Adults, then you’d set this to 2.
Send Invite Email
If the entry type is going to create a fundraising page, then by default, they will receive the Multi-Entry invite email. However, by changing this option to Yes, the Override Email option will become available.
Override Email
If sending an invite email, by default the Multi-Entry Invite email will trigger. However, you can create an email at event level and then choose it from the dropdown to be the email sent to invite ticket holders to complete their registration when a ticket has been purchased for them.
Entry Form
When invited ticket holders receive an email to sign up and create their fundraising page, the invite email will send them to the Default Registration Form, which is always the first reg form in your list. This setting allows you to choose a different reg form from your list within Entry Forms that they will be directed to, to complete their registration.
Mandatory Fields
When creating your Entry Type, you choose the fields of data you want to collect, and this allows you to set which are mandatory.
Note: Each Entry Type can only be used for one Ticket Packages, and not across multiple.
Ticket Packages
Now you’ve created your Entry Types, you can use these to build up your Ticket Packages.
Click on +New Ticket Package to begin, and the below popup will appear.

Let’s go through the settings:
Status
Open or Closed will determine if the Ticket Package is open to be purchased.
Ticket Price
Define the cost for this Ticket Package.
# Tickets per purchase
This defines how many tickets are in the Ticket Package. For example, an Adult ticket would be 1 ticket. Whereas a Family ticket comprising of two adults and two children, may be set as 4 tickets per purchase.
Total Available
Set a capacity for how many of this Ticket Package you have available. This would count a Family ticket as 1, as it is counting the Ticket Package as a whole. If you do not add a value here, then there will be no limit.
Max Buy Limit
Entering a number allows you to limit the number of each Ticket Package that can be purchased. You may want entrants to only be able to buy a maximum of four adult tickets for example.
Min Buy Limit
You can also set a minimum buy limit. You may want to make it mandatory to purchase at least one adult ticket to progress through the registration flow.
Code
You can create a code that will be applied to the Ticket Package that can be pulled into reports.
Category
This is not essential, but if set, Ticket Packages with the same category will appear behind an accordion header. The below image shows an Adult and Senior Adult Ticket Package both within the Adult category.

Title
This is the name of your Ticket Package, and can be pulled into your reports using the field Ticket. If you have mutiple 'Adult' tickets for example, it can be useful to call them 'Saturday Adult', and 'Sunday Adult' so they can be differentiated in a report.
Description
You can add more information about the Ticket Package. For example, you may want to clarify that a Family ticket is two adults and two children.
Tax Receipt Line
Define how each ticket will be labeled within the receipt the purchaser receives. If nothing is added then each ticket line will default to the name of the event.

Ticket Image
You can upload an image or logo to appear against the ticket package when choosing tickets. An example is in the image at the start of the article, where the Adult ticket has an image.
Within the Ticket Package popup, you’ll notice Entry Types to the left hand side. This is where you select and highlight the Entry Types that are going to be used to build up your Ticket Package. It’s essential at least one Entry Type is selected in order for a ticket record to be created on the Multi Entry step of the registration flow. If no Entry types are selected then no details will be collected on the Multi Entry step and no ticket records will be created.

Registration Flow
Now you’ve created your ticket packages, they need to be added to the registration flow.
Within your event, navigate to Entry Forms, where you will have your default registration flow, and any others you’ve set up. Click the pen and paper icon to edit a paticular reg flow. Here you can edit each of the entry steps that the entrant will go through. Click the edit icon to the right of each step to customise that step.
Tickets
This is the first step within your registration process. Under Ticket Options, the tickets you want available to purchase need to be highlighted and then saved. Once done, they will appear on the first step of registration.

Create Account
This is where the ticket purchaser creates their Member record. If they’ve registered for a previous event on your site, then they’ll be prompted to login.
Create Your Page
If the event has fundraising, then this is where your ticket purchaser will set up their fundraising page.
Multiple Entries
This step needs to be enabled and set to mandatory. On this step, the ticket purchaser will enter the details of all the ticket holders. If it is not mandatory, then the ticket purchaser will be able to skip the step, resulting in ticket records not being created.
Optional Donation
Define the settings for optional donation and payment.
Once set up, we always advise running some test entries through your event so you can experience the user journey. You can delete these once you’re ready to go live.
Don't want to collect information for each ticket holder?
If you don't want to collect information about each ticket holder, then you can skip setting up Entry Types. Instead, set up your Ticket packages as normal, but don't assign Entry Types.
When setting up the registration flow, do not enable the Multi-Entry step.
This means when purchasing tickets, the main ticket purchaser can choose their tickets and go through the registration flow, but will not fill in any details about the individual ticket holders.
No ticketholder records will be created. The ticket purchaser will have a member record, and against their member record will be the number of the tickets they've purchased, e.g. 2 x Adult and 1 x Child.
Check out our support articles on Ticketed events overview.
If you’d like further help please pop in a support ticket from your admin and our team will assist you.
