

Reporting: Creating, Editing and Filtering Exports
Your Data Exports are a goldmine of insights to keep track of your events, fundraisers, and donations. Whilst your dashboard can give you a good overview of your site, your Data Exports will give you a deeper insight into what’s happening and how it's performing.
The data exports module allows you to create multiple exports to pull data on your fundraisers, donations, transactions, teams and more. There’s no limit to the number of customised exports you create. All exports can be downloaded at any time, or sent to you on a specific schedule.
You can control who from your team has access to your Funraisin platform by adding new team members or archiving those who have left. Adding new team members is quick to do and there is no limit on how many can be added.
Introduction to your data exports module
Your Data Exports module can be found in the main left-hand navigation on your site: Reporting > Data Exports.
On this page you’ll find a list of the exports currently set up on your site.
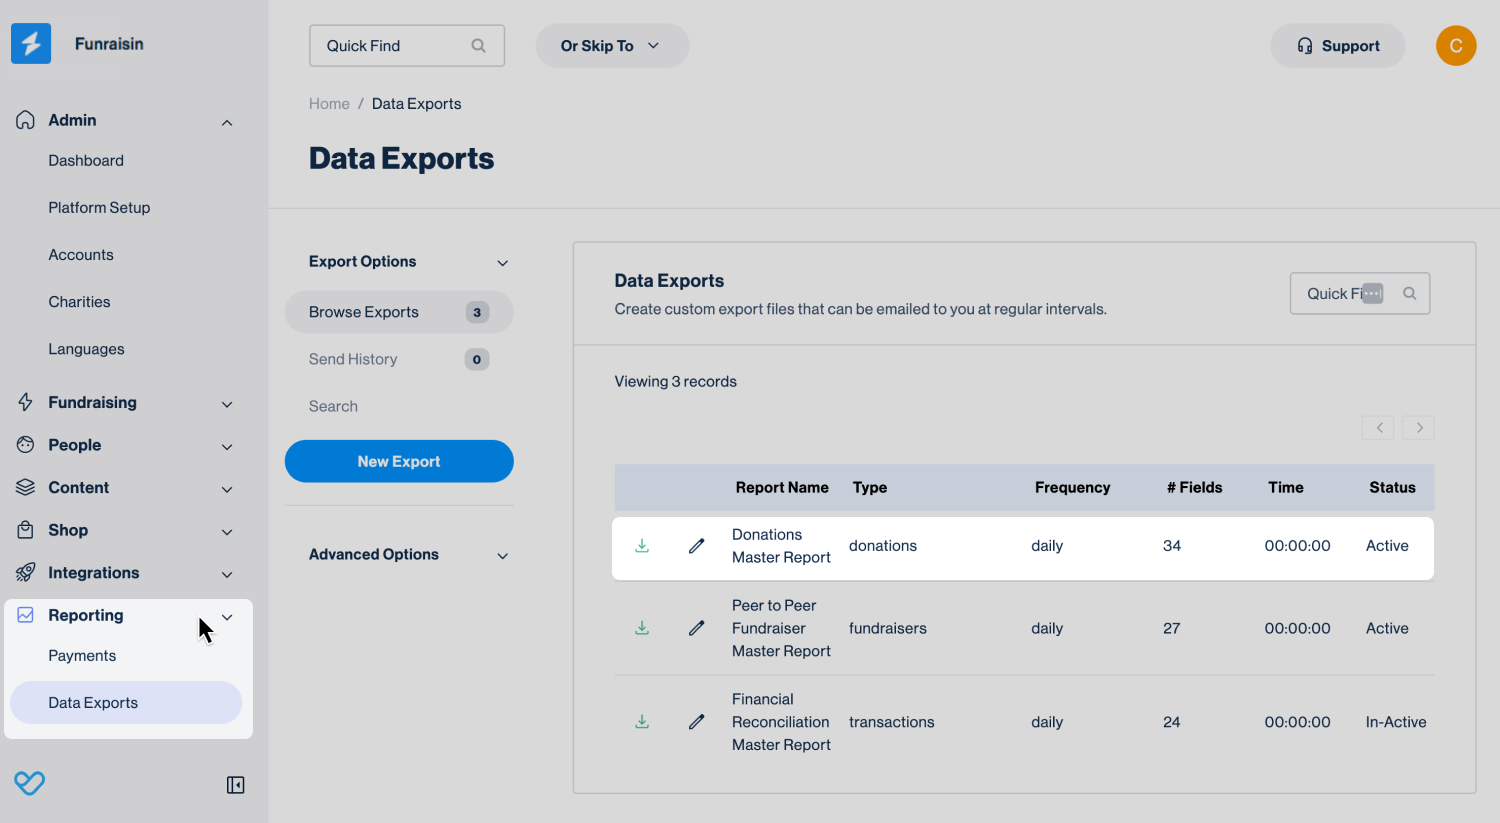
Let’s run through the details in your exports list.
- Filter: Filter the reports list by type, frequency, or status to quickly find reports.
- Sort: Sort the reports list by name, number of fields, creation date, or last run date.
- Green download icon: Clicking this will download your export to your device as a CSV file.
- Pencil: Clicking this will open the export for editing.
- Report name: The name given to the export when created.
- Type: Where the export information is being pulled from in the database.
- Frequency: If being sent to your inbox, this is the frequency. By default, all exports will say ‘Daily’.
- #Fields: The number of fields currently in the export. An export must have a minimum of one field in order to download.
- Time: If being sent to your inbox, this is the scheduled time.
- Status: An export must be set to ‘Active’ in order to send to your inbox.
- Last ran: If being sent to your inbox, this is the last time it was sent.
Setting up a new export
To create a new export, within Data Exports, click on the New Export button.
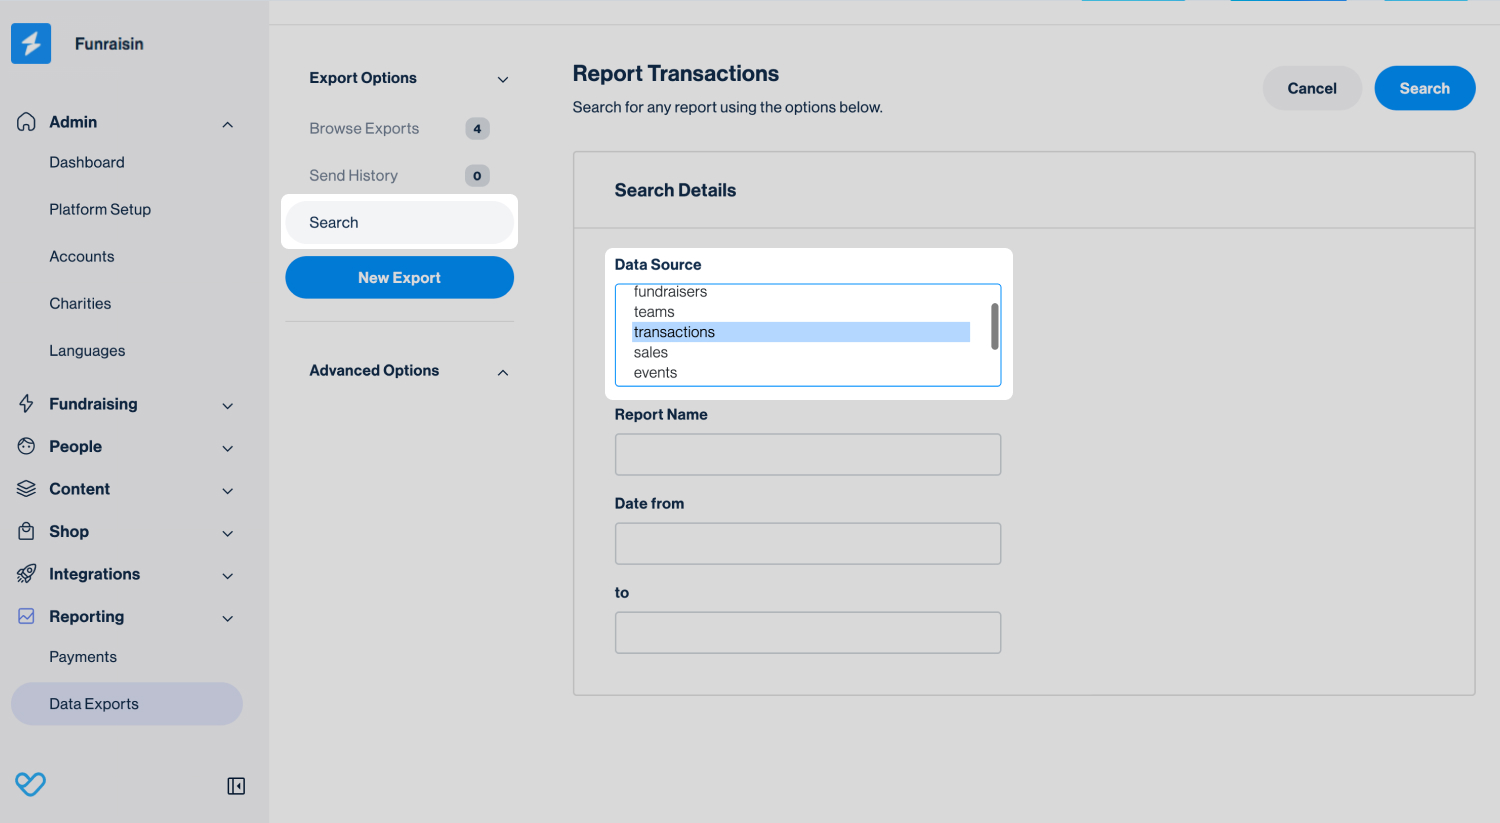
Give your export a name, and choose a data source. The data source is where the information is pulling from such as, Donations, Transactions, Fundraisers and Teams. The data source you choose will dictate the available information you can export on. Once named and the source chosen, hit Save.
We have a more in-depth article on Data Sources.
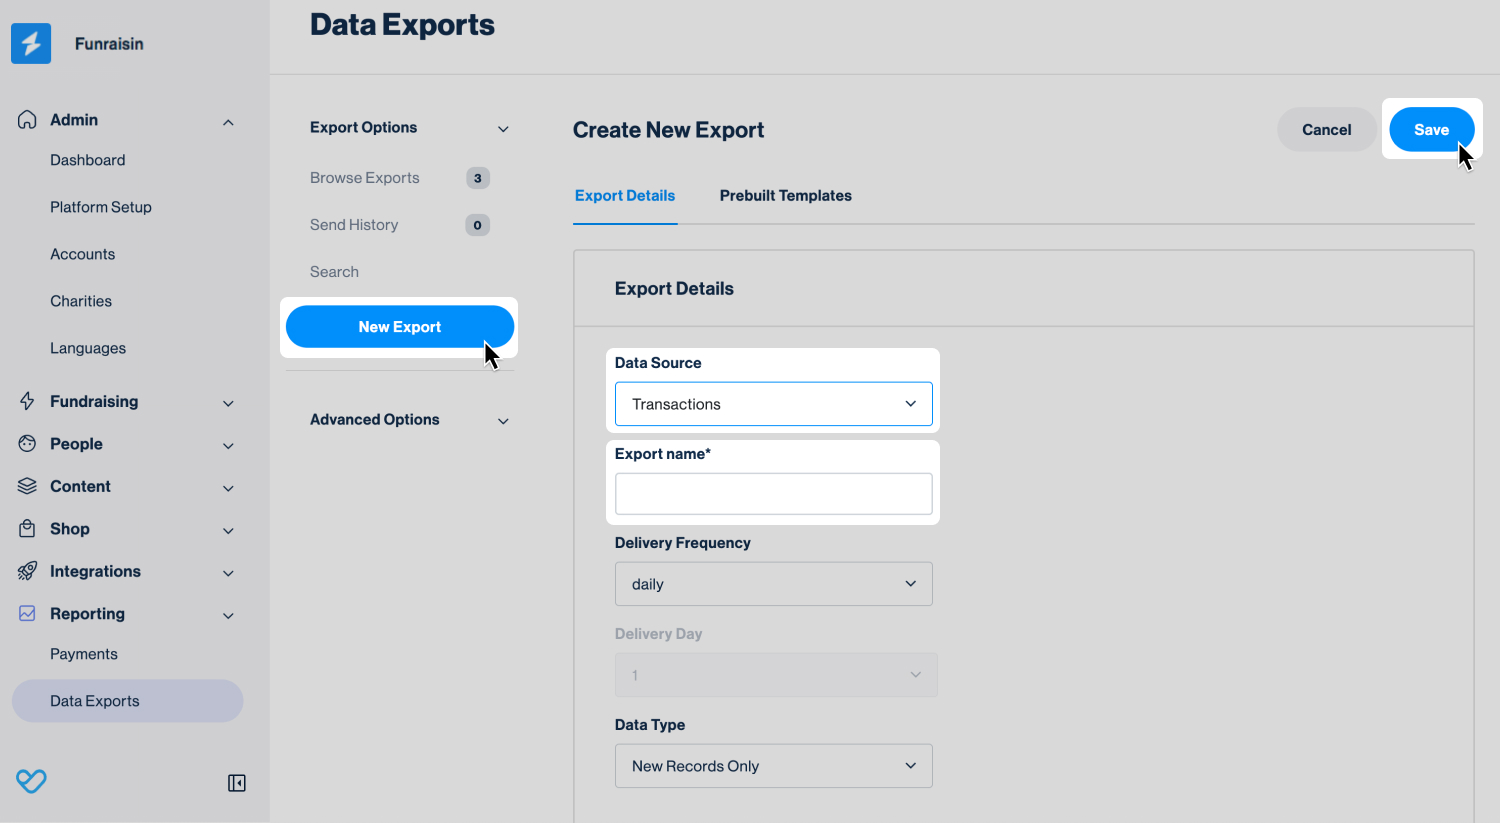
Once saved, you’ll land on your Export Details tab which will allow you to edit the name of your export, and also some other options. The additional options, such as Active/In-Active, Delivery Frequency etc. all relate to if you want your export to send to your inbox on a regular basis. These settings can be ignored for now. We have a more in-depth article on scheduling exports to send.
Navigate back to Browse Exports in the central navigation. You’ll notice your new export is at the top of your Data Exports list, but #Fields will say 0. Therefore, we need to add fields to the export in order for data to download.
Tip! We also have pre-built templates you can use! When creating a new export, give your export a name, then move over to the Prebuilt Templates tab. Choose a template then Save.
When you view your Export Fields you’ll see your export already pre-populated with suggested fields that you can keep or edit.
Adding and editing export fields
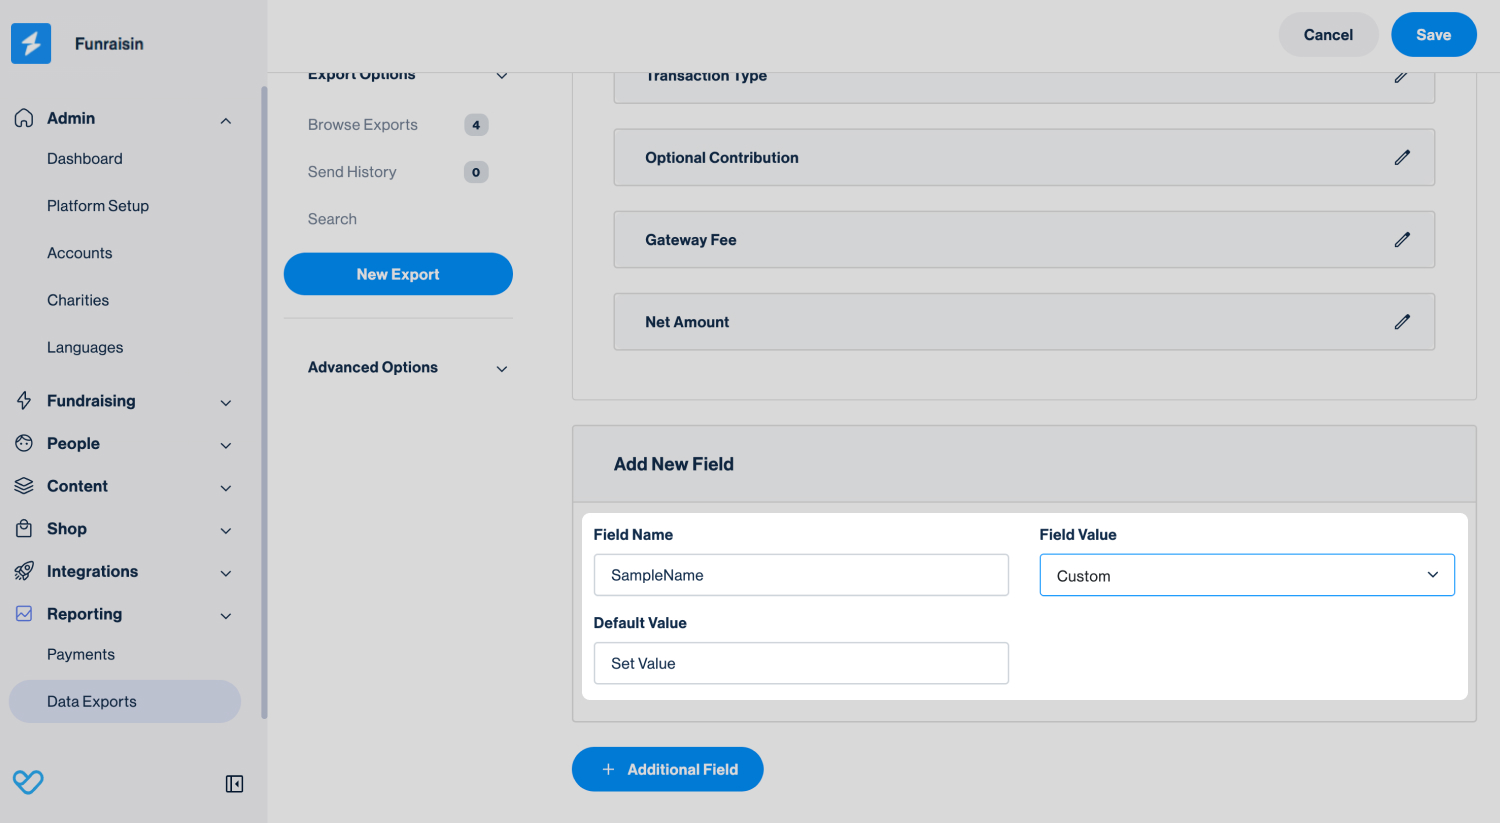
Click on the pencil icon next to your export name, and then Export Fields tab along the top. Here you can select the fields you'd like to pull in, name them, and order them.
Select +Additional Field to add as many fields to your export as you wish. Specify the Field Name, then select the data this should correspond to from the Field Value drop-down. Many charities name their fields to match their CRM to assist with importing, such as fname for First Name.
We have a more in-depth article on Data Exports fields glossary which lists out all the available fields.


Tip! When naming your fields, it's important to ensure they are unique. You cannot have two fields with the same name. However, you can have two fields pulling the same data.
Tip! Please note there are some data sources with multiple field values with similar names, make sure you are selecting the right field value for what you require by selecting the field value under the appropriate heading.
For example, in a donations export, there is First Name under Donor Info, this will collect the first name of the donor. Under Member Info there is also First Name but this will collect the name of the person the donation is sponsoring.
If you’d like an export field to pull a set value, then you can set the Field Value to ‘Custom’ which is the first option in the dropdown. Then, in Default value, add in the value you want to populate that field.
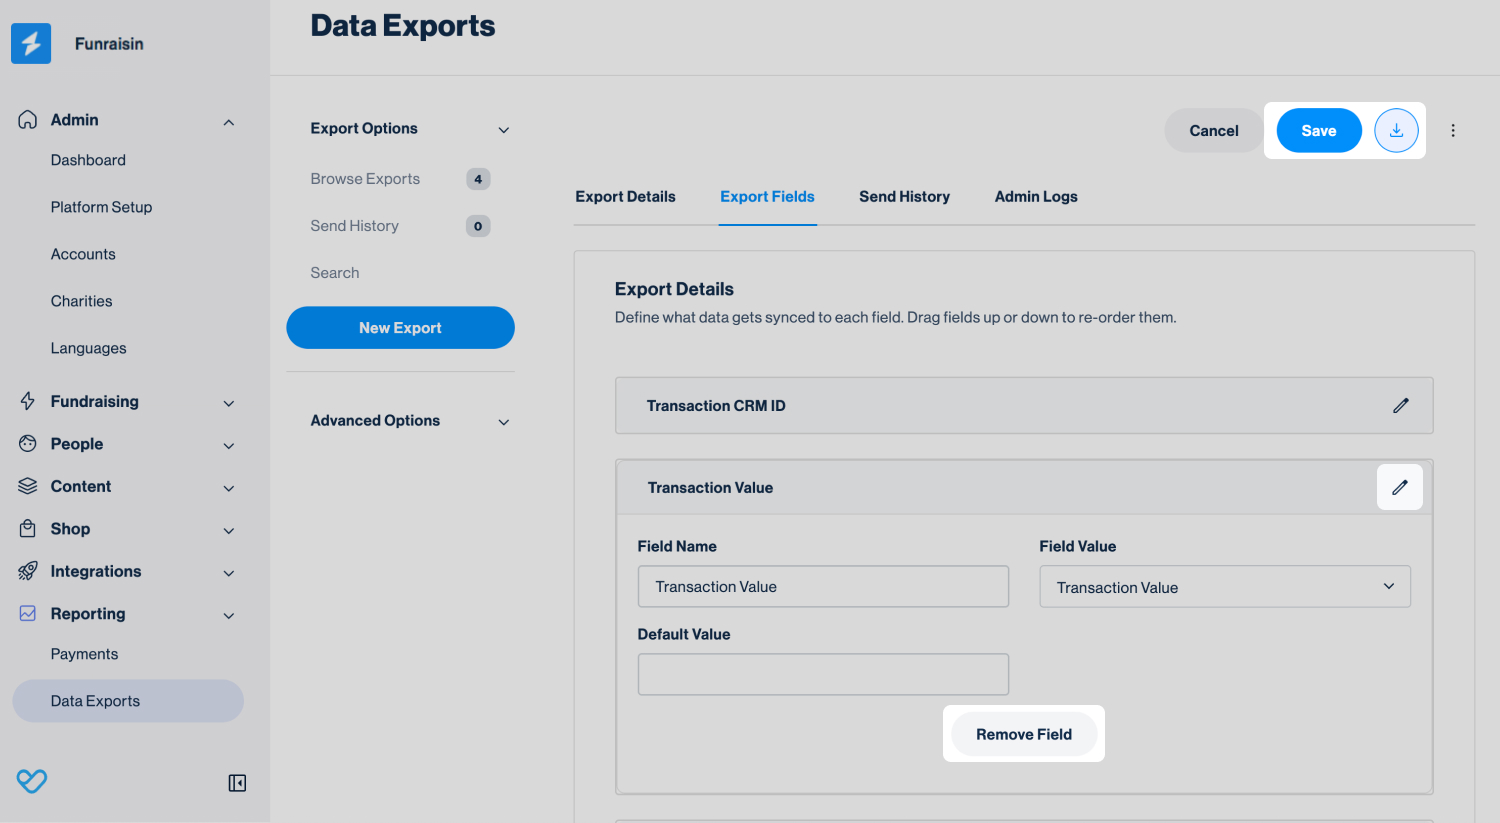
Once you’ve added fields, hit Save. You can edit your fields at any time by clicking the pencil icon to edit the field name, field value or even delete. To re-order, simply drag and drop the fields. Once amended, ensure you hit save.
To download your export when viewing or editing it, simply click on the blue arrow in the top right corner next to the Save button.
Filtering your export
When an export is created, there will be no filters applied. If there are no filters then it will look for data from across your whole platform, e.g. all donations, or all fundraisers. However, you’ll likely want to add some filters to refine the data that pulls into your export.
Depending on your data source, your exports can be filtered by:
- Smart list
- Date range
- Event name
- Event type
- Page name
- DIY theme
- Charity (if multi charity module is being used)
To add a filter, edit your export, navigate to the Export Details tab and scroll down to the Filters section.
You may want to view donations made between two specific dates. Simply add these dates to the date range, save, and then download. You can further filter by selecting one or more events, saving and downloading to only get donations made between two dates and associated with certain events.
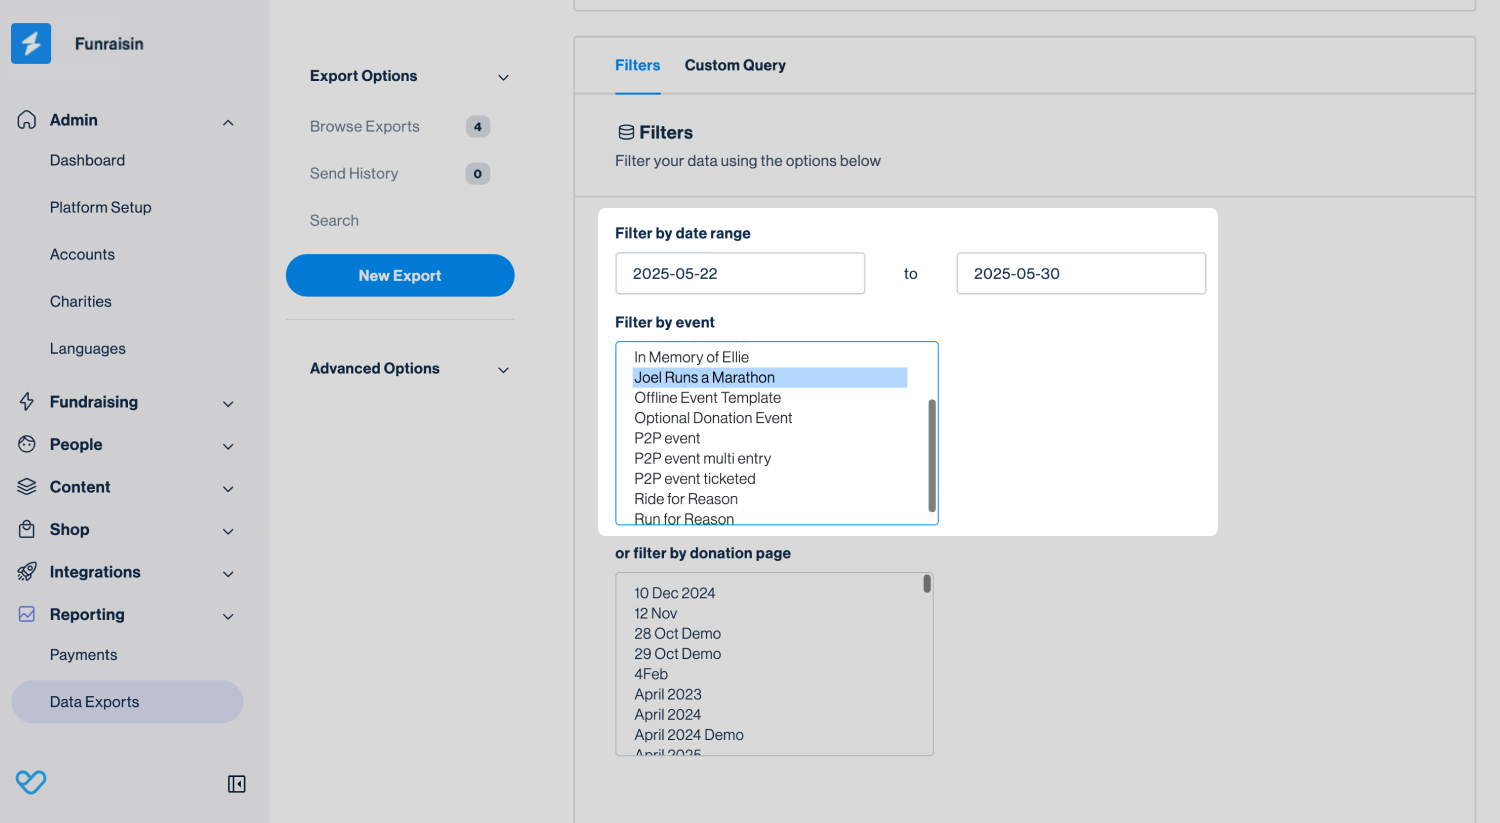
Tip! When adding filters, some of the options are not possible to select together. For example, within a fundraisers export you can filter by event (select one or more events), or event type (online, offline, DIY), or DIY theme (select one or more theme). The word ‘or’ is crucial here. You cannot select an event, and an event type.
Some export types will have the option to choose a Smart List to filter your export. If selected, this will override all other filters selected. Smart lists can filter by a really specific criteria, e.g. Personal donations over $10 on event X.
We have a more in-depth article on setting up smart lists.
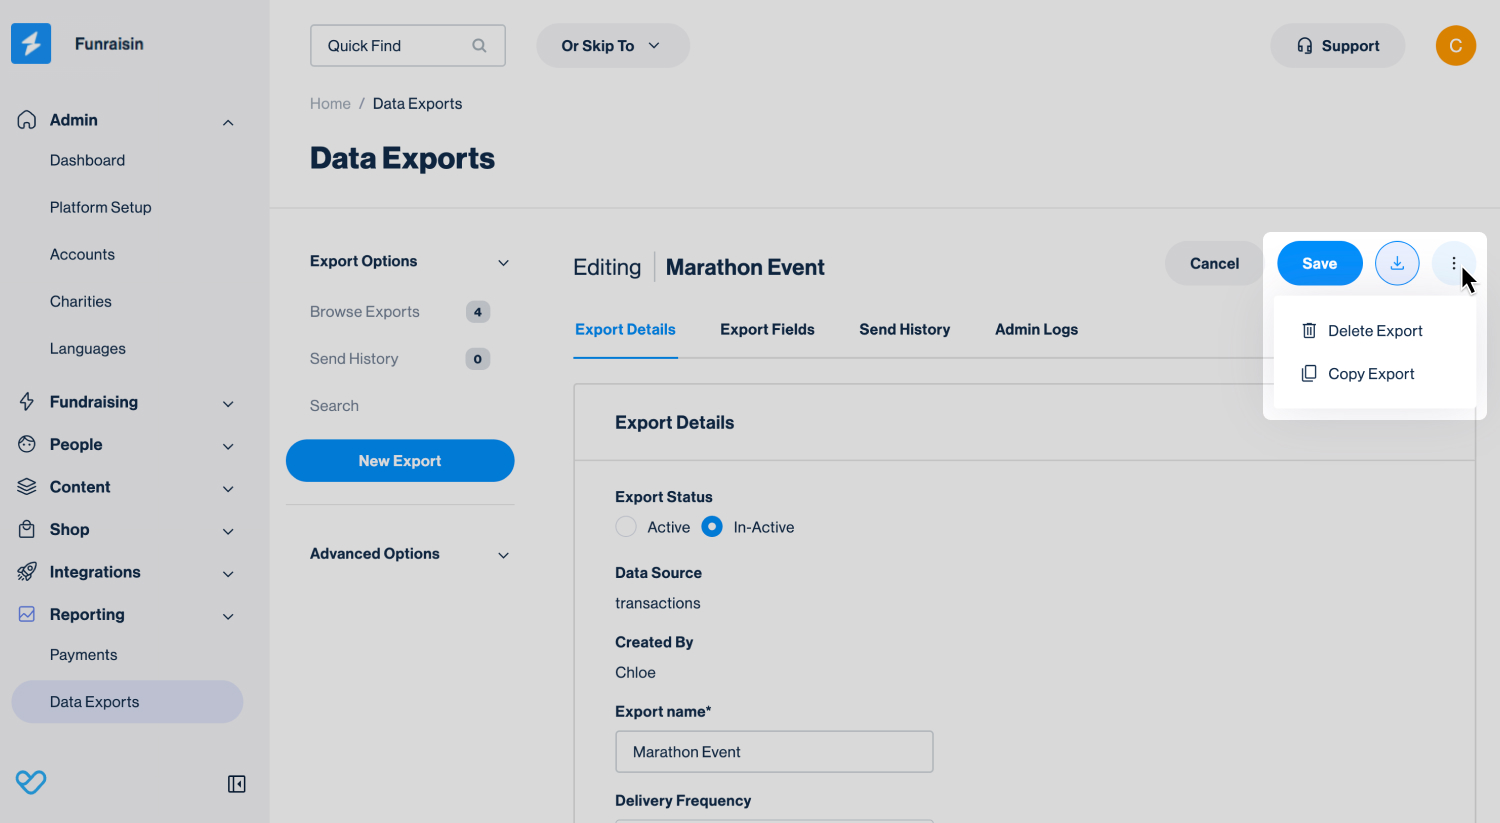
Amend or clone existing exports
To amend an existing export, simply navigate to Browse Exports, scroll to your export from the lists and click the pencil icon to make edits. If you have lots of exports on your platform, there is a search option in the central navigation. You can search by export name or the export type.
To clone an existing export, edit the export and click on the three dots in the top right hand corner. This will give you two options - Delete or Copy. After clicking copy, a confirmation lightbox will appear. Click Yes, and you’ll be directed back to your list of exports. A new one will appear with the same name as the export that was copied, but with (copy) in the name. This will have the same fields and filters applied already, so you can easily go in and edit this export to customise further.
Still need help? Check out other reporting and data export articles or reach out to the Funraisin Support team by logging a ticket through the Support Module in your platform.
Last updated: 20 Jul 2026
