

Donation handles
Change dollar handle amounts for personal and sponsored donations to match the goal of your campaign.
Dollar handles are preset, suggested donation amounts that can be selected by entrants or donors when making a donation.
They give users a set of easily accessible options to choose from when donating that are relevant to your goals and service values.
Dollar Handle Types
Dollar handles can be changed for all donation types (sponsored donations, personal donations, in memory, one-off, and regular giving).
Sponsored and Personal Donations
Sponsored Donations are the dollar handles that appear on a fundraisers/team page. Personal donations are the dollar handles that appear within the registration flow for the entrant to donate to themselves.
To edit your platform default Sponsored Donations and Personal Donations, head to:
Platform Setup > Donation Defaults
Your view will default to Sponsored Donations and here‘s where you build up your dollar handles specific to a sponsored donation.
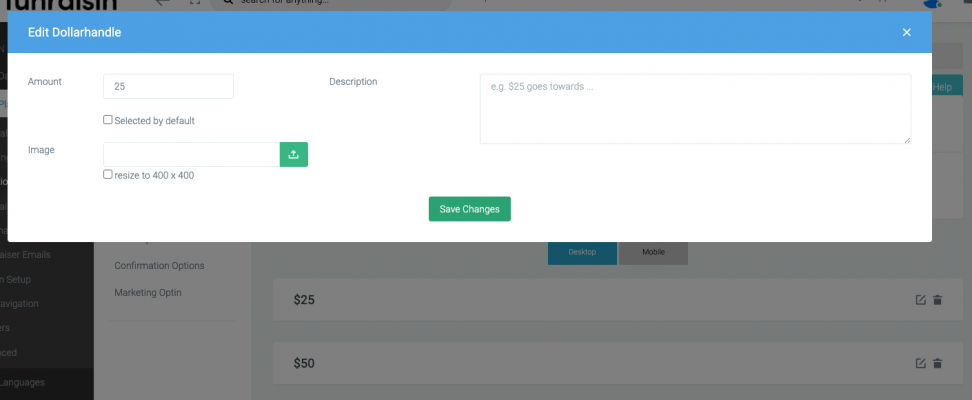
Click the edit icon on the right of each dollar handle to change the amount, image, and description/impact text. If uploading images to be used for each dollar handle, they should be a consistent size, JPG format, and square.
Once saved, you can drag and drop your list of dollar handles to order as you wish.
You also have the option to change the suggested amounts to be different on desktop vs mobile.
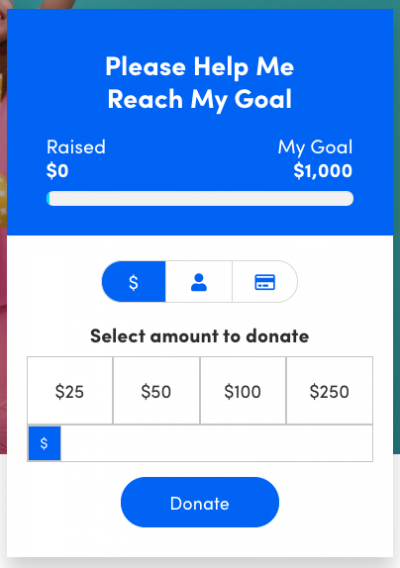
Below is an example of how the Sponsored donation dollar handles look on a fundraising page.
Event-specific dollar handles
If you would like to adjust the donation defaults for an event you can do this by navigating to:
Edit your event > Donation Defaults (white middle nav) > Tick to enable custom dollar handles
Once enabled, you can set up dollar handles that will be specific to that event.

One-off, in memory and regular giving
One-off, in memory, and regular giving donations are handled in your Pages module. You can create as many donation pages as you need for your seasonal appeals, always-on donation pages, and more.
Head to pages, add a New Page and then select the Donation Template. Continue on as you normally would with setting up your page with all the elements and styling you'd like (the header image, SEO metadata, the content itself which can appear above the donation form, etc). This support article provides a step-by-step guide to setting up a donation page.
Within Classic Builder, you’ll now see the Donation Settings option in your middle navigation. Click this and you’ll see all the options within a donation page. You can turn on One-Off, Recurring Donations, and Paypal by going into the payment settings tab (if you’ve connected up to your Paypal account), or any combination of these.
Within your Donation Settings section you can customise the dollar handles, form options, confirmation page, thank you email, and choose your preferred layout option.
If using Visual Builder, edit the donation section to display your donation-specific settings.

Dollar Handles
Editing your dollar handles is done the same as through your platform level Sponsored and Personal Donations. Add the amount, description (optional) and image (optional).
Form Options
Here’s where you can turn on and off data capture fields for each donation page you create, turn on the default In Memory fields, or even add new fields by inserting a web form you’ve created. If inserting a web form, the fields in your web form will appear as the last fields on the donation form above the submit button. Please note, web forms are not supported on all donation layouts.
The below images are an example of where to edit within Classic Builder and Visual Builder.


Confirmation Page
Your Confirmation Page allows you to either redirect a donor to a specific page after they make their donation or you can choose to simply display a specific confirmation page copy on the default donation confirmation page template (in this case the header image and header copy will default to the specific donation page you are using). Edit your confirmation page copy easily using the editor on this tab.


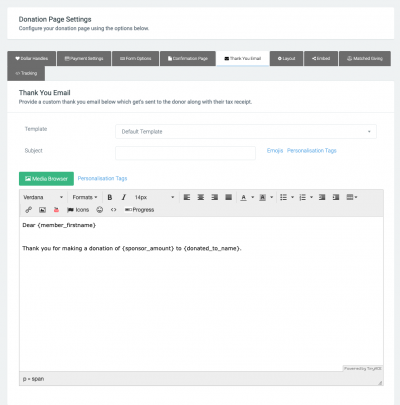
Confirmation Email
Here’s where you can customise the thank you email that donors will receive specific to the donation page they made their donation on. For example, if you’re creating an end of financial year appeal, you may wish to style the email template and/or use a specific copy relating to the end financial year appeal in the confirmation email the donor receives. Choose the template you’d like to use and then edit the copy through the editor – remembering to use the personalisation tags as needed such as sponsor name and sponsor amount to personalise the email.

If you're running multiple events on your platform with different target audiences, then it's a great idea to ensure your dollar handles are unique to that event. We also suggest adding in images and descriptors so you can explain to your supporters what their money will go towards.
E.g $25 will provide an animal in the shelter with a new home support kit.
If you’d like further help, please pop in a support ticket from your admin, and our team will assist you.
