

Platform Setup: Charities (Multi-charity)
As organizations grow, fundraising activity often extends across multiple teams, regions, or affiliated entities. While each group may have its own operational requirements, supporters still expect a consistent and connected experience when engaging with your organization.
Our Charities module helps organizations manage multiple charity entities within a single Funraisin platform. Each charity can maintain its own payment processing, reporting, tax receipt details, and administration settings while continuing to operate within a shared fundraising environment.
This article explains how Multi-charity works, how to configure additional charity entities, and how to assign charities across fundraising activities and admin users.
What is the Charities module?
The Charities module (also known as multi-charity) enables a single Funraisin platform to support multiple charity entities, each with its own settings.
Each charity can have its own contact details, logo, tax receipt details, payment gateway, tracking codes, and CRM setup. This helps each entity manage its own fundraising activity, reporting, compliance requirements, and supporter communications while still operating within one shared platform.
Multi-charity is commonly used for:
- State or regional teams
- Affiliate or federated organizations
- Separate legal entities within one organization
Admin users can also be assigned to a specific charity. This limits their access to that charity’s activities and data, helping teams manage permissions and governance across a shared platform.
Tip! The Charities module is available as part of any Funraisin platform but may need to be enabled before it appears in the admin. If Charities does not appear under Admin, submit a support ticket from the platform and the Funraisin Support team can enable it.
Default charity settings
Each Funraisin platform has a main charity configuration in Platform Setup. This is the default charity used across the platform and includes details such as the payment gateway, tax receipt, and other core settings.
This primary charity does not need to be recreated in the Charities module. The Charities module is used to add and manage additional charity entities.
Unless a different charity is assigned to an event, form, page, or other fundraising activity, the platform-level charity settings will be used by default.
Setting up an additional charity
Use the Charities module to create additional charity entities and configure their settings before assigning them to fundraising activities across the platform.
To add an additional charity:
- 1
- Navigate to Admin > Charities.
- 2
- Click New Charity.
- 3
- Add the relevant information across the available tabs:
- Charity Details: Add the core charity information, including status, contact details, Gift Aid settings, and marketing opt-in copy.
- Tax Receipts: Configure the receipt details used for fundraising activity assigned to this charity, or choose to use the platform-level settings.
- Regions: Store region information against the charity for administrative reference.
- States: Associate states with the charity for DIY fundraising assignment when a charity has not already been assigned.
- 4
- Click Save.
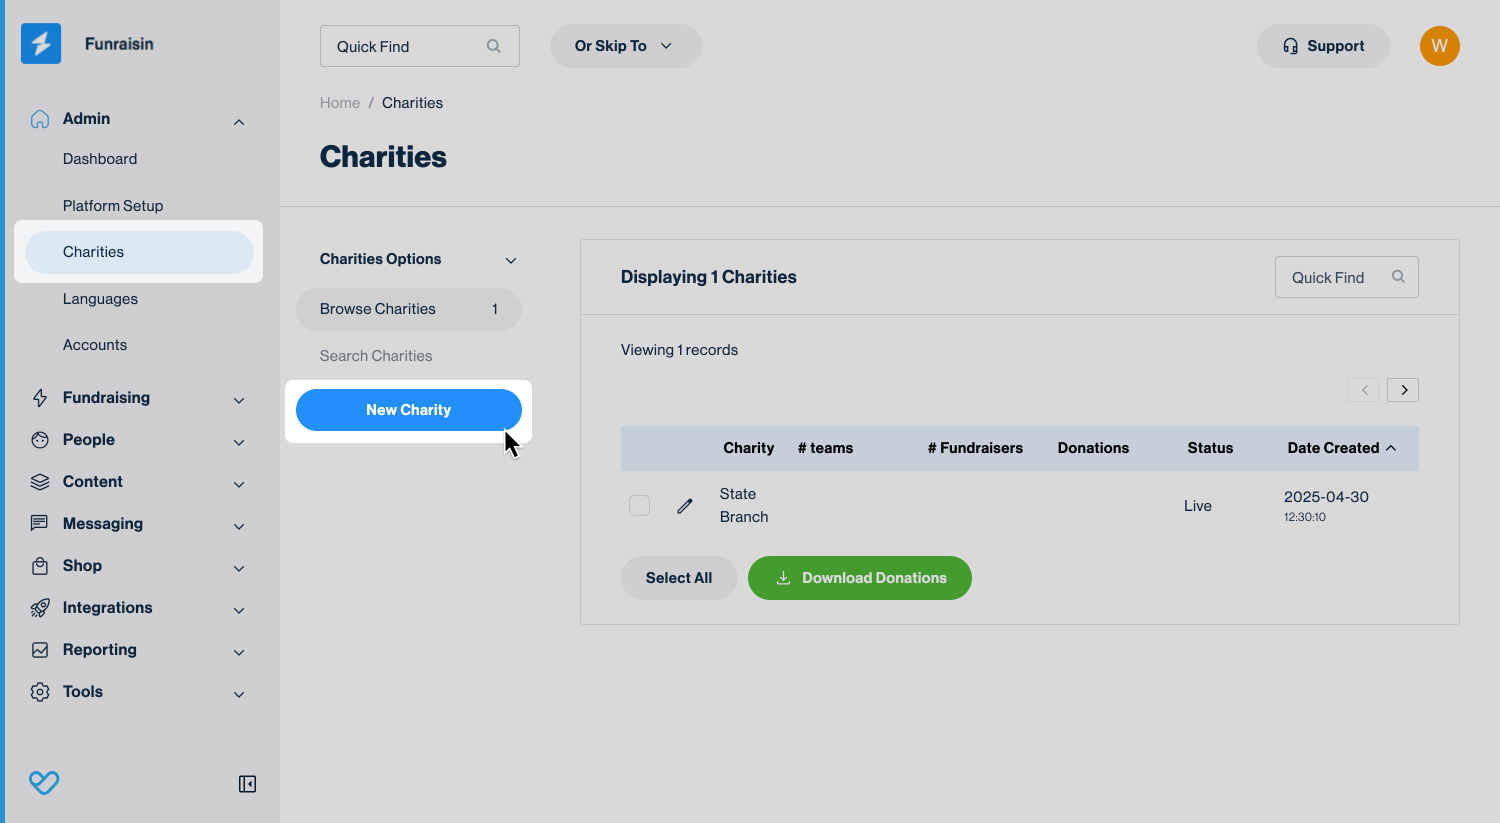
The sections below explain the available fields and settings in each tab.
Charity Details
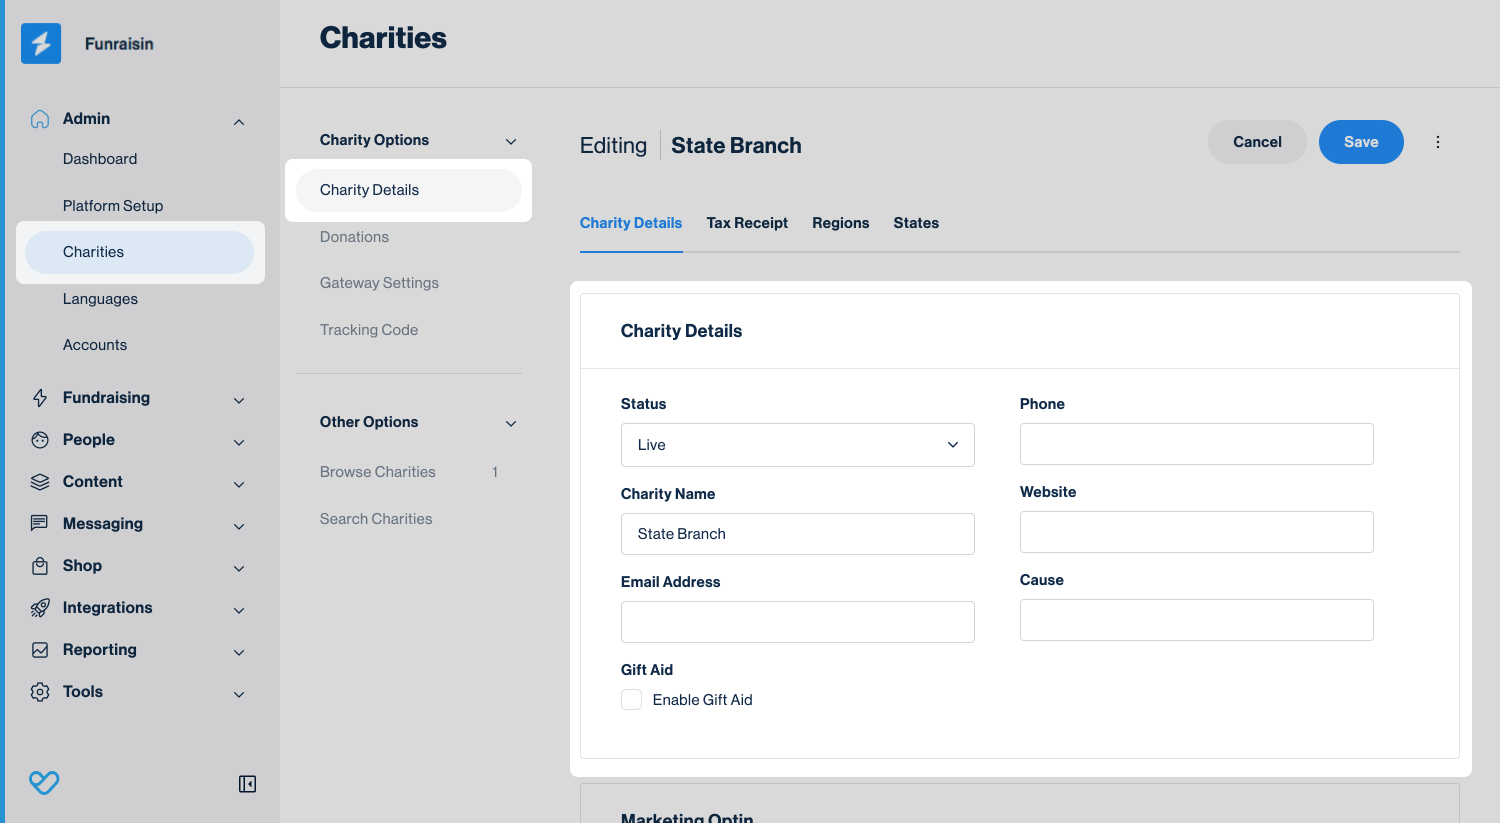
Use the Charity Details tab to add the core details for the charity.
- Status: Controls whether the charity is available to assign to a fundraising activity. Live charities can be selected and assigned. Setting a charity to Offline removes it from the available selection lists. This is recommended instead of deleting a charity, as it helps maintain accurate audit records.
- Charity Name: The name of the charity or subgroup. This is the name that will appear on receipts.
- Email Address: The email address shown on receipts.
- Phone: The phone number shown on receipts.
- Website: Used for admin reference only and does not appear on public-facing content.
- Cause: Used for admin reference only and does not appear on public-facing content.
- Gift Aid: Controls whether Gift Aid is enabled for this charity. Gift Aid must be configured at the platform level, and the same Gift Aid settings and message apply across all charities.
- Marketing Opt-in: Controls the marketing opt-in message on sponsored donation forms for events assigned to this charity. This overrides the platform-level copy when an event or DIY theme is assigned to the charity.
Tax Receipts
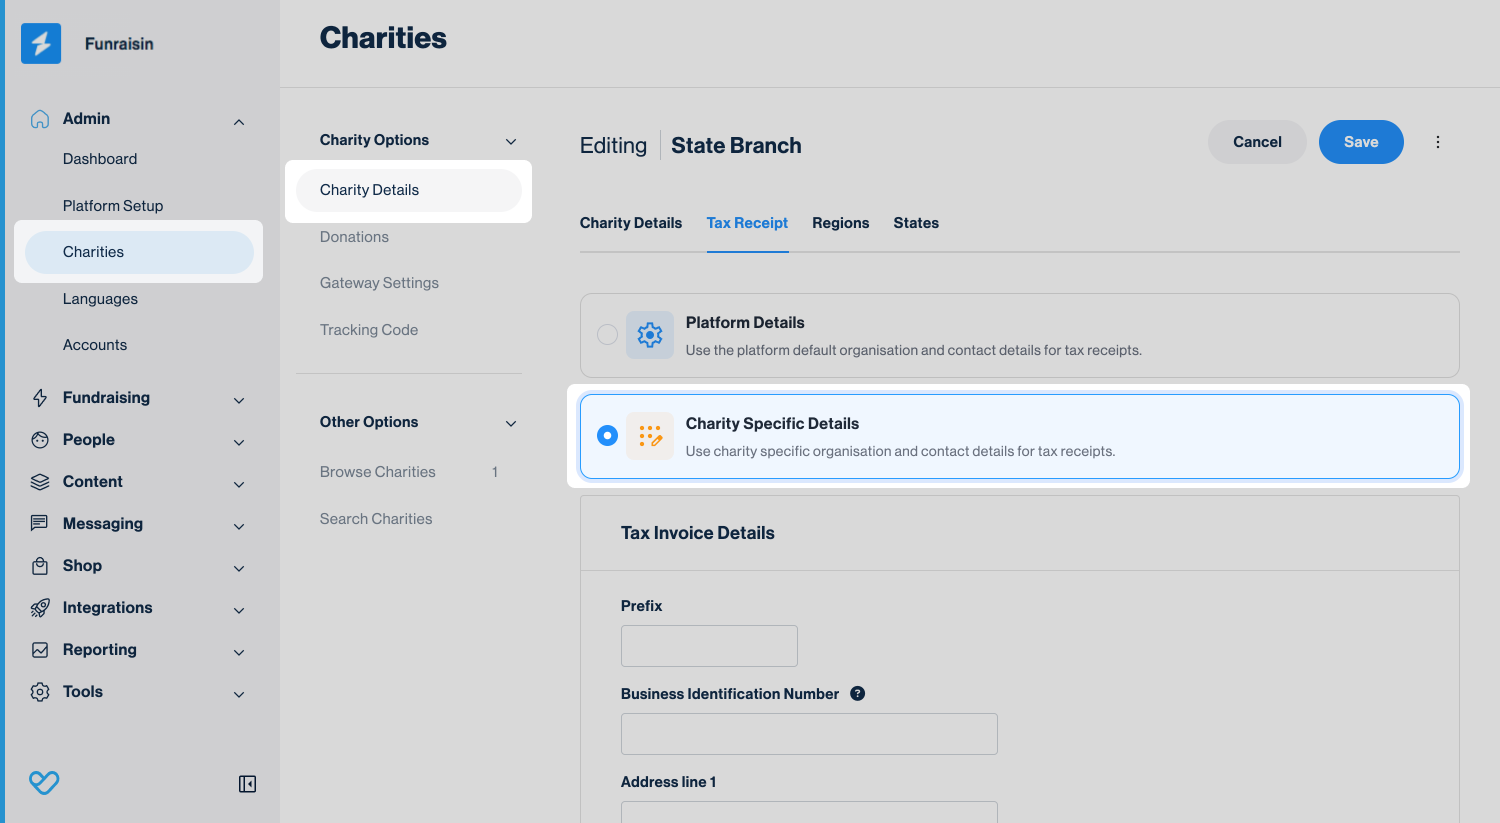
Use the Tax Receipts tab to control the tax receipt details used for fundraising activity assigned to this charity.
When configuring tax receipt details, select one of the following options:
- Platform Details: Uses the platform-level tax receipt details. If the platform-level details are updated later, those updates will also apply to this charity.
- Charity Details: Uses charity-specific tax receipt details, including organization information, receipt messaging, logo, and signature.
Using Platform Details only applies to the tax receipt settings. It does not override information added in the Charity Details tab or the charity's payment gateway settings.
When Charity Details is selected, the following fields are available:
- Prefix: Add the receipt prefix used for tax receipts issued by this charity.
- Business Identification Number: Add the company, charity, or business identification number that should appear on the tax receipt. This may include IDs such as EIN, BA, ABN, CRN, or another relevant registration number.
- Address Line 1: Add the first line of the address that should appear on the tax receipt.
- Address Line 2: Add the second line of the address that should appear on the tax receipt, if required.
- Address Line 3: Add the third line of the address that should appear on the tax receipt, if required.
- Country: Select the country that should appear on the tax receipt.
- Tax Receipt Logo: Upload the logo used on tax receipts. The logo must be a JPEG file at 72 dpi and 2000 × 2000 px.
- Tax Receipt Messages: Add custom text to the bottom of each PDF tax receipt, such as a thank-you message, compliance statement, or seasonal note. There are seven message fields, each linked to a specific transaction type. Any message added will only appear on receipts for that transaction type.
- Tax Receipt Signature: Optional. Upload a signature image to include at the bottom of receipts, such as a signature from the CEO or finance team.
Regions and States
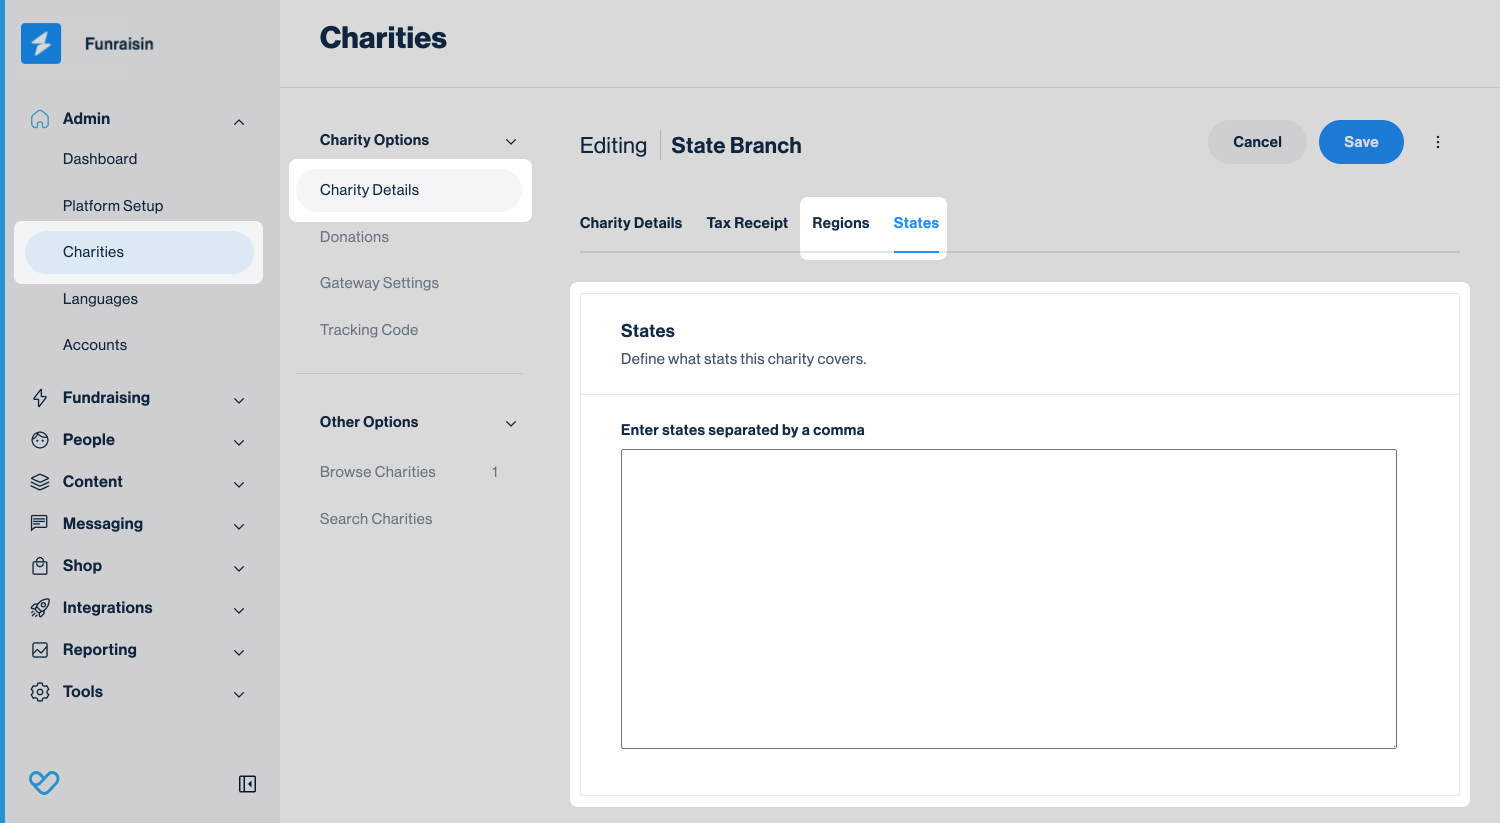
This is optional. Use the Regions and States tabs to store region and state information for the charity.
The States tab is used for DIY fundraising. If a DIY theme is not assigned to a charity and the entrant has selected a state that matches a charity, the entrant will automatically be assigned to that charity.
Region information can also be stored against a charity for administrative reference.
After a charity has been created and saved, additional settings can be configured, including payment gateway details and tracking codes.
Payment gateways
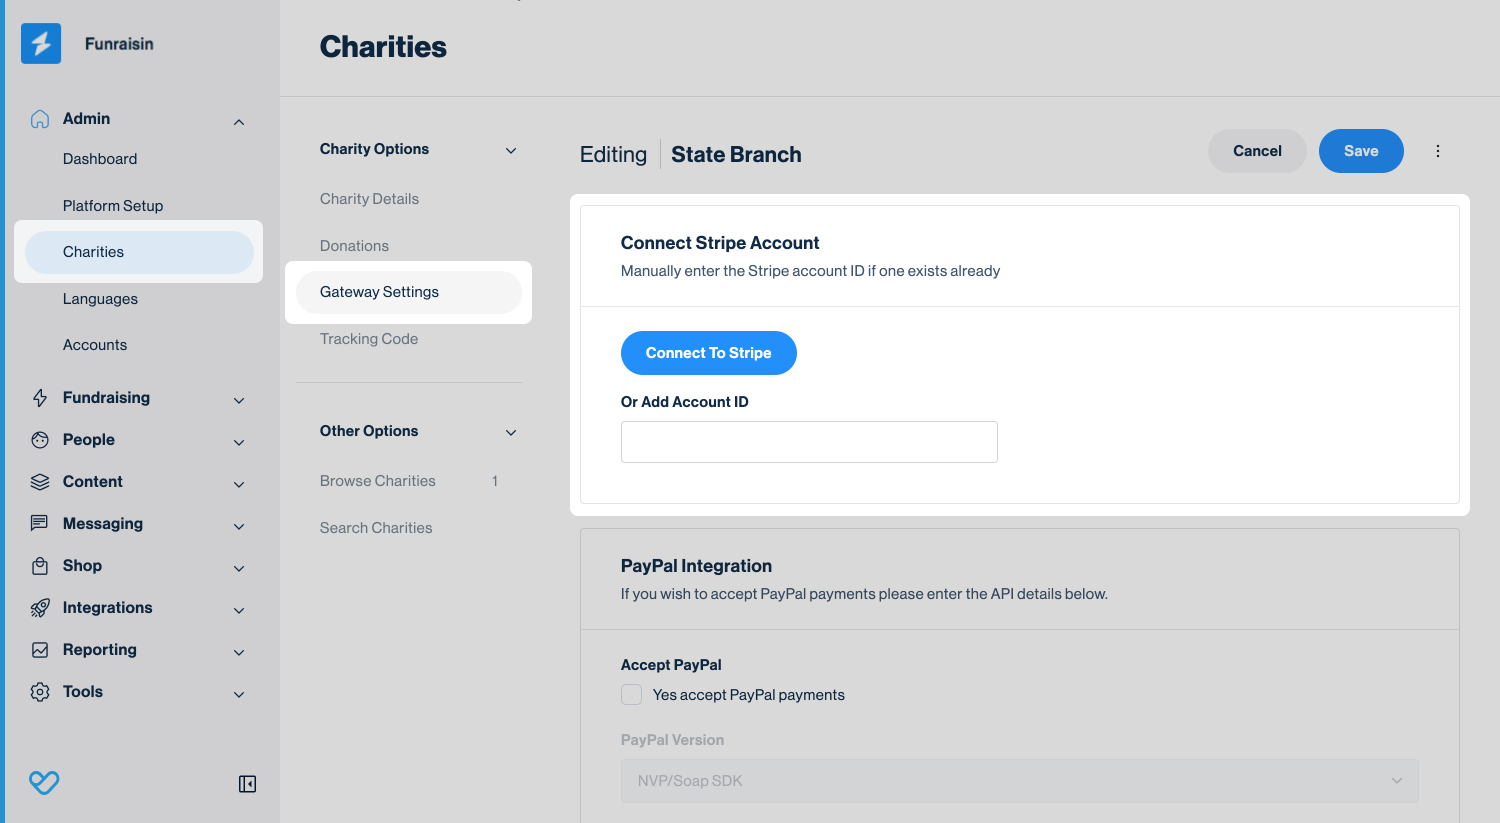
Each charity entity can connect its own Stripe account. If no charity-level Stripe account is connected, payments will be processed through the platform-level Stripe account. This only affects the payment gateway used for processing the transaction. Tax receipts will still use the receipt details for the charity assigned to the fundraising activity.
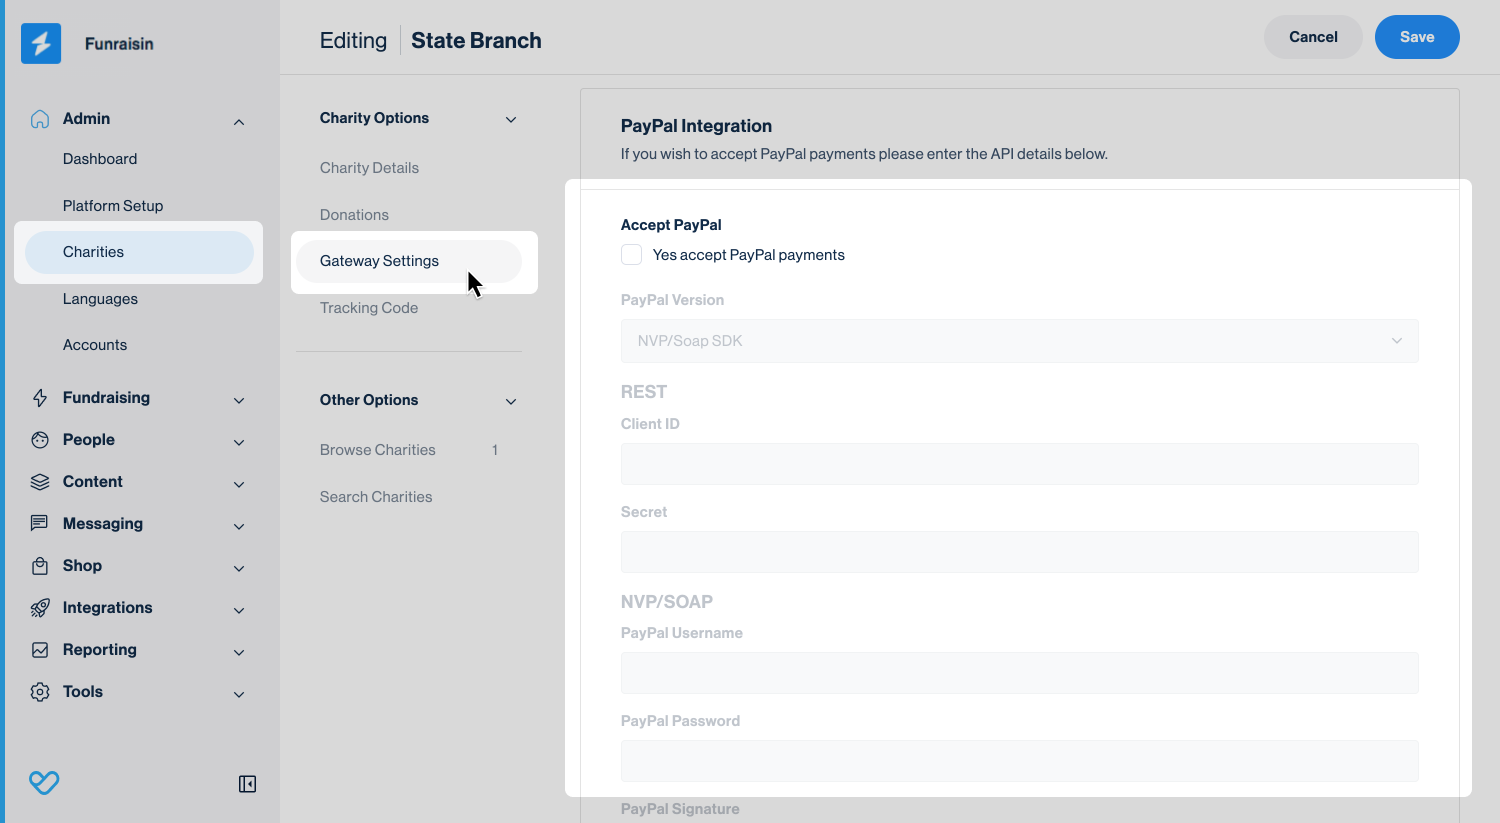
Each charity entity can also connect its own PayPal account.
Important: The same payment methods must be enabled across all charity entities. If PayPal, Apple Pay, or Google Pay is enabled for one charity, the same payment method must be enabled for every charity on the platform.
Connecting Stripe
To connect a Stripe account:
- 1
- Navigate to Admin > Charities.
- 2
- Click the edit icon beside the charity that needs to be updated.
- 3
- Under Charity Settings in the middle navigation, select Gateway Settings.
- 4
- Click Connect to Stripe and follow the prompts to connect the Stripe account.
Tip! Make sure you are logged into the correct Stripe account before clicking Connect to Stripe.
Connecting PayPal
To connect a PayPal account:
- 1
- Navigate to Admin > Charities.
- 2
- Click the edit icon beside the charity that needs to be updated.
- 3
- Under Charity Settings in the middle navigation, select Gateway Settings.
- 4
- Select Yes accept PayPal payments.
- 5
- Select REST API from the PayPal Version dropdown.
- 6
- Add the required PayPal credentials.
- 7
- Click Save.
Important: If using PayPal, all charity entities must also use the same PayPal version. This should be the REST API as PayPal is retiring its legacy NVP/SOAP API.
Tracking codes
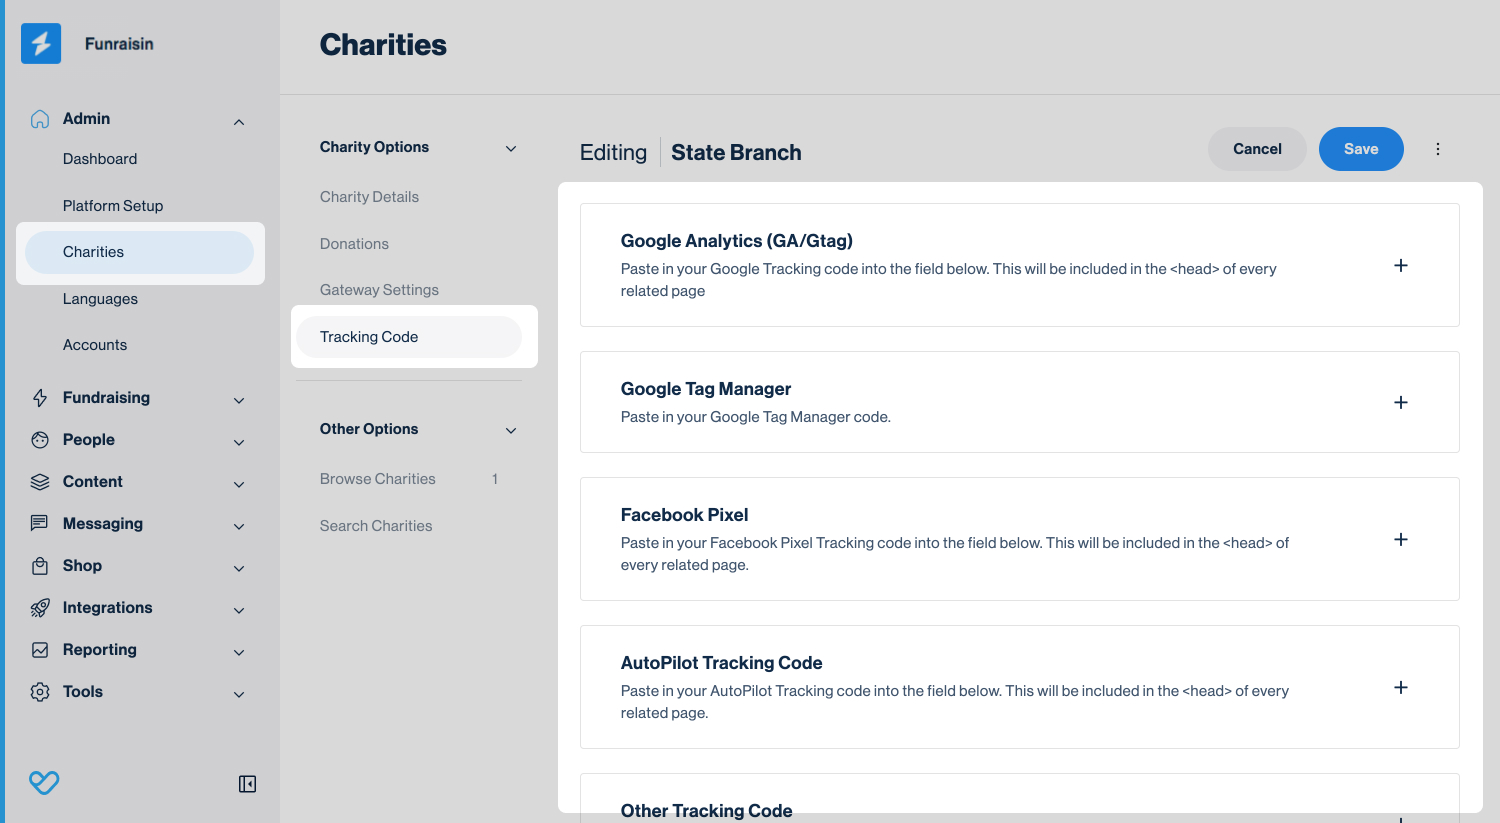
Charity-level tracking codes allow analytics and marketing activity to be tracked separately for a specific charity.
Available tracking code options include:
- Google Analytics (GA/Gtag)
- Google Tag Manager
- Facebook Pixel
- AutoPilot Tracking Code
- Other Tracking Code
To add tracking codes:
- 1
- Navigate to Admin > Charities.
- 2
- Click the edit icon beside the charity that needs to be updated.
- 3
- Under Charity Options in the middle navigation, select Tracking Code.
- 4
- Add the relevant tracking credentials.
- 5
- Click Save.
Integrations
Each charity can connect its own integrations, allowing individual charity entities to manage their own CRM and marketing platform while continuing to operate within a shared Funraisin platform.
Supported charity-level integrations include:
- Salesforce
- Ortto
- Mailchimp
- Campaign Monitor
- Kudosity (Previously Burst SMS)
When a charity-level admin user accesses an integration from within the Integrations module settings, the platform recognizes their assigned charity and allows them to configure credentials for that specific charity. This means different charity entities can connect to different supported platforms if required. For example, one charity may use Mailchimp while another uses Campaign Monitor.
While different marketing platforms can be used across charity entities, we recommend using the same platform wherever possible. This provides the most consistent experience across the platform, as some features, such as Web Forms, have limitations when different marketing platforms are used. Donation and fundraising data continue to be managed independently for each charity.
Important: Raiser's Edge does not support charity-level configuration and cannot be used as an additional charity integration.
Important: Facebook Fundraising supports a single Facebook connection per platform. It is not possible to connect separate Facebook Fundraising accounts for individual charity entities.
Tip! Because every multi-charity implementation is different, we recommend contacting the Funraisin Support team before configuring charity-level integrations. Our team will work with you to understand your fundraising structure and recommend the best integration approach for your platform. To get started, submit a support ticket from within your Funraisin platform.
Charity-level admin users and permissions
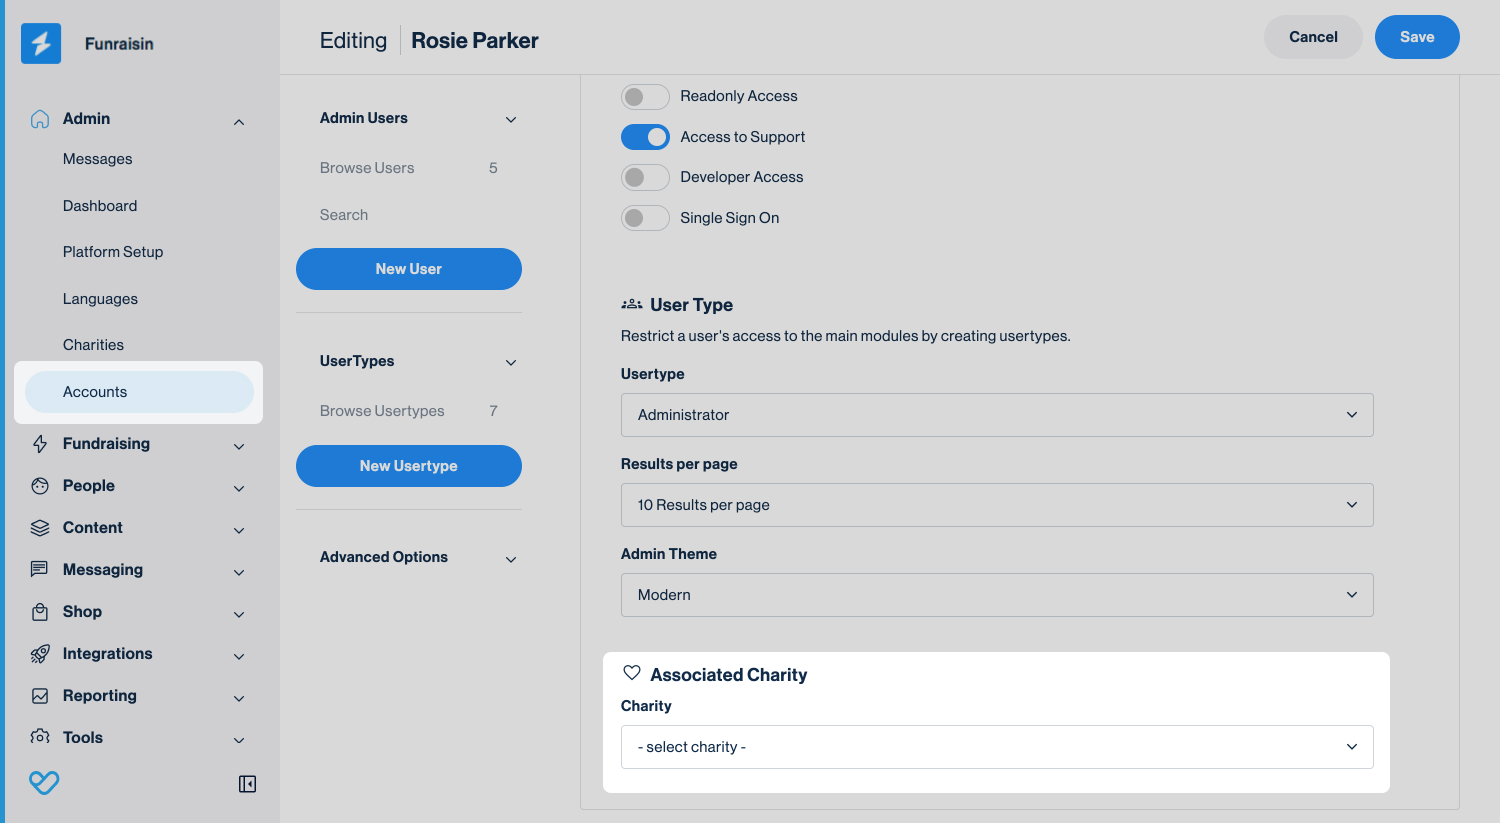
Admin users can be assigned to a specific charity to limit their access to that charity's activity and data.
When an admin user is linked to a charity, their access is restricted to the data, events, fundraisers, content, and donations associated with that charity. This helps organizations manage permissions across teams, regions, or charity entities while keeping charity-specific information separate and private.
To assign an admin user to a charity:
- 1
- Navigate to Admin > Accounts.
- 2
- Click New User to add a new admin or click the edit icon beside an existing user.
- 3
- In the Associated Charity dropdown, select the relevant charity.
- 4
- Click Save.
Important: Assigning an admin user to a charity limits what they can view and manage in the platform. Before assigning a charity, confirm the admin user only needs access to activity and data connected to that charity.
Messages Permissions
When using multi-charity, a charity-level admin user's access to Messages depends on their assigned charity, their admin permissions, and the events they have access to. Depending on these permissions, some messages may be available as preview only, while others can be created and edited.
Assigning a charity to a fundraising activity
After an additional charity has been set up, it can be assigned to events, donation forms, pages, and other fundraising activities across the relevant modules.
Assigning a charity helps ensure the correct charity-level settings are used, including payment gateway, tax receipt, tracking, and reporting settings. It also helps ensure charity-level admin users only access activity and data associated with their assigned charity.
The charity selection is available in different areas of the platform, depending on the module.
Assigning a charity to an event
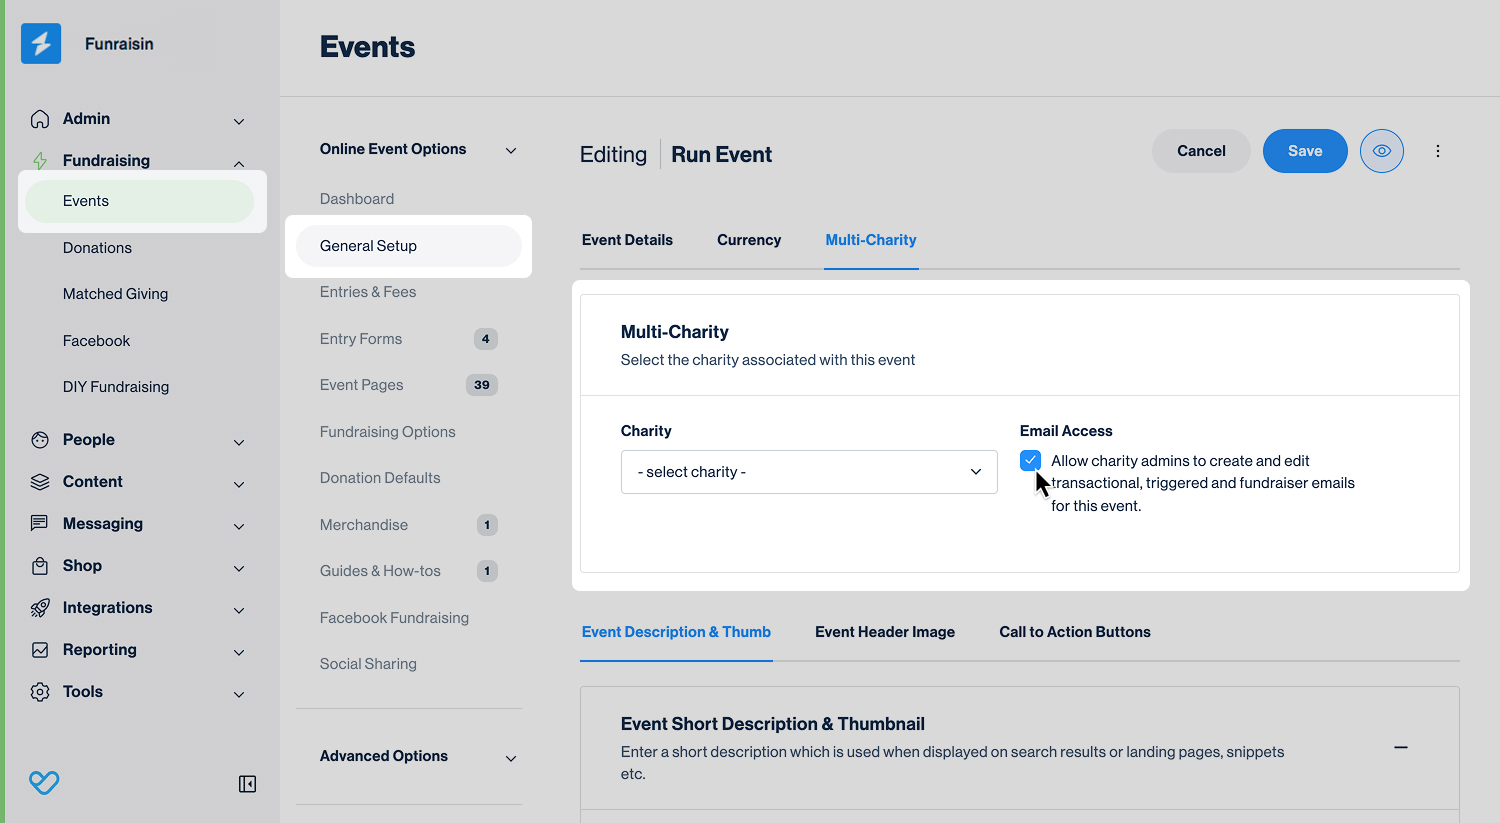
A charity can be assigned to both online and offline events from the event's Multi-Charity tab.
To assign a charity to an event:
- 1
- Navigate to Fundraising > Events, then select either View Online Events or View Offline Events.
- 2
- Click the edit icon beside the event that needs to be updated.
- 3
- Under Online Event Settings or Offline Event Settings, select General Setup.
- 4
- Click the Multi-Charity tab.
- 5
- Select the relevant charity from the dropdown.
- 6
- Click Save.
Important: To allow charity-level admin users to create and edit transactional, triggered, and fundraiser emails for this event, select the Email Access option before saving.
Assigning a charity to a DIY theme
There are two ways to assign a charity to a DIY theme:
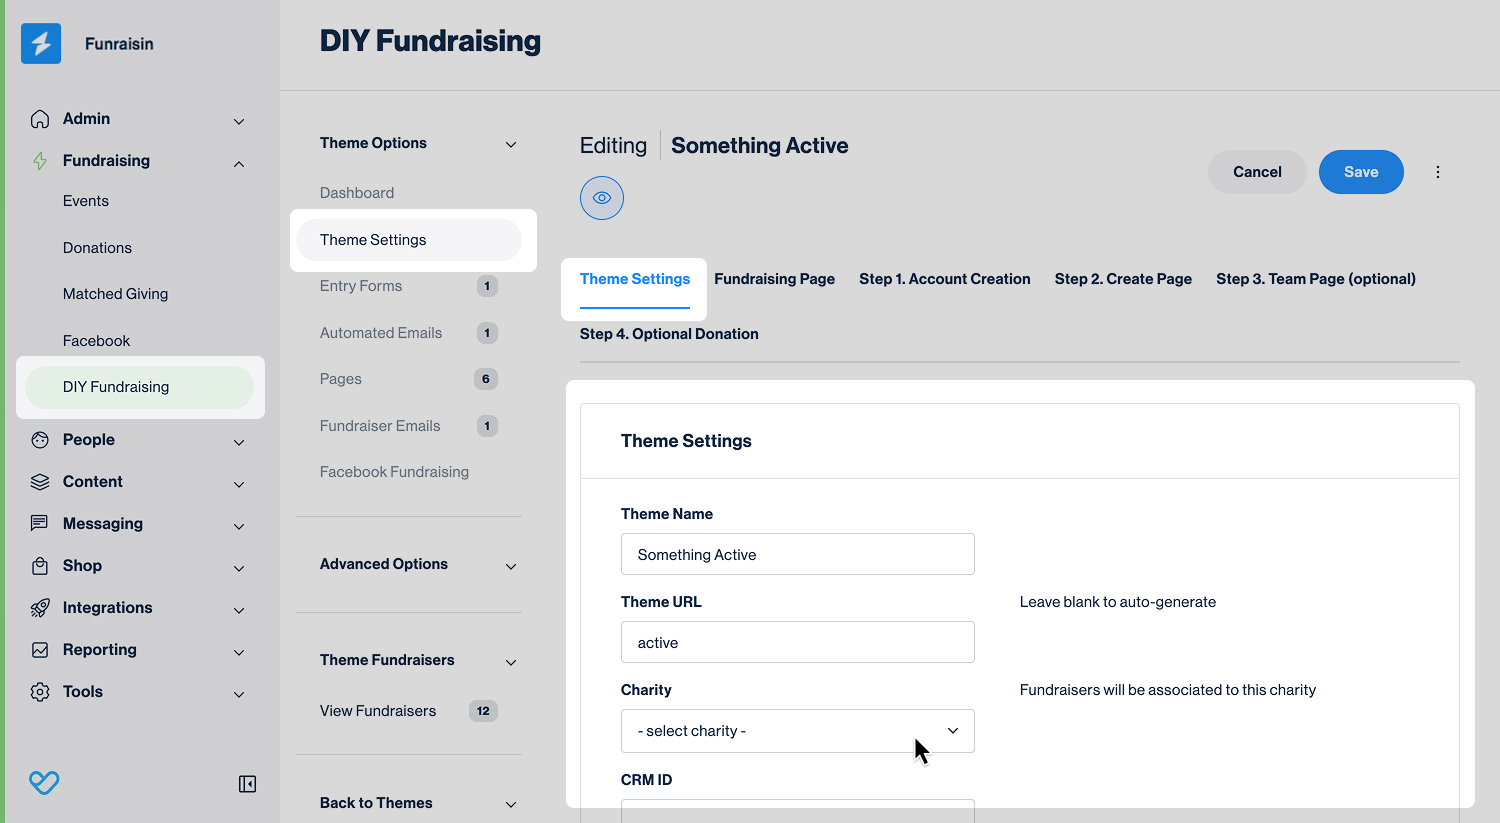
- Assign a specific charity to the DIY theme. All fundraisers created using that theme will be assigned to the selected charity.
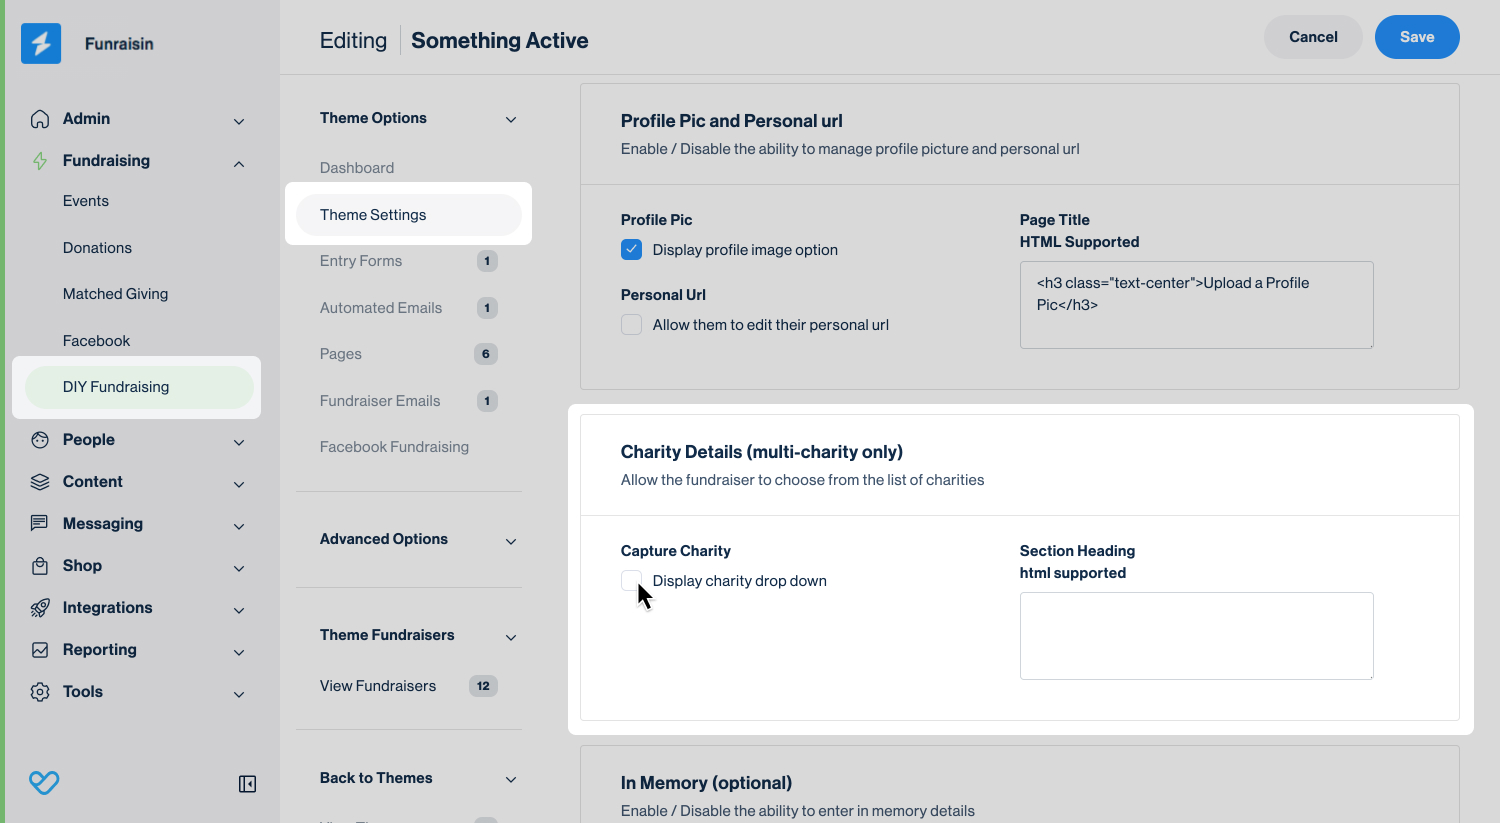
- Allow fundraisers to choose a charity during registration by enabling the charity selection dropdown on the DIY theme. This allows a single DIY theme to be used across multiple charity entities, reducing the need to create separate themes for each charity.
Assigning a specific charity to a DIY theme
To assign a specific charity to a DIY theme:
- 1
- Navigate to Fundraising > DIY Fundraising.
- 2
- Click the edit icon beside the DIY theme that needs to be updated.
- 3
- Under Theme Options, select Theme Settings.
- 4
- Go to the Theme Settings tab.
- 5
- Select the relevant charity from the dropdown.
- 6
- Click Save.
Enabling the charity selection dropdown for a DIY theme
To allow fundraisers to choose a charity when creating their fundraising page:
- 1
- Navigate to Fundraising > DIY Fundraising.
- 2
- Click the edit icon beside the DIY theme that needs to be updated.
- 3
- Under Theme Options, select Theme Settings.
- 4
- Go to the Step 2. Create a Page tab.
- 5
- In the Charity Details section, tick Capture Charity.
- 6
- Click Save.
Platform-level content pages (Page access only)
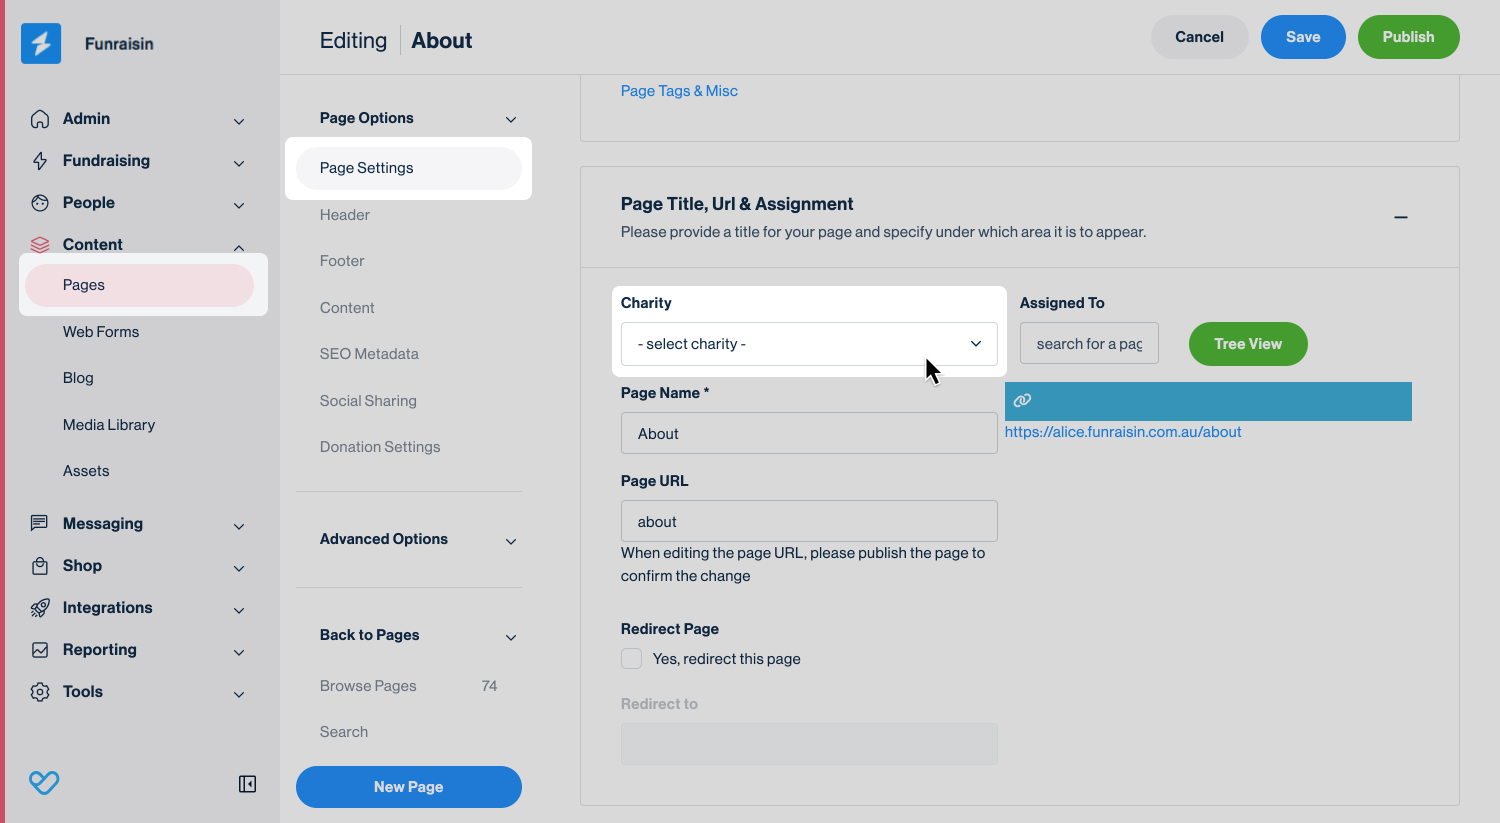
Assigning a charity to a platform-level content page allows charity-level admin users to access and edit that page.
Assigning a charity to a page only controls page access. It does not assign any donation forms on the page to that charity or apply charity-level settings to those forms.
To assign a charity to a platform-level content page:
- 1
- Navigate to Content > Pages.
- 2
- Click the edit icon beside the page that needs to be updated.
- 3
- Under Page Options, select Page Settings.
- 4
- In the Page Title, URL & Assignment section, select the relevant charity from the dropdown.
- 5
- Click Publish.
Donation forms
A charity can be assigned to a donation form either through a page’s donation settings in the admin or directly in Visual Builder.
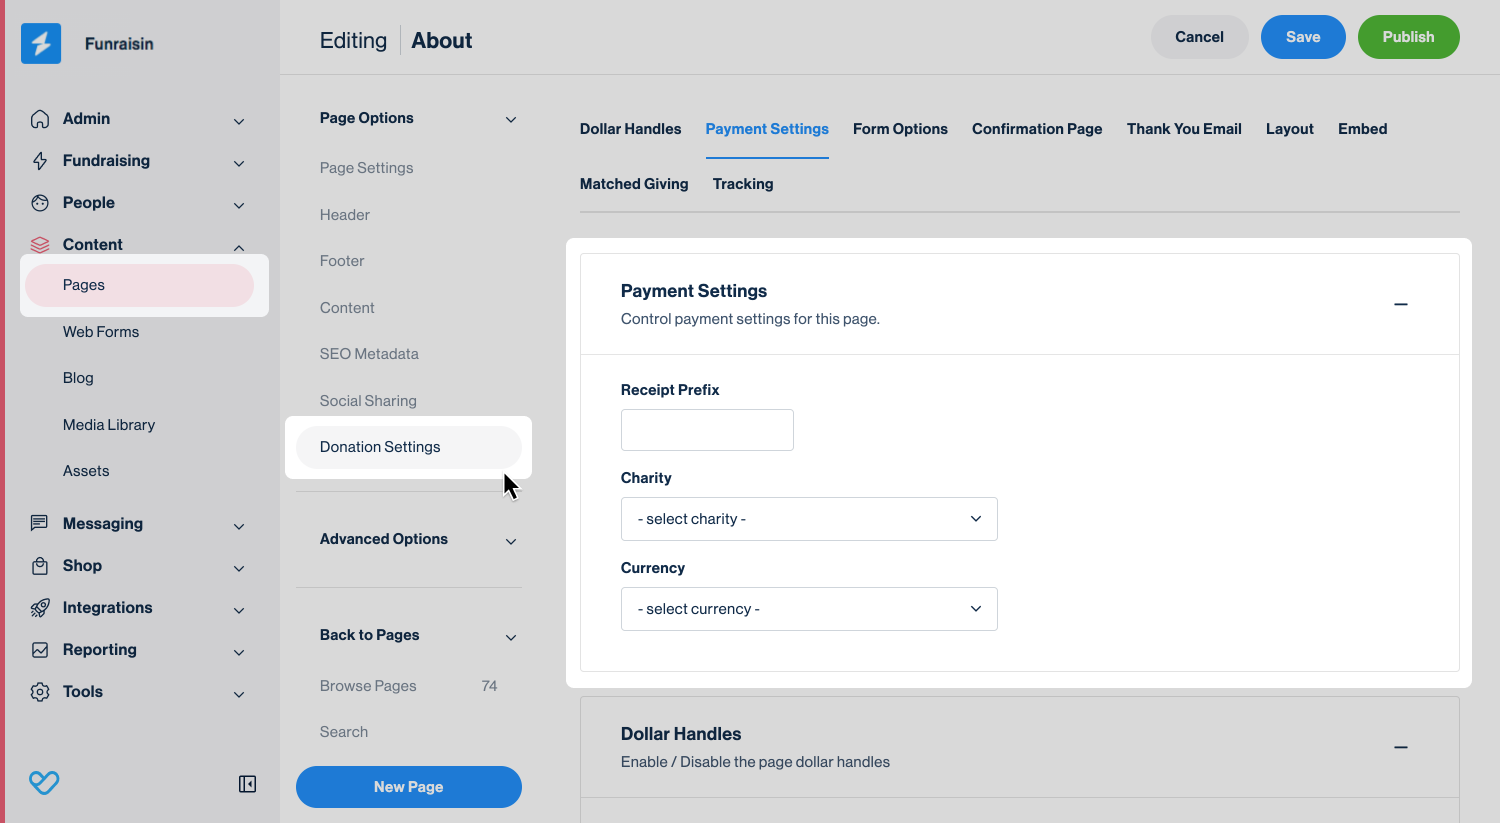
Assigning a charity in page settings
To assign a charity to a donation form in page settings:
- 1
- Navigate to Content > Pages.
- 2
- Click the edit icon beside the page that needs to be updated.
- 3
- Under Page Options, select Donation Settings.
- 4
- Click the Payment Settings tab.
- 5
- In the Payment Settings section, select the relevant charity from the dropdown.
- 6
- Click Publish.
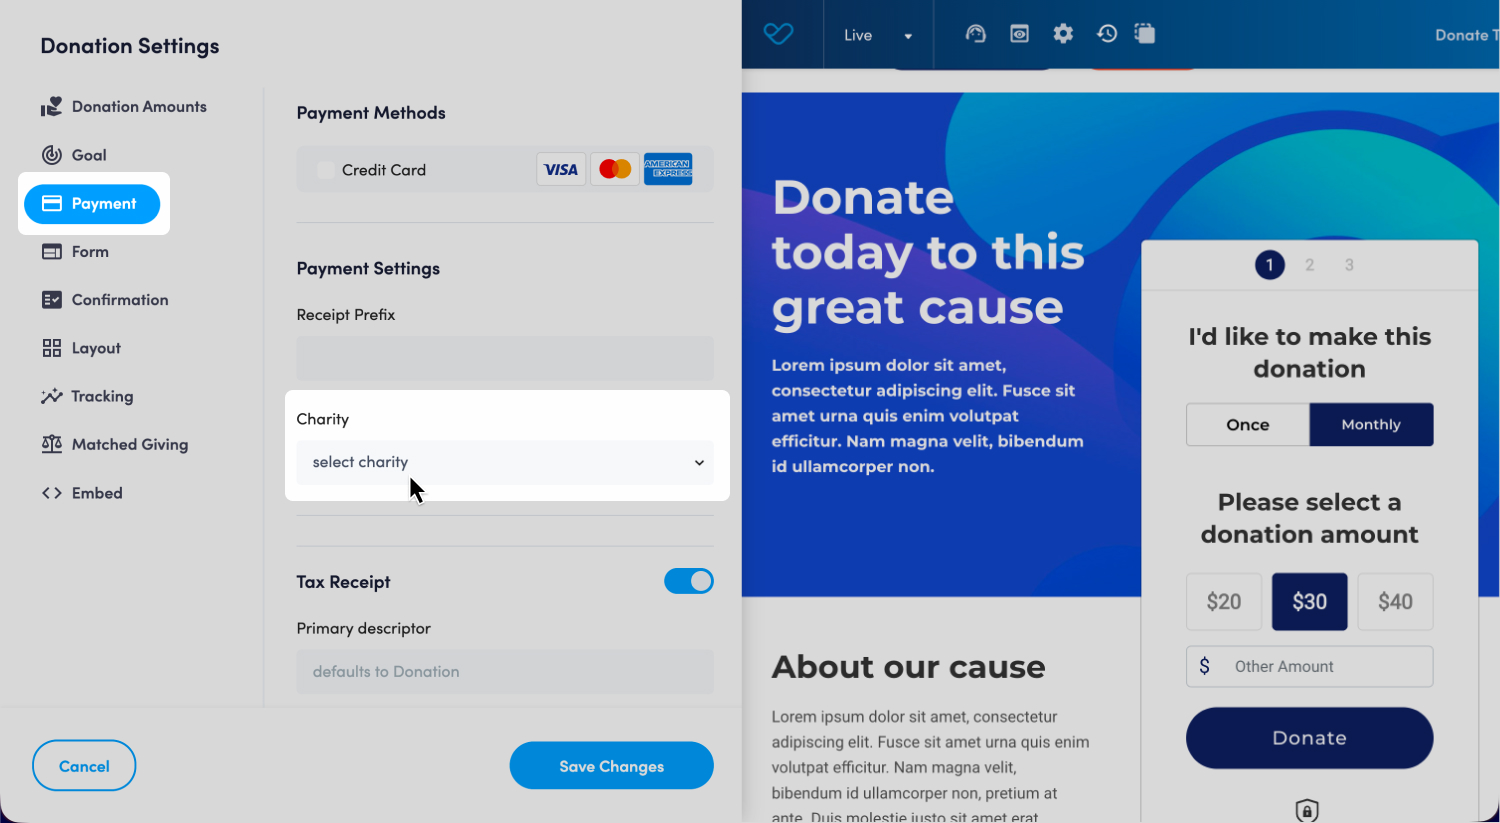
Assigning a charity using Visual Builder
To assign a charity to a donation form in Visual Builder:
- 1
- Navigate to Content > Pages.
- 2
- Click the page name of the page that needs to be updated to expand the available options.
- 3
- Click Visual Builder to open the page.
- 4
- Hover over the donation form, then click the Heart icon to open the donation form settings.
- 5
- Click the Payment tab.
- 6
- In the Payment Settings section, select the relevant charity from the dropdown.
- 7
- Click Save Changes.
- 8
- Click Publish.
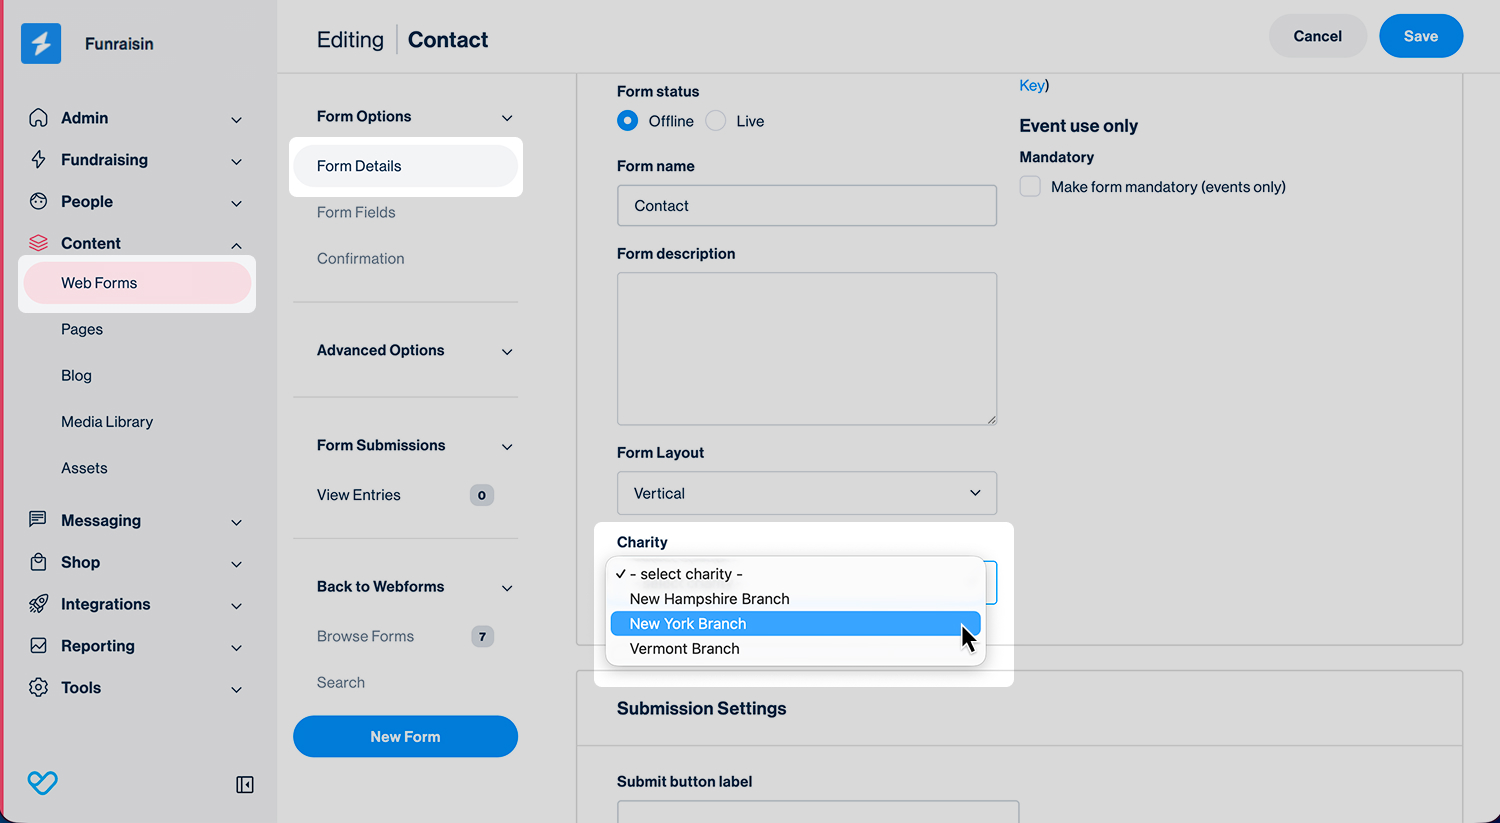
Assigning a charity to a web form
To assign a charity to a web form:
- 1
- Navigate to Content > Web Forms.
- 2
- Click the edit icon beside the web form that needs to be updated.
- 3
- Under Form Options, select Form Details.
- 4
- In the Form Setting section, select the relevant charity from the dropdown.
- 5
- Click Save.
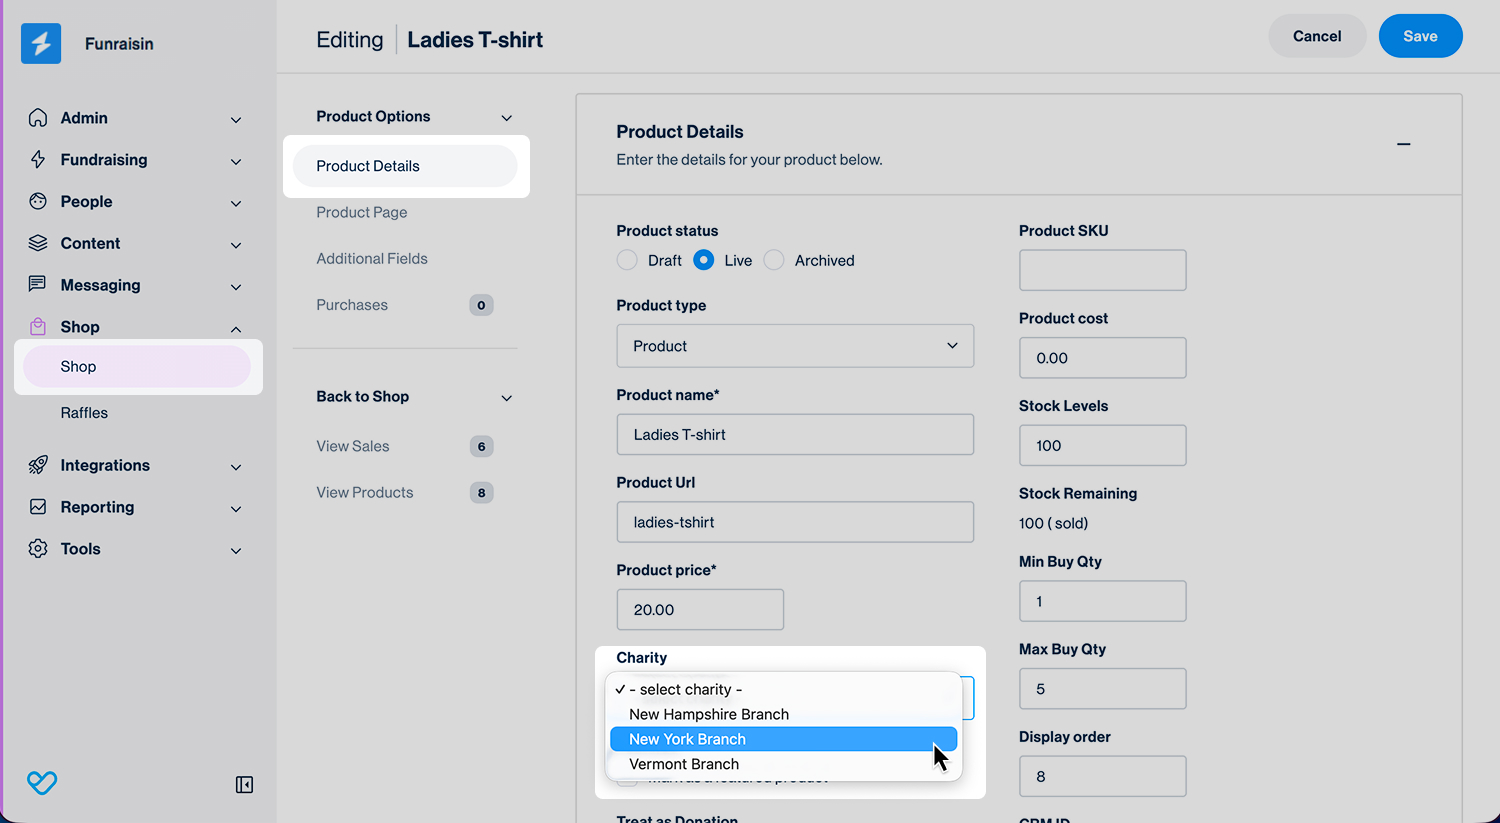
Assigning a charity to a shop product
To assign a charity to a shop product:
- 1
- Navigate to Shop > Shop.
- 2
- Under Products, click View Products.
- 3
- Click the edit icon beside the product that needs to be updated.
- 4
- Select the Product Details tab.
- 5
- In the Product Details section, select the relevant charity from the dropdown.
- 6
- Click Save.
Important: A single shop transaction can only be processed through one Stripe account. For example, if a supporter purchases products assigned to multiple charity entities in a single order, the transaction cannot be split across multiple Stripe accounts. For this reason, we recommend keeping all products within a shop associated with a single charity entity.
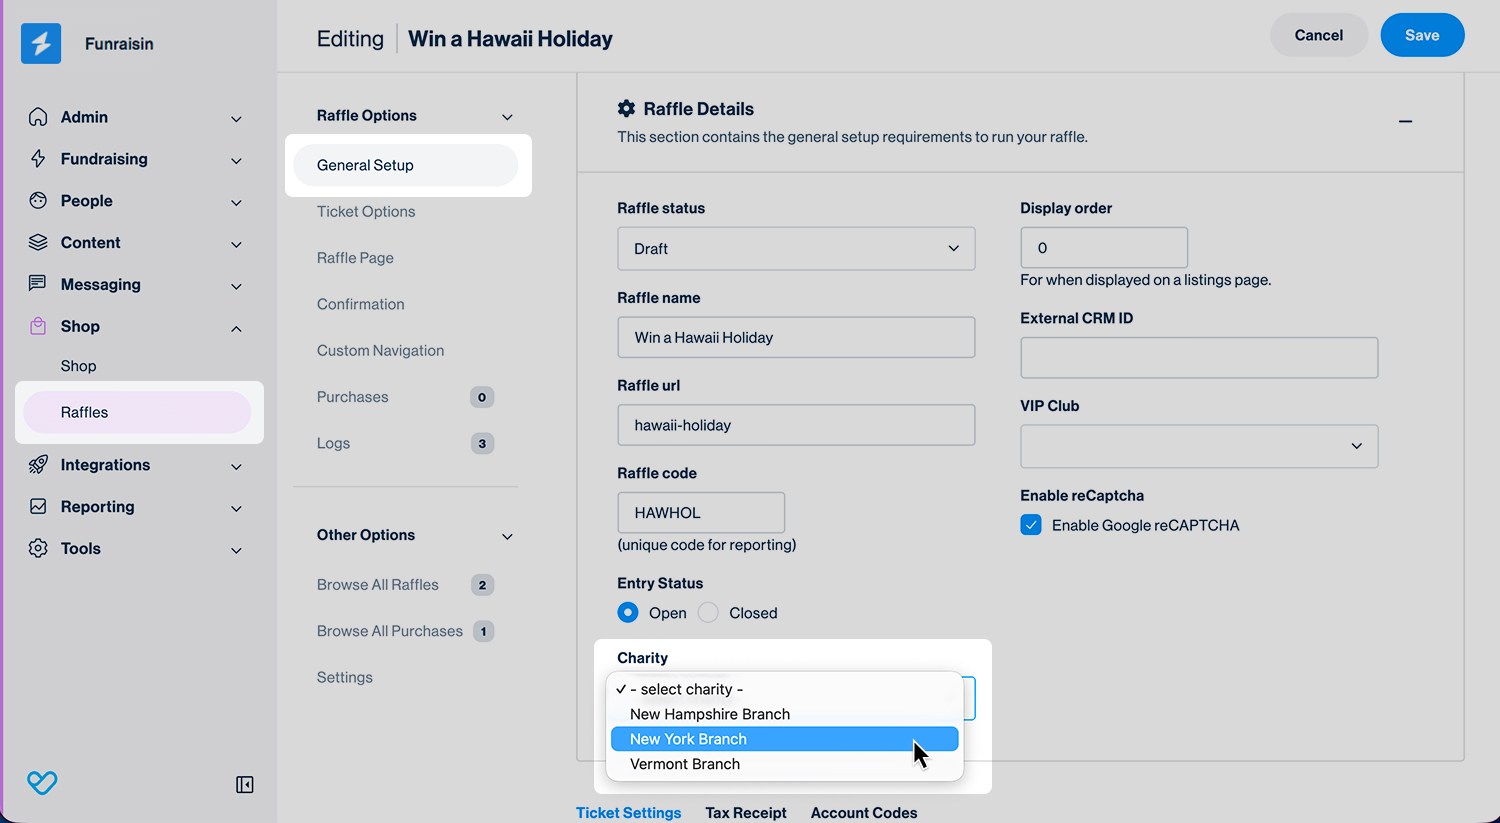
Assigning a charity to a raffle
To assign a charity to a raffle:
- 1
- Navigate to Shop > Raffles.
- 2
- Click the edit icon beside the raffle that needs to be updated.
- 3
- In the Raffle Details section, select the relevant Charity from the dropdown.
- 4
- Click Save.
Reporting
Reporting can be viewed and filtered by charity in several areas of the platform. Data Exports can be filtered by charity, and the Charities module allows admins to view the donations associated with a specific charity.
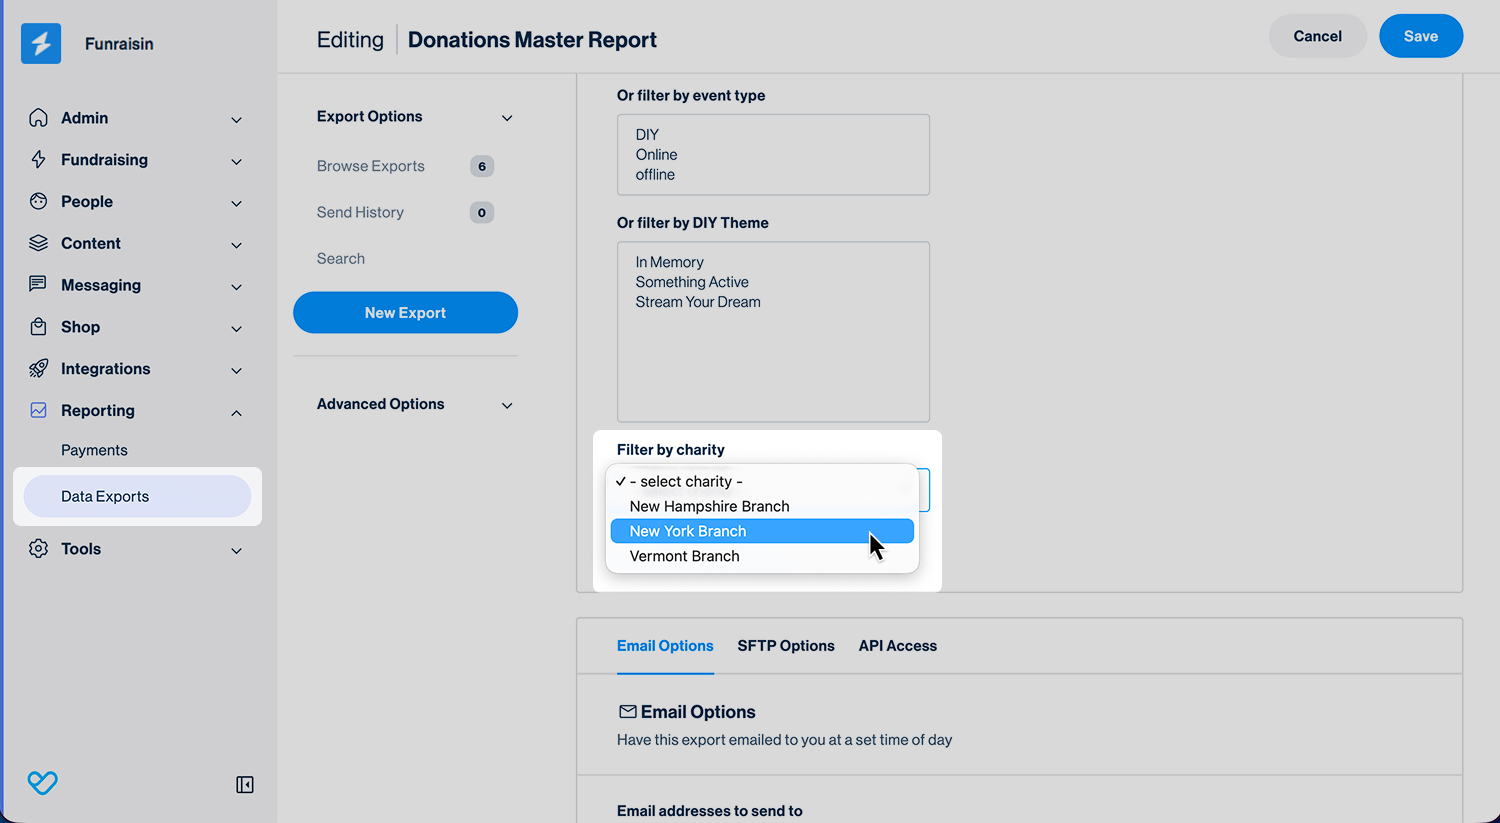
Data Export
To filter a data export by charity:
- 1
- Navigate to Reporting > Data Exports.
- 2
- Under Export Options, select Browse Exports.
- 3
- Click the edit icon beside the export that needs to be updated.
- 4
- Select the Export Details tab.
- 5
- In the Filters section, select the relevant charity from the Filter by charity dropdown.
- 6
- Click Save.
Charities module
To view a list of donations associated with a charity:
- 1
- Navigate to Admin > Charities.
- 2
- Click the edit icon beside the charity.
- 3
- Under Charity Options in the middle navigation, select Donations.
Still need help? Check out our other Platform Setup support articles or reach out to the Funraisin Support team by logging a ticket through the Support Module in your platform.
Last updated: 26 Aug 2026
