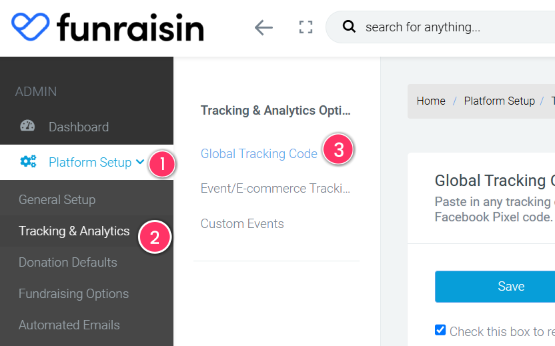
Within your Funraisin site, you’ll find dedicated areas for placing tracking codes from various sources. To locate these, head to:
Platform Setup »» Tracking & Analytics »» Global Tracking Codes

Jump to:
Google Analytics (GA4)
Google Analytics (specifically the 'GA4' version) is Google’s latest update to their analytics platform, and is designed to track website user engagement. It provides flexible reporting and an understanding of how people find, and interact with your site. This is especially useful for fundraising websites, where you can:
- Monitor conversion funnels.
- Track user journeys from your landing pages to the donation confirmation.
- Analyze engagement on event or campaign pages.
- Identify which channels or campaigns drive the most registration and donations.
Google Analytics tracking can be set up either directly with the Google Analytics tracking code, or through Google Tag Manager (GTM). If you aren’t using GTM, please follow these steps for Google Analytics (if you plan to use GTM, check out our GTM instructions).
- 1
- Navigate to
Platform Setup»»Tracking & Analytics»»Global Tracking Codes - 2
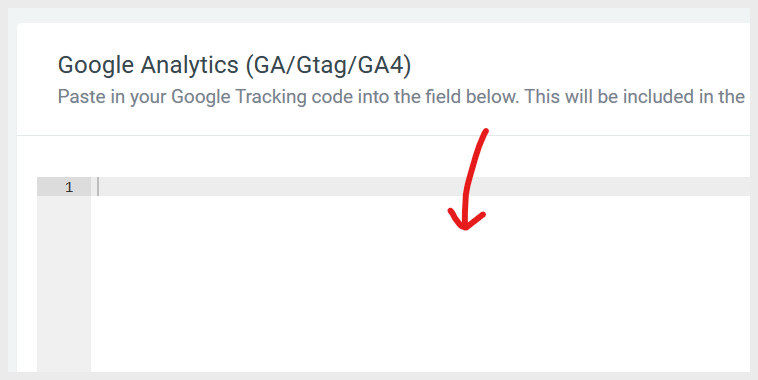
- Expand the Google Analytics tracking option.
- 3
- Paste your GA4 tracking code into the highlighted field.
- 4
- Click Save
Data typically takes 12–24 hours to appear in your GA4 dashboard.

Google Tag Manager
Google Tag Manager (GTM) is a tool that allows you to manage and deploy marketing tags—like tracking codes or pixels—without having to edit your site’s code each time. It’s especially useful for fundraising sites running multiple campaigns that need flexible tracking for user interactions, event registrations, and donations.
To add GTM:
- 1
- Navigate to
Platform Setup»»Tracking & Analytics»»Global Tracking Codes. - 2
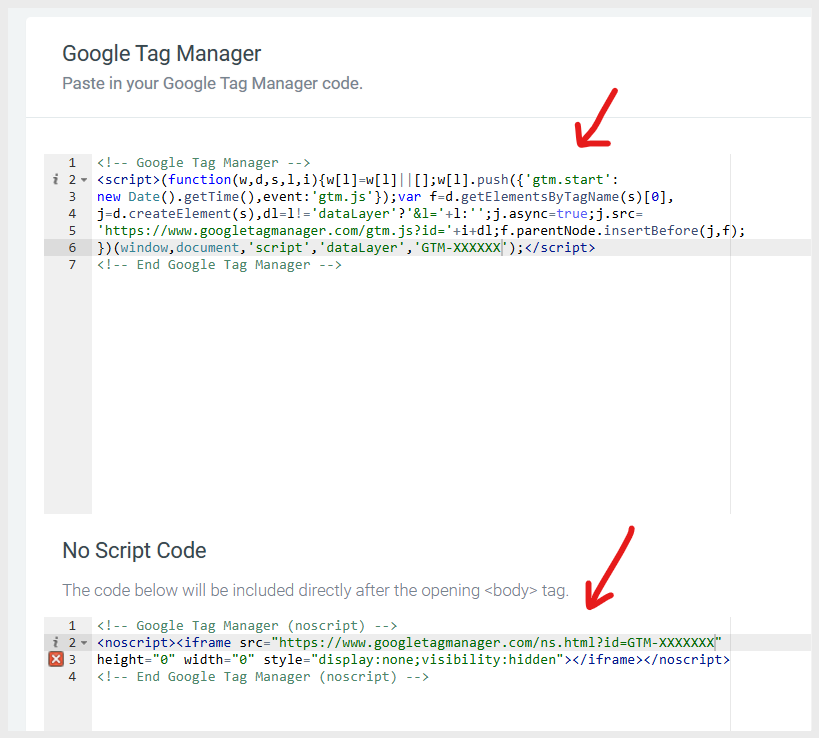
- Expand the Google Tag Manager tracking option.
- 3
- Paste your GTM container code into the designated placeholder, and the no-script code into its corresponding placeholder.
- 4
- Click Save.
If you need a more detailed walkthrough, check out our Google Tag Manager article. It can take 12–24 hours for data to start appearing in your connected analytics platforms.

Facebook / Meta Pixel
The Facebook (Meta) Pixel is a piece of code that helps you measure and optimize the effectiveness of your Facebook ads by tracking user actions, such as purchases (donations) and registrations on your Funraisin site.
You can implement the Facebook Pixel in two ways—standard pixel or Conversions API. However, even if you plan to use the Conversions API, you should still set up the standard pixel to capture pageviews, as the Conversions API only currently sends conversion events (Purchase and CompleteRegistration).
Standard Pixel
- 1
- Go to
Platform Setup»Tracking & Analytics»Global Tracking Codes. - 2
- Expand the Facebook Pixel section.
- 3
- Select Standard pixel as the tracking method.
- 4
- Paste the pixel’s JavaScript code into the text area. It’s safe to ignore warnings about the
noscripttag. - 5
- Click Save.
This setup sends browser events such as Purchases (for donations), CompleteRegistration (for registrations), and pageviews. You can verify these with the Facebook Pixel Helper extension.
Conversions API
- 1
- Go to
Platform Setup»Tracking & Analytics»Global Tracking Codes. - 2
- Expand the Facebook Pixel section.
- 3
- Select Conversions API as the tracking method.
- 4
- Enter your Pixel ID and Auth Token. For help generating an Auth Token (also called an 'Access Token'), see Facebook’s documentation.
- 5
- Paste the pixel’s JavaScript code into the text area. It’s safe to ignore warnings about the
noscripttag. - 6
- Click Save.
This setup sends server-side conversion events such as Purchases and CompleteRegistration, ensuring measurement even if browser tracking is restricted. However, pageviews are not tracked via Conversions API, so you should keep the standard pixel active as well.
If you need more help, please open a support ticket from your Funraisin admin, and our team will assist you.
Autopilot / Ortto
Autopilot (now known as Ortto) is a marketing automation platform that helps you orchestrate user journeys across multiple channels. It’s useful for fundraising because you can nurture anonymous visitors into engaged supporters by tracking their behavior and sending targeted messages.
To add your Autopilot/Ortto tracking code:
- 1
- Log in to your Autopilot/Ortto account and locate your unique tracking snippet. For detailed steps, see this article.
- 2
- In your Funraisin admin, go to
Platform Setup»»Tracking & Analytics»»Global Tracking Codes. - 3
- Expand the Autopilot option.
- 4
- Paste the tracking code snippet from your Autopilot/Ortto account into the highlighted field.
- 5
- Click Save.
You’ll now be able to watch as visitors go from anonymous to known, enabling more personalized outreach and campaign tracking.
TikTok Pixel
The TikTok Pixel helps measure the effectiveness of your TikTok ads, allowing you to track important events like donations (CompletePayment) and registrations (CompleteRegistration). You can implement this using either the standard browser-based pixel or the Events API.
To add your TikTok Pixel:
- 1
- Go to
Platform Setup»»Tracking & Analytics»»Global Tracking Codes. - 2
- Expand the TikTok Pixel section.
- 3
- Choose one of the following methods:
- Standard Pixel: Enter the pixel’s JavaScript code in the text area. It’s safe to ignore any “noscript” warnings.
- Events API: Enter your Pixel ID and Auth Token (along with the pixel's JavaScript code in the text area). You can find instructions on generating an Auth Token in TikTok’s documentation.
- 4
- Click Save.
Once implemented, your Funraisin site will send key events such as donations and registrations back to TikTok. For additional guidance, see TikTok’s official Pixel documentation. If you need further help, feel free to open a support ticket from your Funraisin admin.
Other Tracking Codes
If you’re using any other bespoke tools that need site-wide tracking or data, you can use the Other Tracking Codes tab. You can choose where your code appears:
- 1
- Within the Header tag.
- 2
- After the opening Body tag (recommended if you’re unsure).
- 3
- In the Footer.
Simply paste your snippet into the relevant field, then save. The code will be applied across your entire site.
If you’d like further help please pop in a support ticket from your Funraisin admin and our team will assist you.
Conversion Tracking in GA4 (incl. ecommerce)
When tracking conversions in Google Analytics (including ecommerce transactions), your Funraisin site can integrate with either Google Tag Manager (GTM) or pass data directly to Google Analytics (GA4). We recommend using GTM for a more flexible and easily managed setup.
Google Tag Manager uses something called the dataLayer. Think of it as a behind-the-scenes container that holds information about the user interactions that are happening on your website—like donations or registrations—so GTM can pick it up and pass it along to Google Analytics.
If you’d like help setting up Google Tag Manager tracking on your site, please submit a support ticket from within your Funraisin admin, and we’ll get you sorted.
You can set the ecommerce tracking on your Funraisin site by going to:
Platform Setup »» Tracking & Analytics »» Event & E-Commerce Tracking
Tracking Code on Pages
You can insert page specific tracking code in Pages module –> [the page you want to track] –> Advanced Options –> Tracking Code.


