

Payments: Connecting to Stripe
Behind every donation is a moment of trust. Supporters expect their contribution to be handled securely, processed smoothly, and directed where it’s needed most—without friction or uncertainty.
To support that experience, Funraisin uses Stripe as its primary payment gateway. Once connected, it enables secure donation processing, supports recurring giving, and helps keep your campaigns running reliably behind the scenes.
This article walks you through connecting Stripe, testing your setup, and troubleshooting common issues so you can confidently start accepting donations.
What is Stripe?
Stripe is the primary payment gateway used by Funraisin to process and manage payments across the platform. Stripe provides:
- Global coverage: Accepts over 135 currencies, allowing supporters to donate from nearly anywhere in the world.
- Flexible payment methods: From credit cards to digital wallets and direct debits, Stripe lets donors choose what works best for them.
- Built-in protection: Advanced security and fraud detection safeguards both your organization and your donors.
- Automatic reconciliation: Fees and payouts are handled in real time, reducing admin overhead and financial risk.
- Charity-friendly rates: In many regions, Funraisin's partnership with Stripe means lower processing costs for nonprofits.
Stripe account setup
Before connecting Stripe to Funraisin, you'll need an active Stripe account.
- New to Stripe? Create an account at stripe.com. You'll need to provide ID and bank details to complete the setup.
- Already have an account? Log in and proceed to the next step.
Tip! Registered nonprofits may be eligible for reduced processing fees through Stripe. Contact Stripe directly to find out if charity rates apply to your organization.
Connecting Stripe to Funraisin
To link your Stripe account, keep both Stripe and Funraisin open in separate browser tabs before you begin.
- 1
- In Funraisin, go to Platform Setup > Payment Settings.
- 2
- Click Connect to Stripe. You'll be redirected to Stripe's secure setup screen.
- 3
- Log in to your Stripe account if prompted.
- 4
- If your login has access to more than one Stripe account, select which one to connect.
- 5
- Confirm that Funraisin can connect to your account when prompted by Stripe.
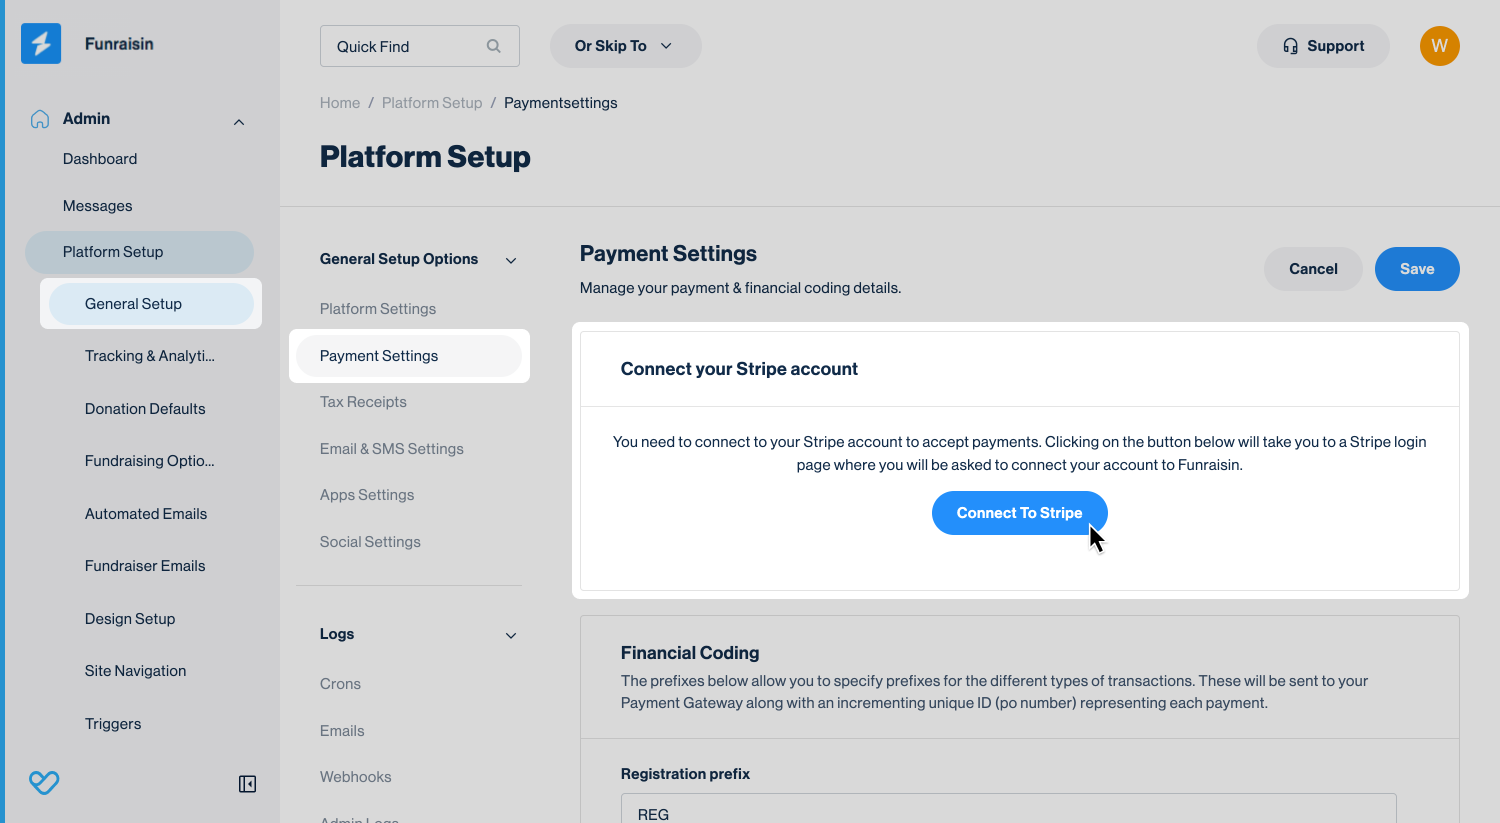
Once authorized, you'll be returned to Funraisin. Your connected Stripe account ID (beginning with acct_) will appear in Payment Settings.
Tip! If your Stripe account isn't fully verified, you'll be prompted to complete ID checks and add your organization's bank details before the connection can be finalized.
Stripe API keys
The next vital step is adding your Stripe live API keys. These keys act like a secure handshake between Stripe and Funraisin—authorizing your platform to process donations on your behalf. Without them, payments won’t work.
Tip! You don’t need to replace the Stripe ‘test’ keys—Funraisin provides them automatically, and they’re only used while your site is in it's Staging phase. Once you switch to live mode, your real payment keys take over.
You’ll find the live API keys in your Stripe account. Simply copy them from Stripe and paste them into your Funraisin payment settings.
- 1
- In Stripe, go to Developers > API keys.
- 2
- Copy your Live Publishable Key (
pk_live_…) and Live Secret Key (sk_live_…).
Tip! Each key has a little copy-to-clipboard icon next to it. Clicking that copies the full key instantly; don’t highlight and copy manually.
- 3
- Back in Funraisin, go to Platform Setup > General Setup > Payment Settings > find the Payment Gateway Settings section and paste in both keys and save.
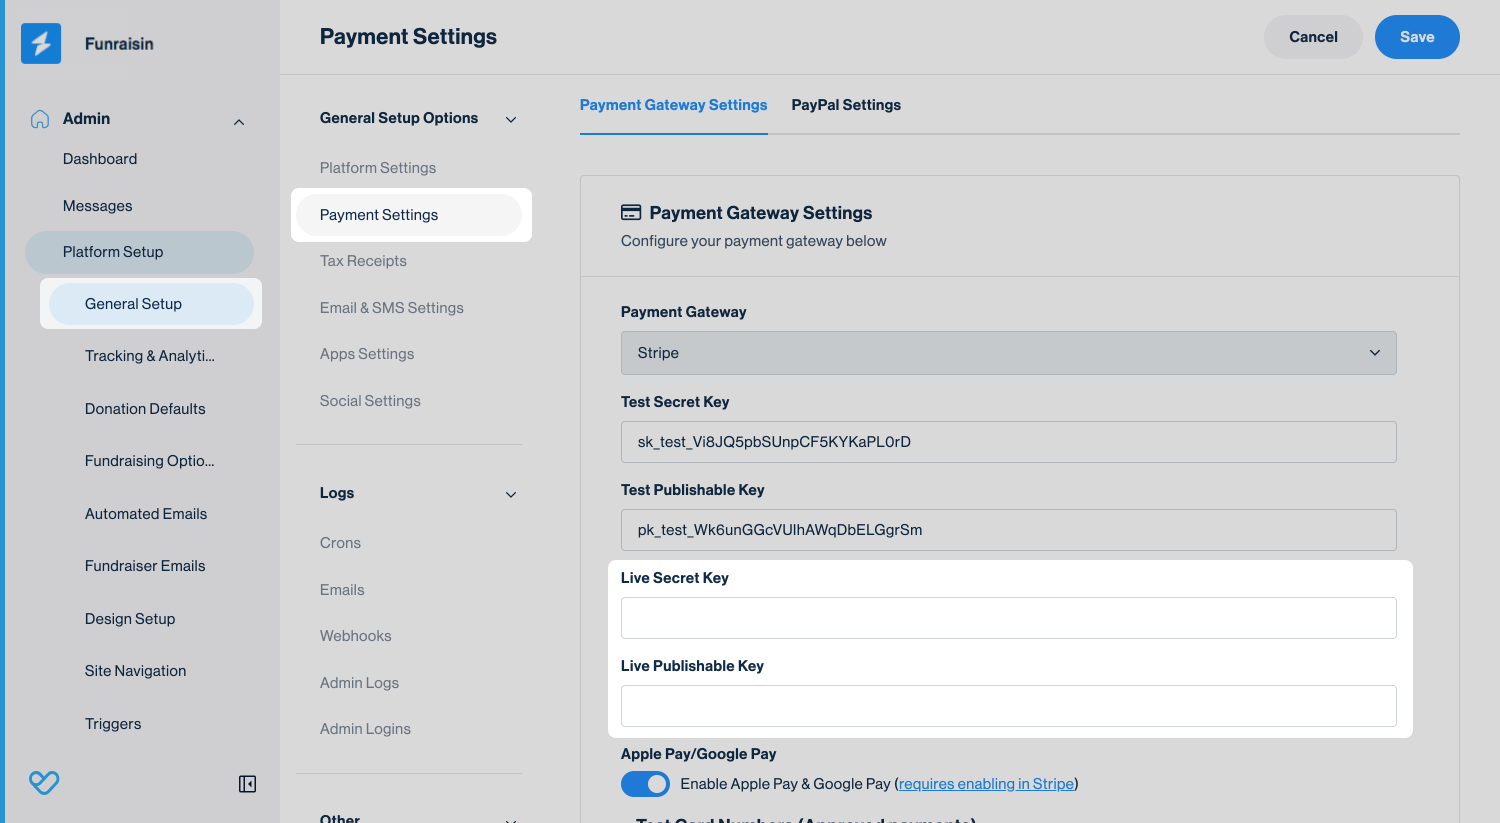
Important Tips:
- Always use live keys, not test keys (
pk_test,sk_test). - Use the copy-to-clipboard button in Stripe to avoid typos.
- Stripe only shows the full secret key once—if you lose it, you’ll need to generate a new one.
- Enter keys directly into Funraisin—never share them over email or support tickets.
Need help locating your keys? See Stripe’s guide on finding your API keys.
Testing your Stripe integration
Before your platform goes live, it remains in test mode so you can safely verify that your Stripe integration is working correctly. While your platform is in this testing phase, complete a few test donations before moving to live payments.
While your platform is in test mode:
- 1
- In Funraisin, go to Platform setup > General setup > Platform settings.
- 2
- Confirm that Run the payment gateway in test mode is enabled
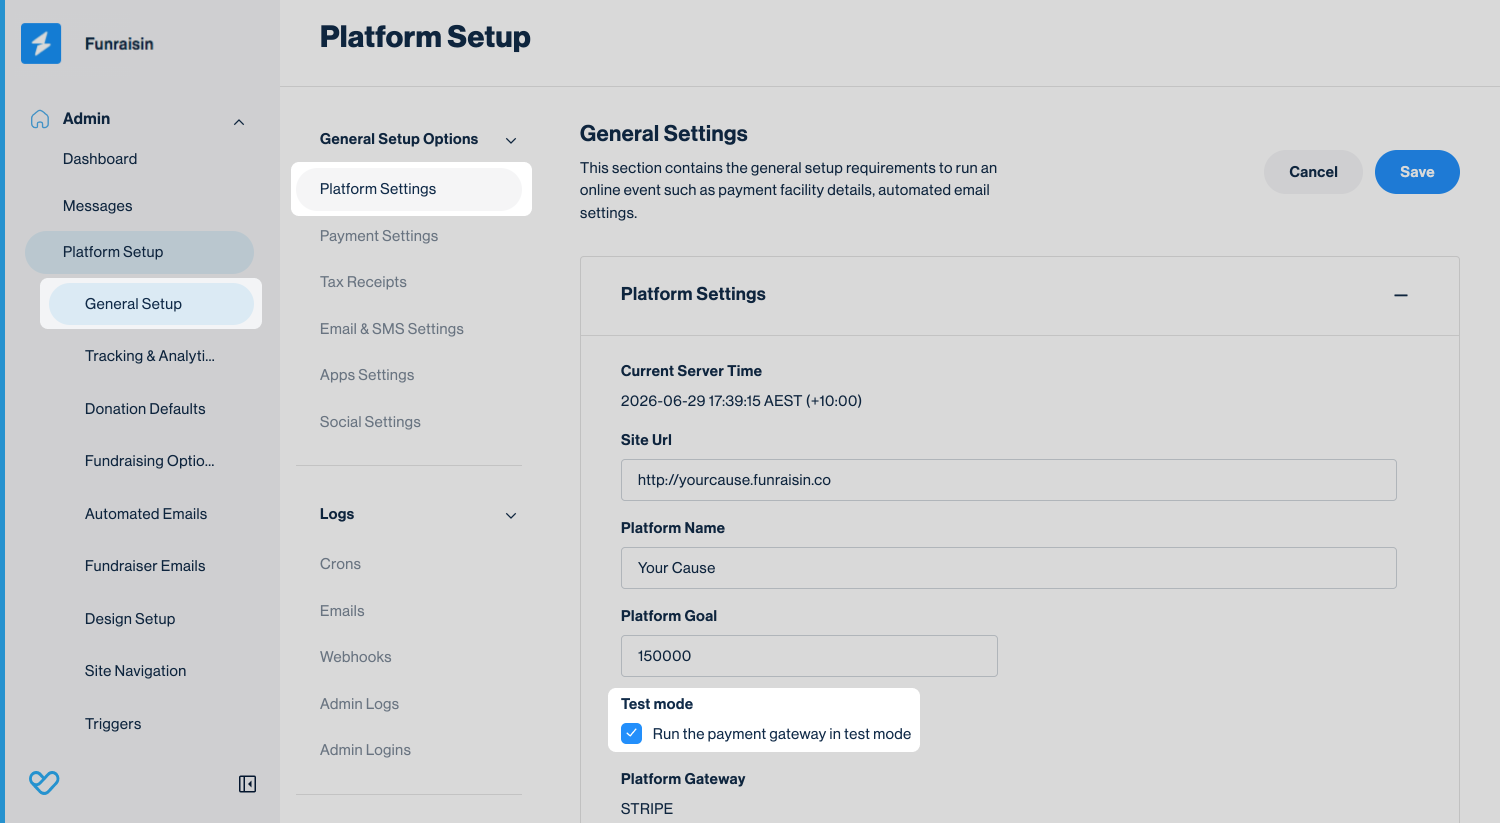
With test mode enabled, you can safely process donations using Stripe’s universal test card:
- Card number: 4242 4242 4242 4242
- Expiry date: any future month/year (MM/YY)
- CVV: any 3-digit number
Run a small donation in test mode to make sure payments are processing correctly.
Important: Keep payments in test mode while checking your setup on the staging site. Once everything has been confirmed and the site is live, uncheck this box and test a live donation to verify that payments are processing correctly.
Confirm and go live
When you’re ready to launch:
- Confirm with the Funraisin team that Stripe is connected.
- We’ll remove password protection, activate the payment gateway, and perform two live test donations.
- Both donations will be refunded immediately after confirmation to confirm a full processing pipeline with Stripe.
Tip! Test mode is only intended for your initial platform setup and testing. Once your platform has gone live, you shouldn't switch it back to test mode. If you need to troubleshoot payment issues after launch, contact the Funraisin Support team.
Multi-charity Stripe setup
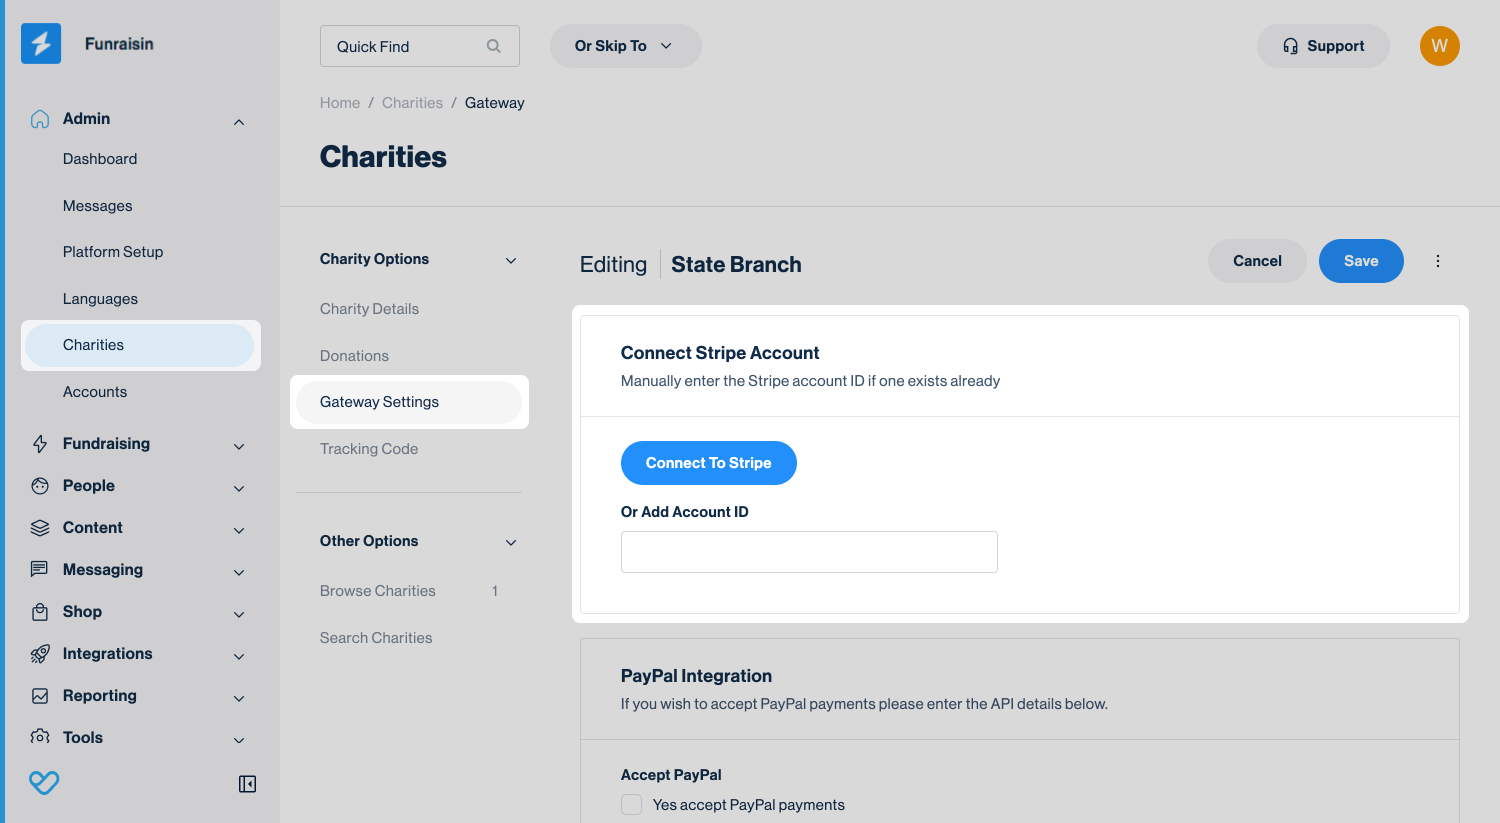
If your organization has multiple entities (for example, national and state branches), each entity will need its own Stripe connection.
- Use the Charities module to set up connections for each branch
- If the same Stripe account is already connected elsewhere, you can reuse the Account ID
- For new accounts, always go through the full Stripe Connect process
Troubleshooting
Most issues trace back to either an incomplete connection or incorrect keys. Here’s how to narrow it down fast:
- Test a donation with and without supporter tips (Tip Jar):
- Works without Tip Jar, fails with Tip Jar = The Stripe account isn’t fully connected to Funraisin.
- Works with Tip Jar, fails without Tip Jar = The keys in your settings are incorrect.
- Check your account ID:
- Confirm there’s an acct_ ID in Payment settings. If not, reconnect Stripe.
- Check your keys:
- Make sure the keys say live, not test.
- Double-check that the secret key is complete, not truncated.
Common mistakes to avoid
- Using test keys on a live site
- Copying the shortened version of a secret key instead of it's full version
- Trying to use restricted keys (these are not yet supported by Funraisin)
- Forgetting to connect each entity in multi-charity setups
Still need help? Check out other Payments support articles, or reach out to the Funraisin Support team by logging a ticket through the Support Module in your platform.
Last updated: 30 Jun 2026
