

Entrants - Manual And Bulk Uploads
Manually upload entrants, ticket holders and teams, individually or in bulk.
Within the platform, you have the option to individually add entrants, or do a bulk upload via CSV.
This article will run through:
Manually adding individual entrants
To manually add an entrant, navigate to:
Entrants > + New Entrant
Here you will be presented with a form to add entrant details.
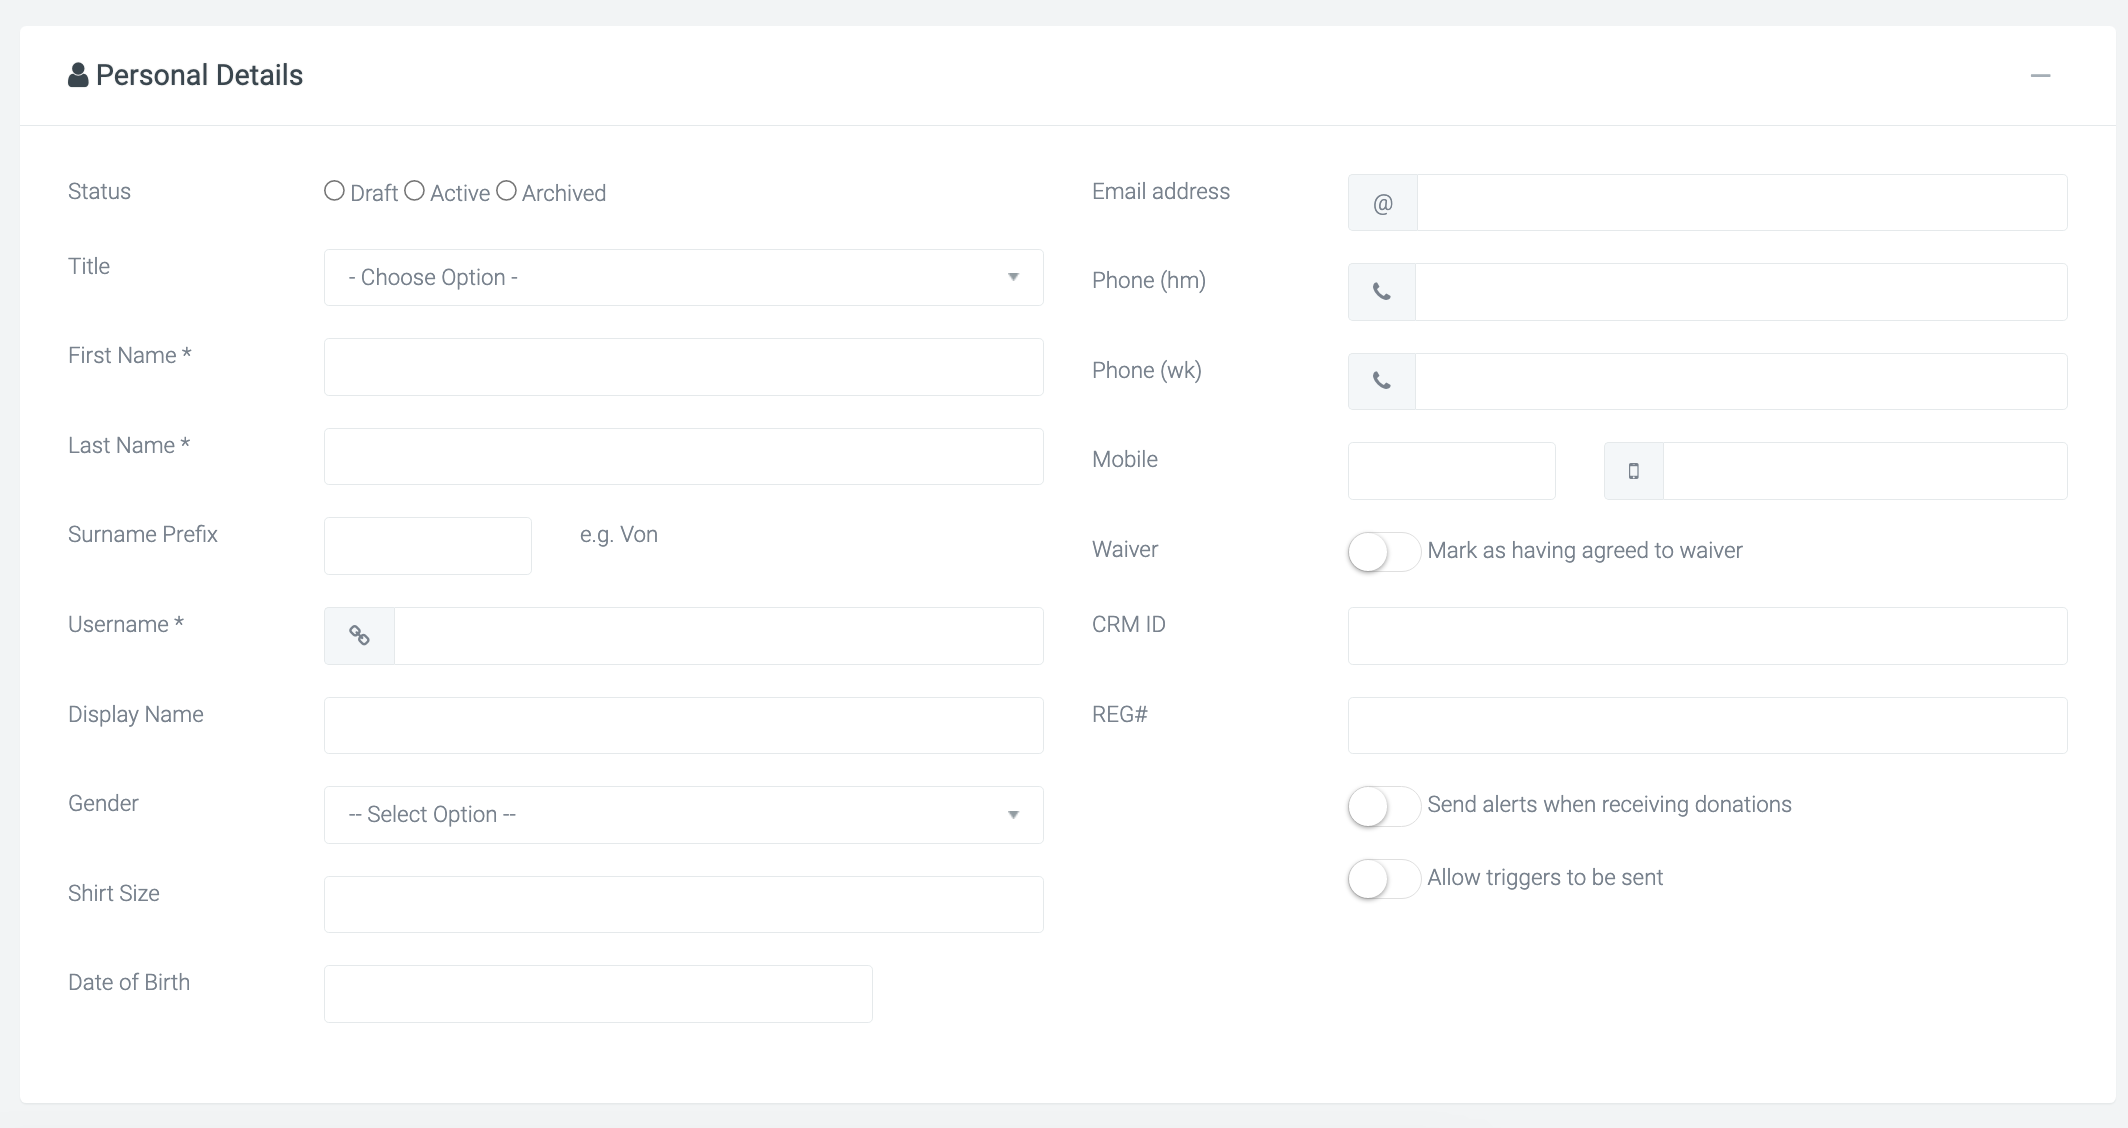
The mandatory details required for an entrant are:
- First Name
- Last Name
- Username (normally firstnamelastname)
- this is how their fundraising URL will appear, e.g. charity.com/fundraisers/tomsmith
Additionally, you can add other details that you know such as address and phone number.
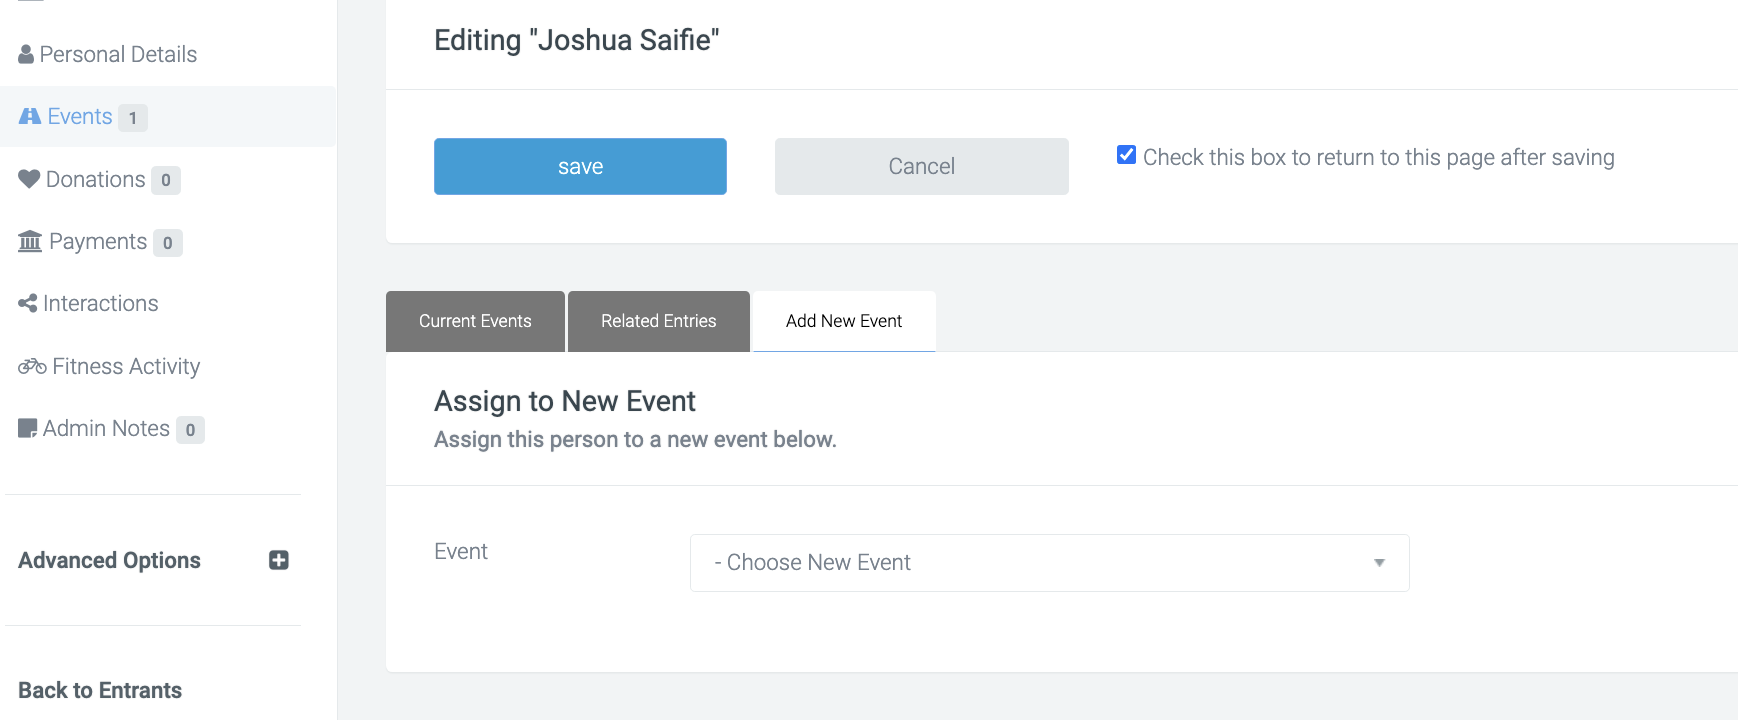
Once saved the newly added entrant will appear within the Entrants module. The entrant, once added, will not be assigned into any events. You will need to edit the new entrant and manually add them into an event by navigating to:
Edit their record > Events (central white nav) > Add New Event
Manually adding teams
Teams can also be added manually in a similar fashion.
This can be done by navigating to:
Teams > + New team
Here you’re presented with a similar form where the required fields are:
- Team Name
- Team Url
- Event
You can also add additional information such as the organisation and charity to directly assign the team to.
Once saved the team will appear in the Teams module, along with the event the team is assigned to.
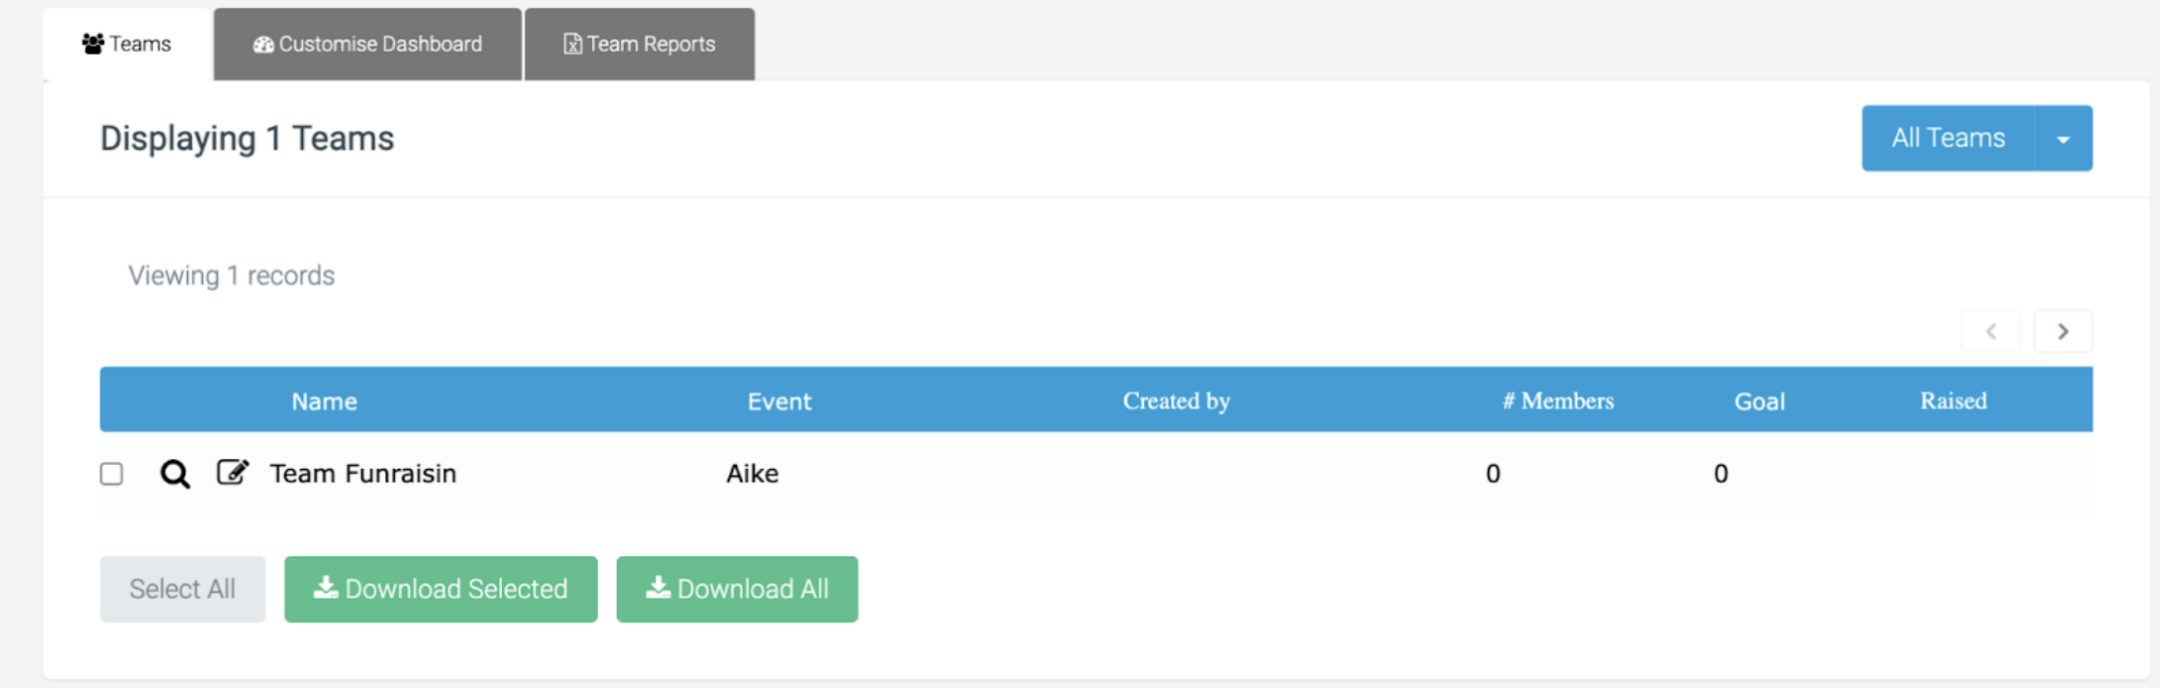
For the team to be active and appear within the event on the live site, each team will need a captain assigned to the team.
We have further support articles on:
Manually adding individual ticket holders
Along with teams and individuals, ticket holders can also be added.
These ticket holders are those who are to attend a ticketed event within the platform.
To add a ticket holder, navigate to:
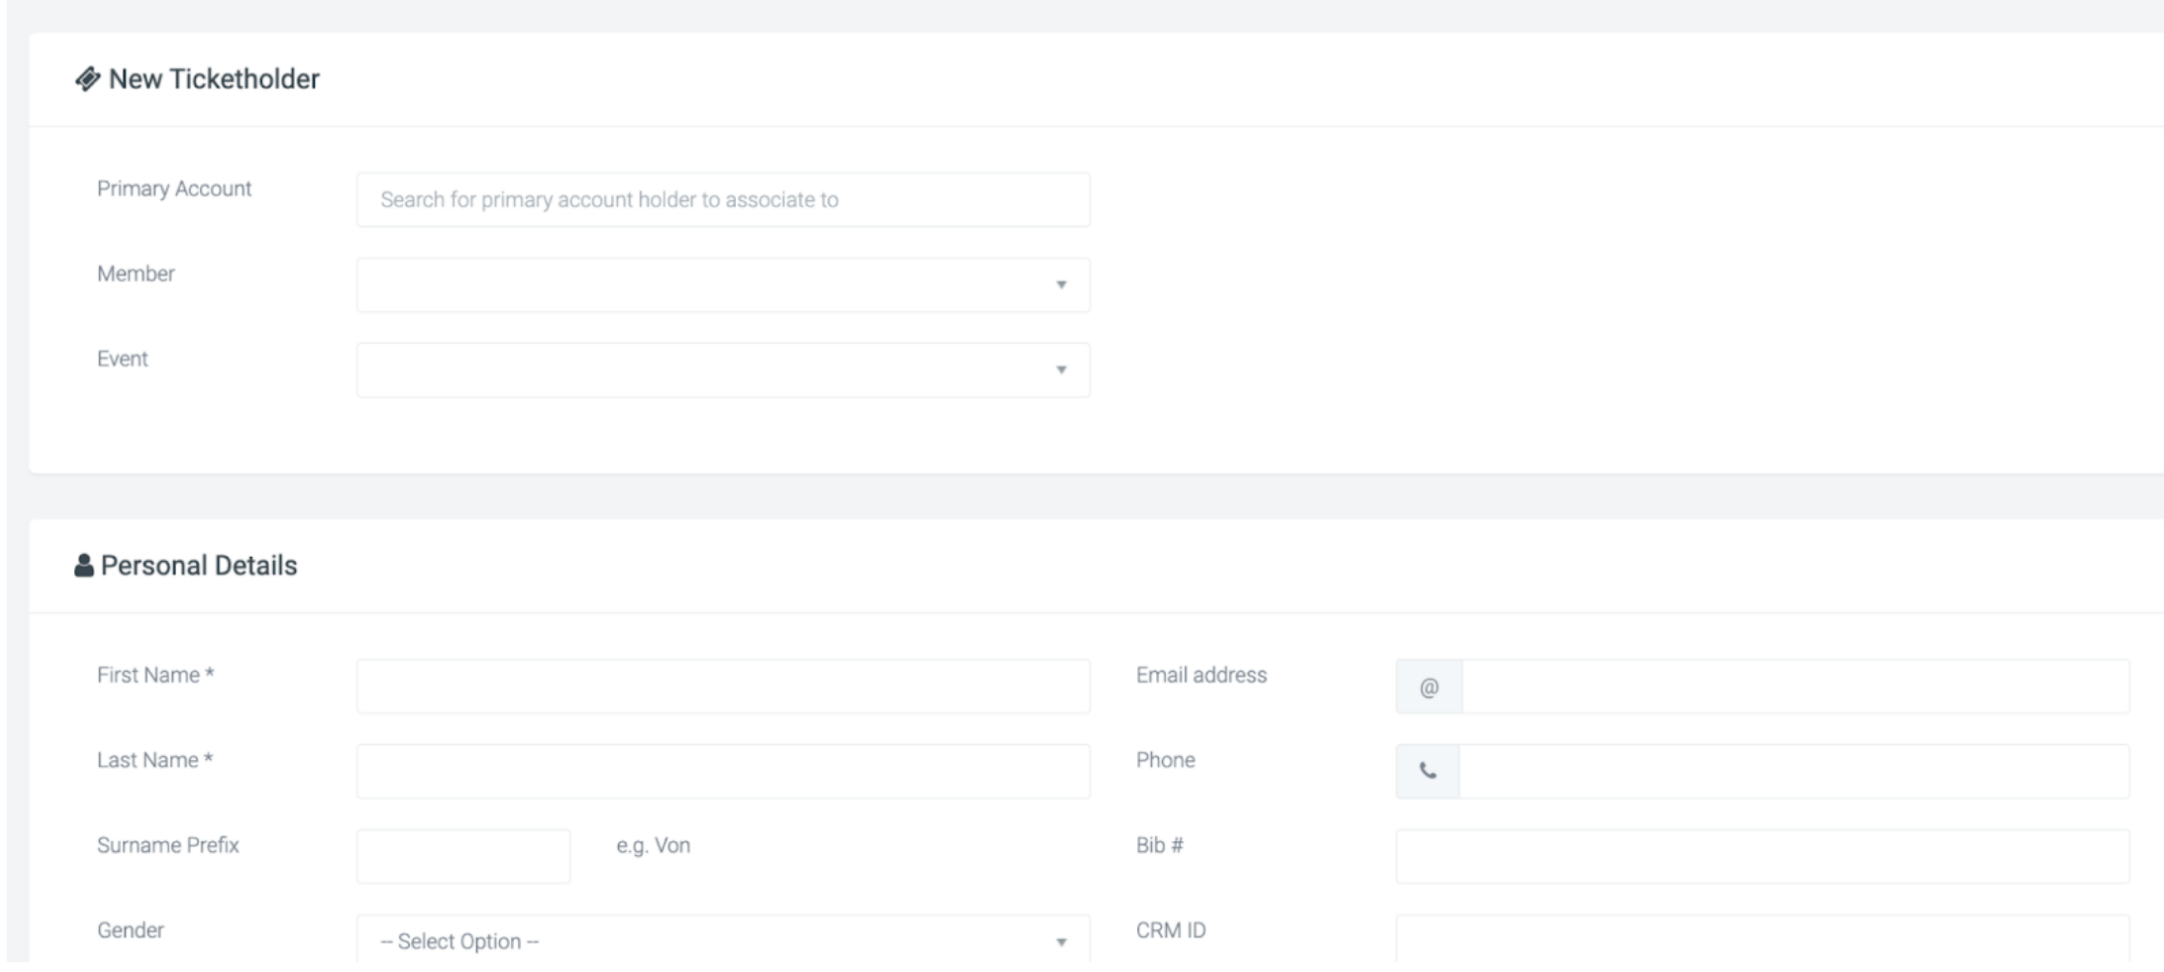
Entrants > +New ticketholder
Within the first section, you can choose the already existing member record to link the ticket to, along with the event.
The mandatory fields required for a ticket holder are:
- First Name
- Last Name
Bulk uploading entrants, ticket holders and teams
Bulk uploads are a way to upload multiple records onto your platform all at once. This can be done by navigating to:
Entrants > Advanced options > Import Entrants
Here you will find the Bulk Import Entrants section where you can upload a csv with the entrants you require on the platform.
To do this, first you will need to download and prepare your csv.
This can be done by downloading the template from the required fields section:
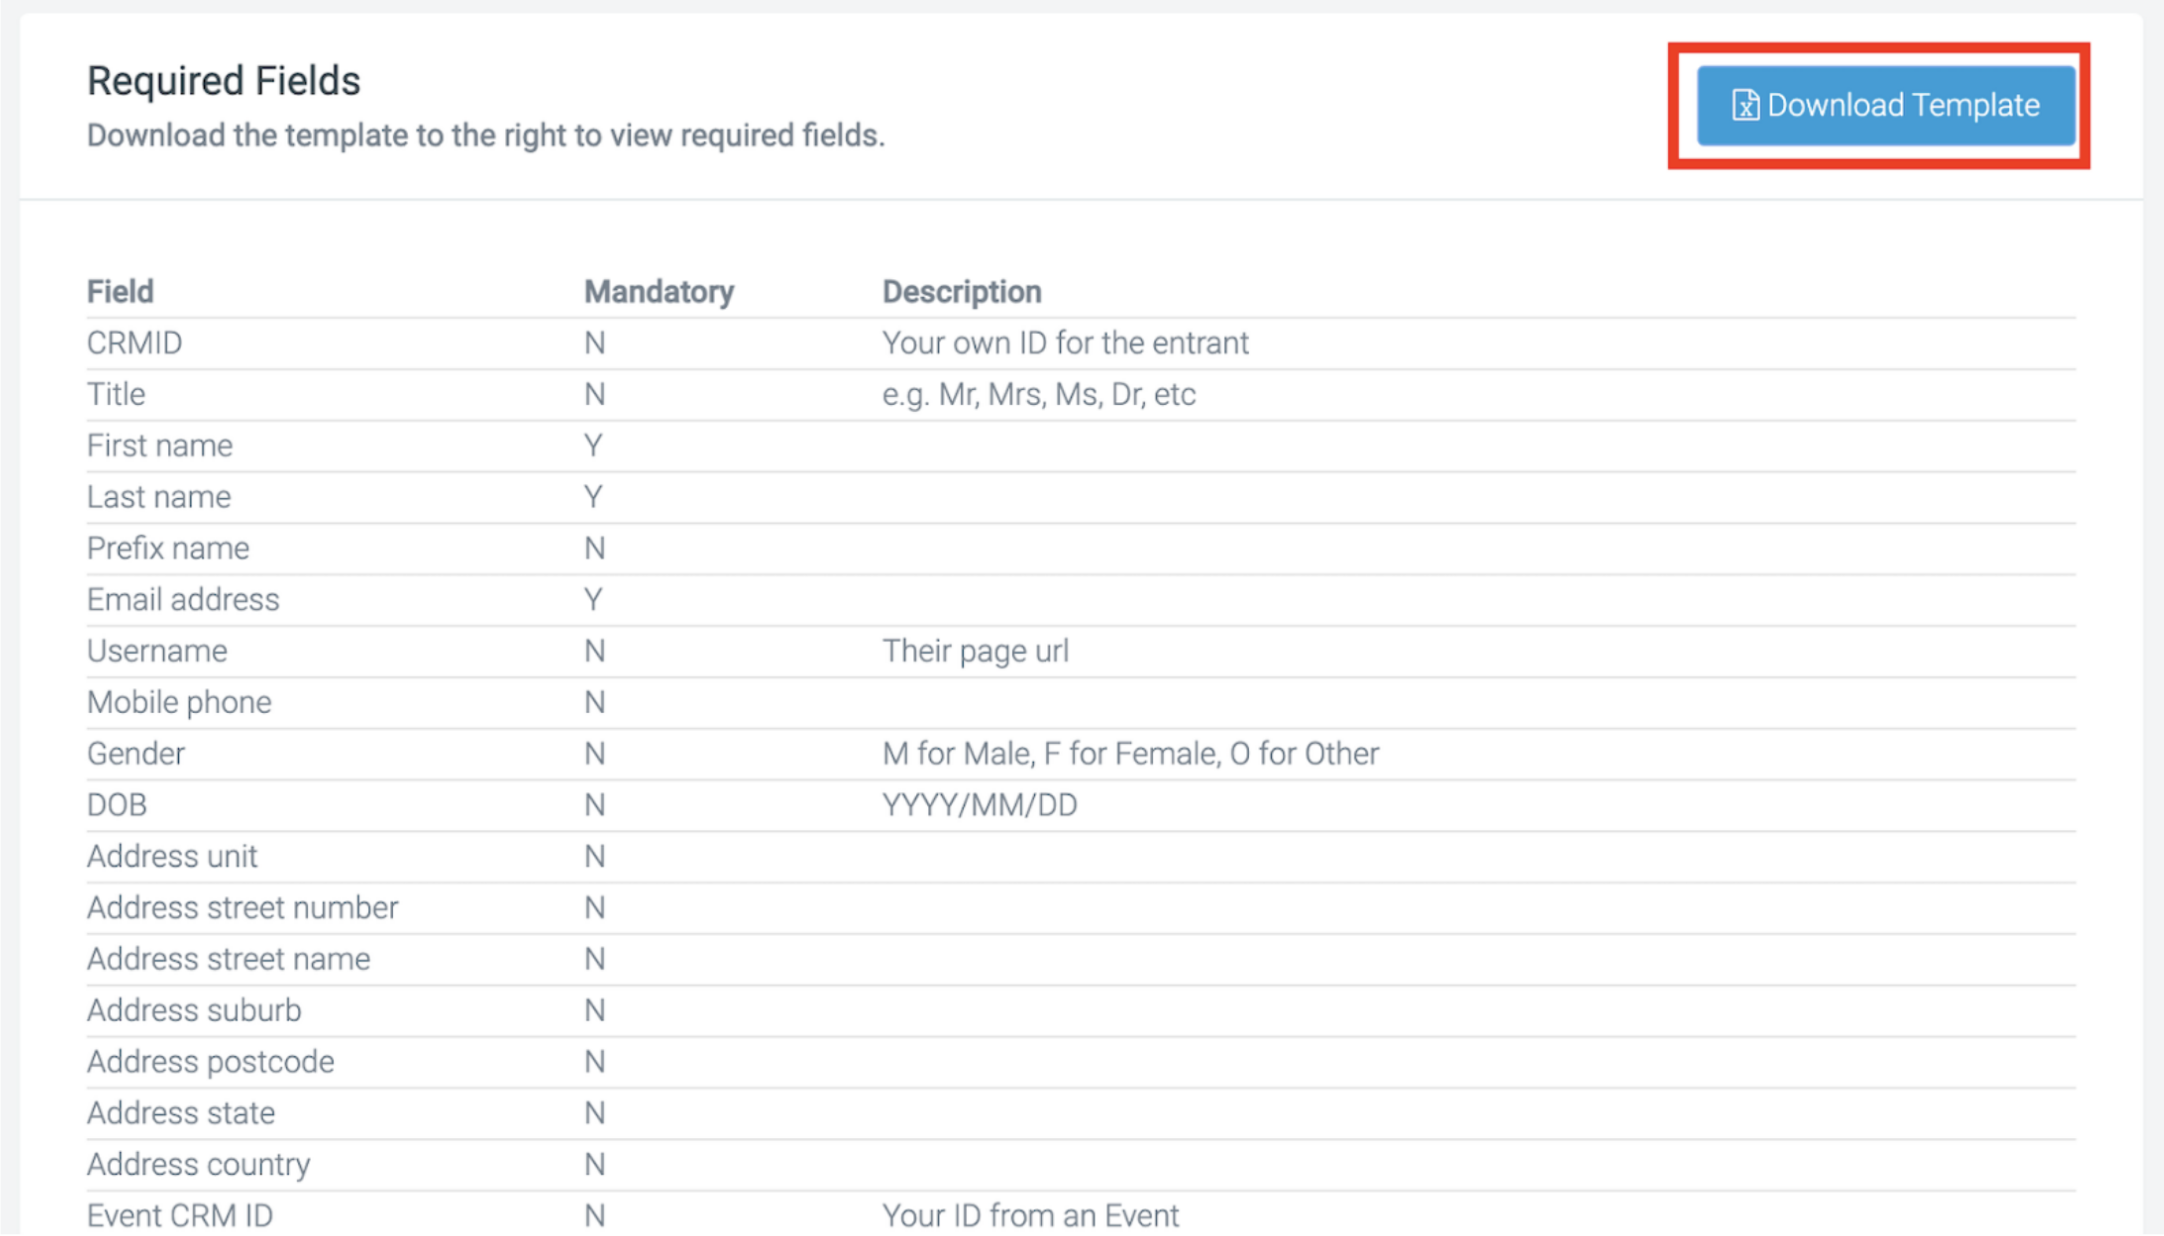
Once the template is downloaded you can add the fields you know to the CSV and save.
Important: Do not rename any columns or move them around as the upload will not work.
The required fields for entrant bulk uploads are:
- First name
- Last name
- Email address
If you want to add the entrants to a team, ensure the Team name field is populated with the exact name of the team you’re adding them to. If creating a new team, add in the new team name and once uploaded a team will be created. The first entrant in the list, in that team, will become the captain.
If you want to create a new organisation, add the name to the field Company name. When uploading, there is the option to tick a box, ‘Create an organisation page from the Company name’.
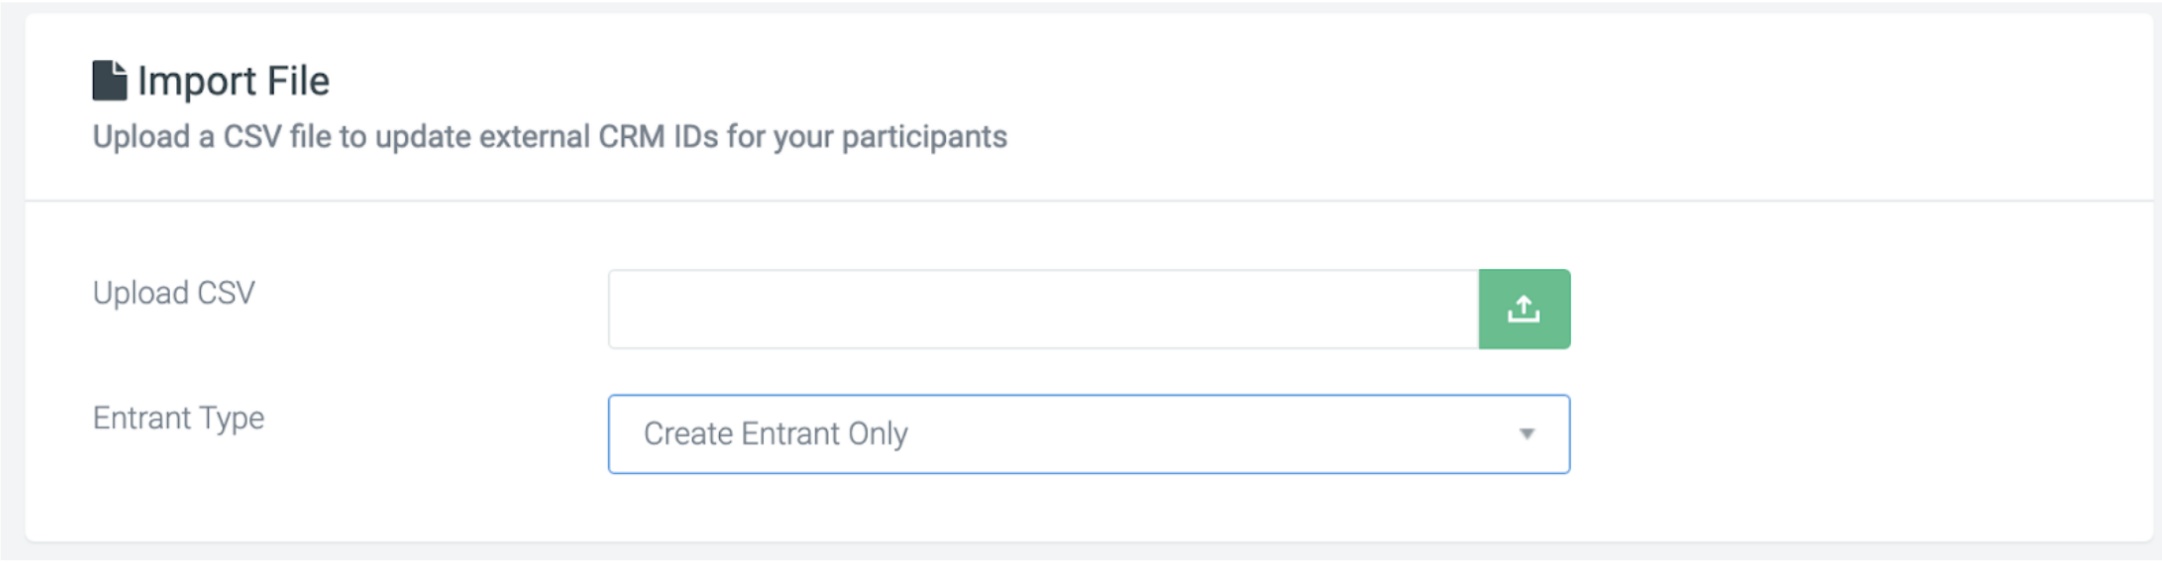
Once you have prepared your .csv file, you can upload the file within the Import file section at the top of the page.
You can then choose the Entrant type you’re uploading:
- Create entrant only
- Create ticketholder only
- Create entrant and ticketholder
You will have some additional options which you can select within the event options section:
- Event: allows you to upload entrants directly to an event
- Create New: Allows you to upload entrants to a newly created event (The new event name will need to be populated in the field Event Name)
- Set Active: A checkbox to automatically set entrants to active within the event
- Bib: If your event is using bibs, then this will allocated a bib number for each imported entrant
- Org Pages: Creates an organisation page if Company Name is added to the .csv
- Wave options: If your event has waves, you can choose the wave to add the entrants to (note this will be the same for all entrants in the import.)
- Ticket: If you’re adding a ticketholder record, you can choose the ticket type to assign to their ticket record (note this will be the same for all entrants in the import.)
The final optional option available is to send a confirmation email to each entrant once they’re uploaded. This is located at the bottom of the page.
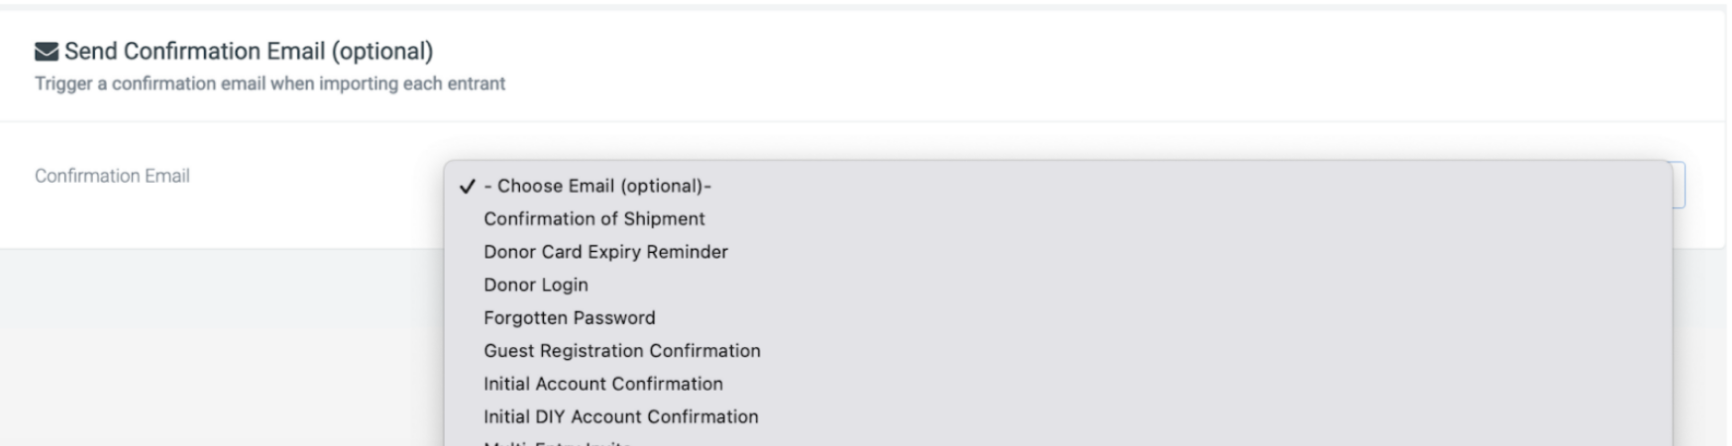
If setting entrants to active, then this email could be used to send a registration receipt, to confirm the entrant has signed up.
If setting entrants to inactive, then this email could be used to send an initial account confirmation, containing a personalised URL, (PURL), dropping the entrant into a shortened registration flow to set their password, accept the terms and conditions, make payment and any other details you require before becoming active.
Once all the details have been added successfully, saving the import at the top of the page will import the entrants to the platform. You will then see these newly added entrants within the entrant section.
If you’d like further help please pop in a support ticket from your Funraisin admin and our team will assist you.
