

Events: Entrant Approval
When supporters register to fundraise, the moment their fundraising page goes live can have a big impact on both their experience and your organization’s outcomes. In some cases, you may want registrations to be reviewed or confirmed before fundraising begins—whether to manage eligibility, reduce invalid sign-ups, or ensure the right context is set from the start.
Entrant approval makes this possible by giving you control over when a fundraising page is activated after registration. Depending on how it’s configured, approval can be completed by an admin or by the entrant themselves, allowing you to balance oversight with a smooth supporter journey.
This article explains how entrant approval works, the different approval options available, where approval can be enabled across Online Events and DIY Themes, and how to manage approvals once registrations are submitted.
What is Entrant Approval?
By default, Online Event and DIY Event fundraising pages are activated automatically after an entrant completes their registration. Entrant approval settings allow admins to control when, how, and by whom a fundraising page is activated.
When entrant approval is enabled, a registration must be approved—either by an admin or by the entrant, depending on the approval type selected—before the fundraising page goes live.
Entrant Approval types
There are two entrant approval options. Each option defines who completes the approval after registration—either a platform admin or the entrant.
Approved By Admins
Approved by admins means that all registrations must be manually approved by an admin before a fundraising page is created.
- How it works
After completing registration, the entrant is redirected to the confirmation page specified in the settings.
If enabled in the approval settings, an email notification is sent to an admin when a new registration is submitted. The admin can then log in, review, and manually approve the entrant.
Once approved, the entrant’s fundraising page is created and becomes active. Admins can also choose to send the registration receipt email at the point of approval. If it is not selected, no automatic email is sent to notify the entrant that their page is live.
- When to use this option
This option is useful when you want greater control over who can create a fundraising page. It’s commonly used for events or campaigns where registrations need to be reviewed before going live, such as invite-only initiatives, compliance-sensitive campaigns, or events with eligibility requirements.
Admin approval also allows you to review registrations before fundraisers start sharing their page, helping ensure the supporter experience remains consistent and on-brand.
Approved By Entrant
Approved by entrant means the entrant completes the approval step themselves after registration. Once registration is submitted, the entrant receives an email containing an activation link. The fundraising page is created after the link is clicked by the entrant.
- How it works
After completing registration, the entrant is redirected to the confirmation page specified in the settings. The entrant also receives an email with a verification link to approve their registration.
Once the link is selected, the entrant’s fundraising page is created and becomes active. The entrant then receives an email confirming that their registration is complete.
- When to use this option
This option works well when you want registration to remain quick and self-service, while still confirming the entrant’s email address. It’s a good fit for open campaigns where manual review isn’t required, but you still want to reduce invalid registrations and confirm that the entrant is a real person.
Entrant approval helps keep the registration flow simple for supporters while ensuring fundraising pages are only created once the entrant has actively confirmed their registration.
Where can Entrant Approval be enabled?
Both entrant approval types can be enabled on:
- DIY Themes
- Online Events
The Approved by Admins entrant approval type is also available on online event registration forms.
Confirmation URLs and pages
When entrant approval is enabled, confirmation URLs can be used to control where an entrant is directed after submitting their registration and, if applicable, after approving their registration via email.
Adding confirmation redirect URLs is optional, but highly recommended. If no confirmation URL is set, the entrant is taken to the platform default page after submitting their registration form. This page does not indicate that the registration is awaiting approval, which can be confusing and may result in a poor supporter experience.
Best practice
For the best supporter experience, it’s recommended to create dedicated content landing pages to use as confirmation redirects. These pages can be created at the Platform and Event levels.
A confirmation page should clearly:
- Explain that the registration has been received.
- Outline the approval process.
- Advise the entrant on next steps.
For example, when an event is set to Approved by Entrant, the confirmation page may include messaging such as:
“Thank you for registering. Please check your email to activate your fundraising page.”
Redirect URL options
Redirect to URL (Confirmation Page): Defines where the entrant is directed immediately after submitting their registration form, while the registration is awaiting approval.
Approval Confirmation URL (Approved by Entrant only): Defines where the entrant is directed after approving their registration via the email verification link.
Enabling Entrant Approval
Approval settings can be enabled at different levels across the platform. The steps below walk you through each setup option.
Online event level
Follow these steps to enable entrant approval at the Online event level.
- 1
- Go to Fundraising, then select Events.
- 2
- Click the edit icon on the event you’d like to update.
- 3
- Under Online Event Options, go to Entries and Fees, then select the Individual tab. Approval settings configured for Individuals apply to Teams and Organizations.
- 4
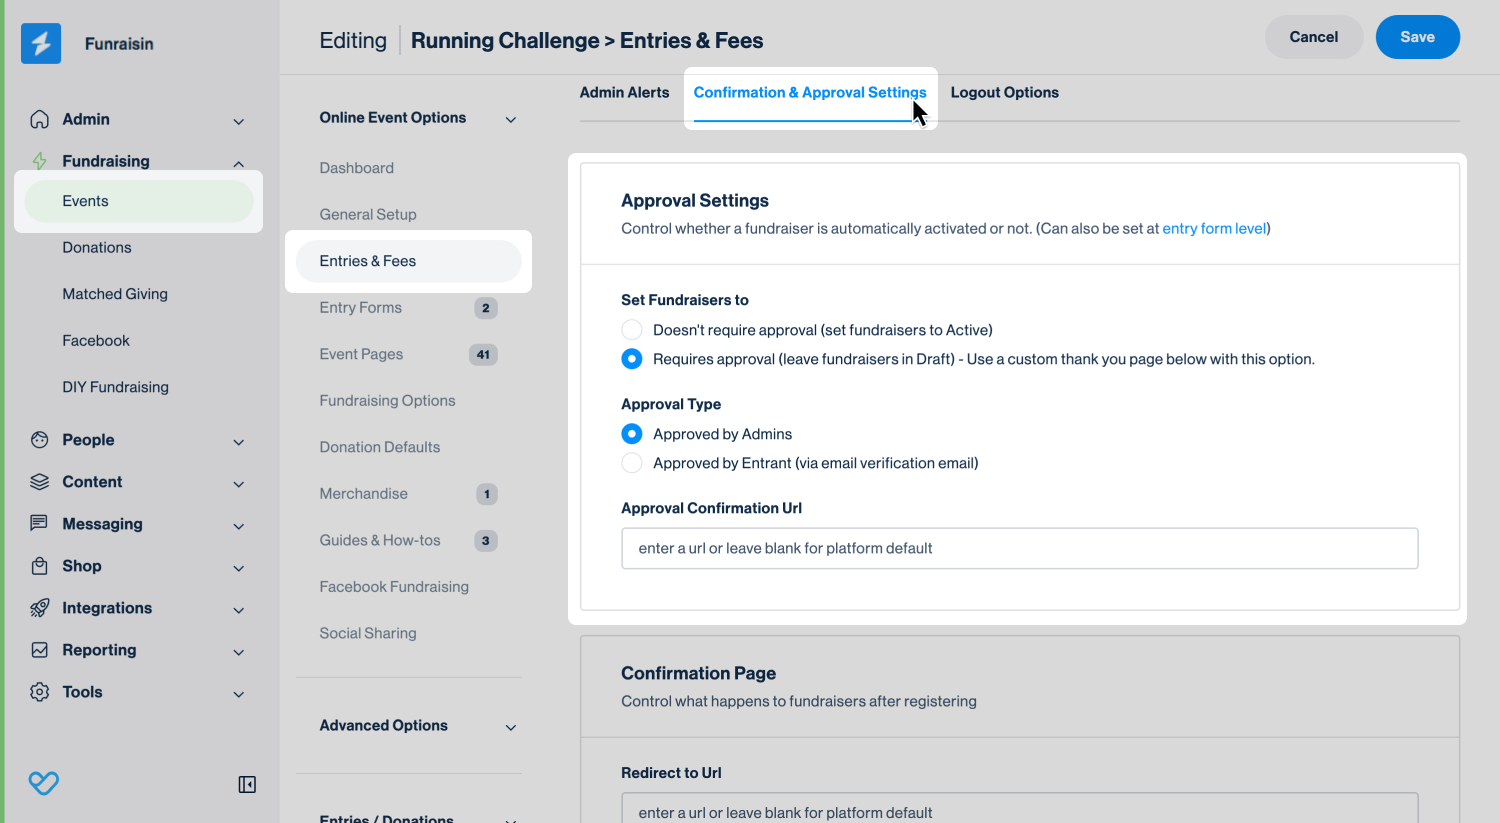
- Scroll down to the bottom of the page, then select the Confirmation & Approval Settings tab.
- 5
- In the Approval Settings section, under Set Fundraisers To, select Requires Approval.
- 6
- Under Approval Type, choose one of the following options:
-
- Approved by Admins
- Then, continue to the Confirmation Page settings (Step 7).
- Approved by Entrant
- Approval Confirmation URL: Add your approval confirmation page URL.
- Approved by Admins
- 7
- In the Confirmation Page settings, add your confirmation page URL to the Redirect to URL field.
Tip! For more information and best practices for confirmation redirects, see the Confirmation URLs and pages section of this article.
- 8
- (For Approve By Admins Only) Next go to the Admin Alerts tab. Tick Enable Alerts, then select the admin who should receive a notification each time someone registers.
- 9
- Click Save.
Online event registration form level
Follow these steps to enable entrant approval at the Online Event registration form level. At this level, only Approved by Admins is supported.
- 1
- Go to Fundraising, then select Events.
- 2
- Click the edit icon on the event you’d like to update.
- 3
- Under Online Event Options, go to Entries and Fees, then select the Individual, Team, or Organization tab.
- 4
- From the selected tab, scroll to the Admin Alerts section at the bottom of the page.
- 5
- Tick Enable Alerts, then select the admin who should receive a notification each time someone registers. The Admin Alert for Individuals applies to Teams and Organizations by default, but can be overridden on each individual tab if needed.
- 6
- Next, navigate to Entry Forms.
- 7
- Click the edit icon on the registration form you’d like to update.
- 8
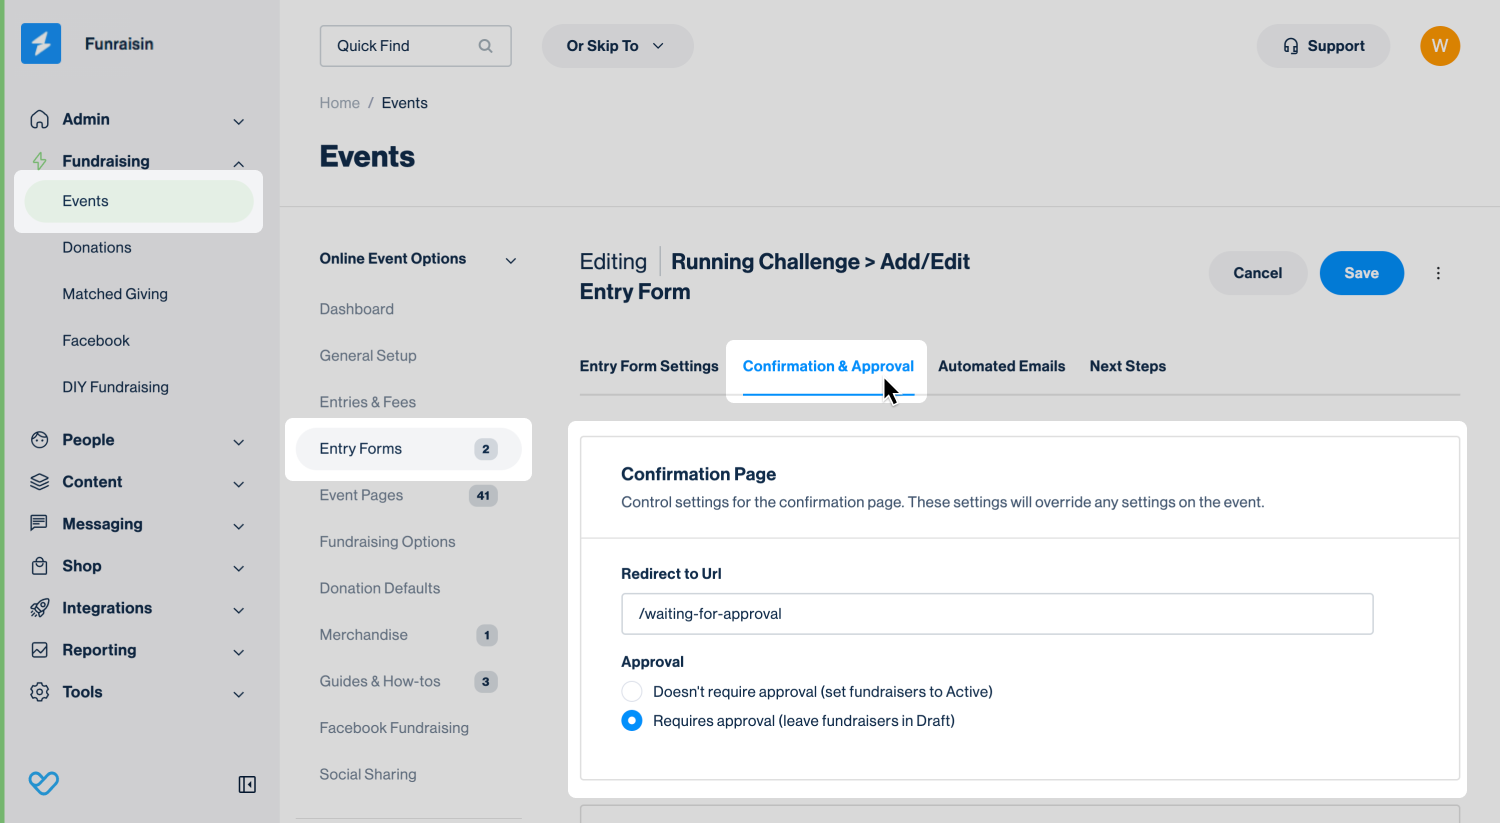
- Go to the Confirmation and Approval tab.
- 9
- In the Confirmation Page section, add a Redirect to URL.
- 10
- Change the Approval setting to Requires Approval.
- 11
- Click Save.
DIY Theme level
Follow these steps to enable entrant approval at the DIY Theme level.
- 1
- Go to Fundraising, then select DIY Fundraising.
- 2
- Click the edit icon on the theme you’d like to update.
- 3
- Under Theme Options, go to Theme Settings, then select the Theme Settings tab.
- 4
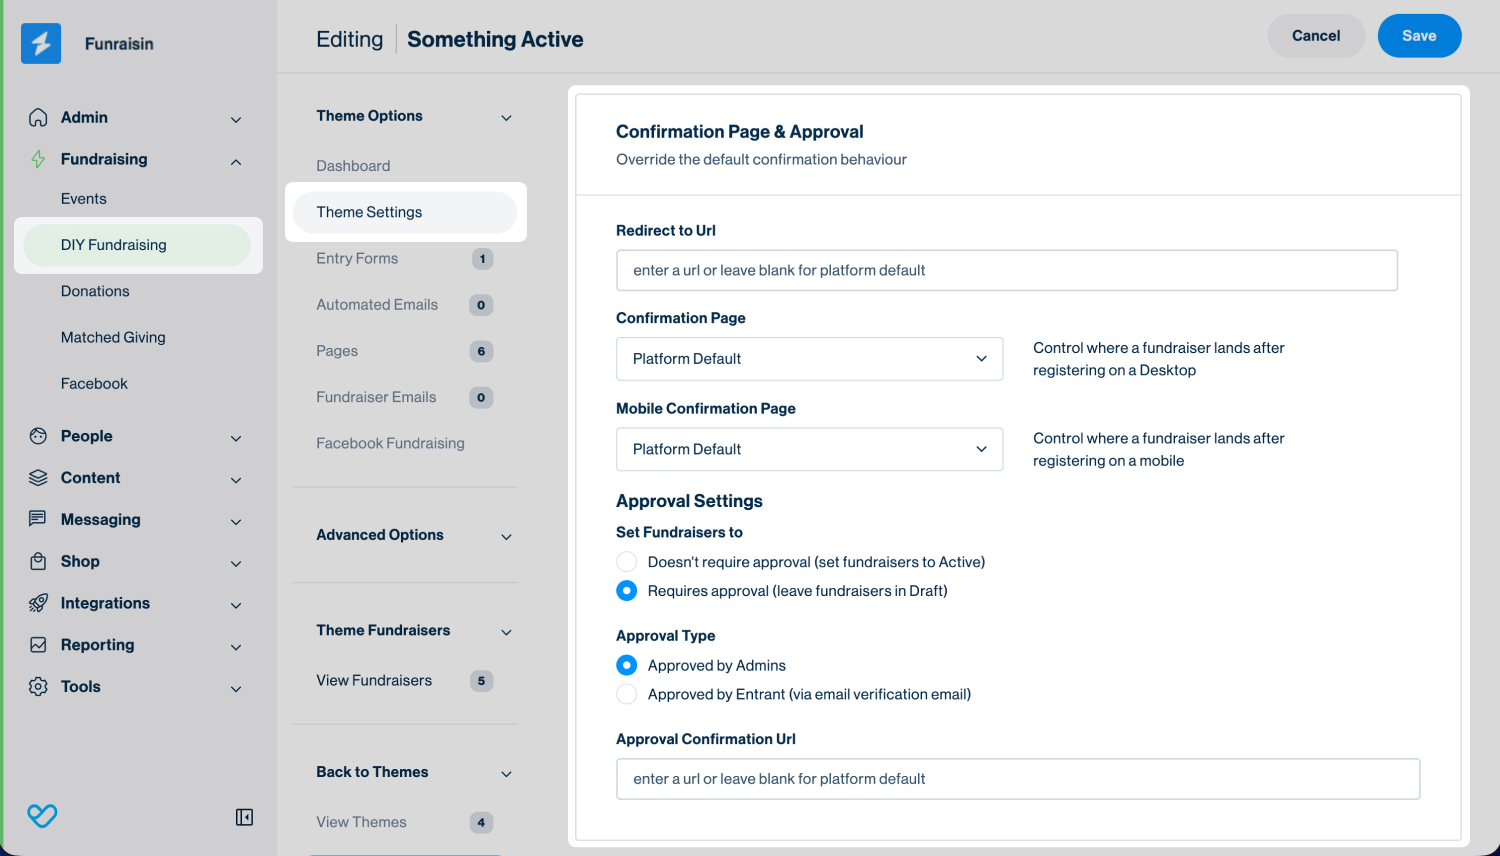
- Scroll to the Confirmation Page and Approval section.
- 5
- In the Confirmation Page settings, add your confirmation page URL to the Redirect to URL field.
- 6
- In the Approval Settings section, under Set Fundraisers To, select Requires Approval.
- 7
- Under Approval Type, choose one of the following options:
- Approved by Admins
- Approved by Entrant
- Approval Confirmation URL: Add your approval confirmation page URL.
- 8
- Click Save.
Approval emails
The automated emails sent when entrant approval is required can be configured and managed at the Platform level, Event level, DIY Theme level, or within Messages.
By default, the global (platform-level) email is used unless it has been overridden at the event or theme level. Any changes made to a global email are automatically applied to all events and themes that use that email.
For platforms with multiple Online Events or DIY Themes, it’s recommended to set up event-specific and DIY Theme–specific emails to ensure messaging is relevant to each campaign.
The sections below outline which transactional emails are used when entrant approval is enabled.
Online event emails
The following transactional emails are used for Online Events:
- Initial Account Confirmation: Sent to an entrant immediately after completing the first step of an event registration when the entrant is new to the platform. This email is not sent to returning participants or entrants who already have an entrant profile. This email can be disabled if required.
- Member Email Verification (Approved by Entrant only): Sent to the entrant immediately after completing event registration. This email contains the verification link used to activate their fundraising page.
- Registration Receipt
- Approved By Admins: Admins can choose to send this email when approving an entrant. If it is not selected, the email is not sent automatically.
- Approved By Entrant: Sent to the entrant after they’ve confirmed their registration via the email link.
- Admin Notification Email: Sent to notify an admin of a new registration requiring approval. This is a system email and can’t be edited.
DIY Theme emails
The following transactional emails are used for DIY Themes:
- Initial DIY Account Confirmation: Sent to an entrant immediately after completing the first step of an event registration when the entrant is new to the platform. This email is not sent to returning participants or entrants who already have an entrant profile. This email can be disabled if required.
- Member Email Verification (Approved By Entrant only): Sent to the entrant immediately after completing registration. This email contains the verification link used to activate their fundraising page.
- Registration Receipt
- Approved by Admins: Admins can choose to send this email when approving an entrant. If it is not selected, the email is not sent automatically.
- Approved by Entrant: Sent to the entrant after they’ve confirmed their registration via the email link.
- New DIY Event: Sent to an admin to notify them of a new DIY registration requiring approval.
Approving entrants
When Approved by Admins is required, an admin must manually approve each registration. Below outlines the approval process for Online Events and DIY Events:
To approve Online Event entrants:
- 1
- Use the Quick Find bar at the top of the platform admin to find the entrant by name or email address.
- 2
- Click the edit icon to open the entrant’s profile.
- 3
- Under Entrant Options, go to Events, then click the edit icon on the event you’d like to approve.
- 4
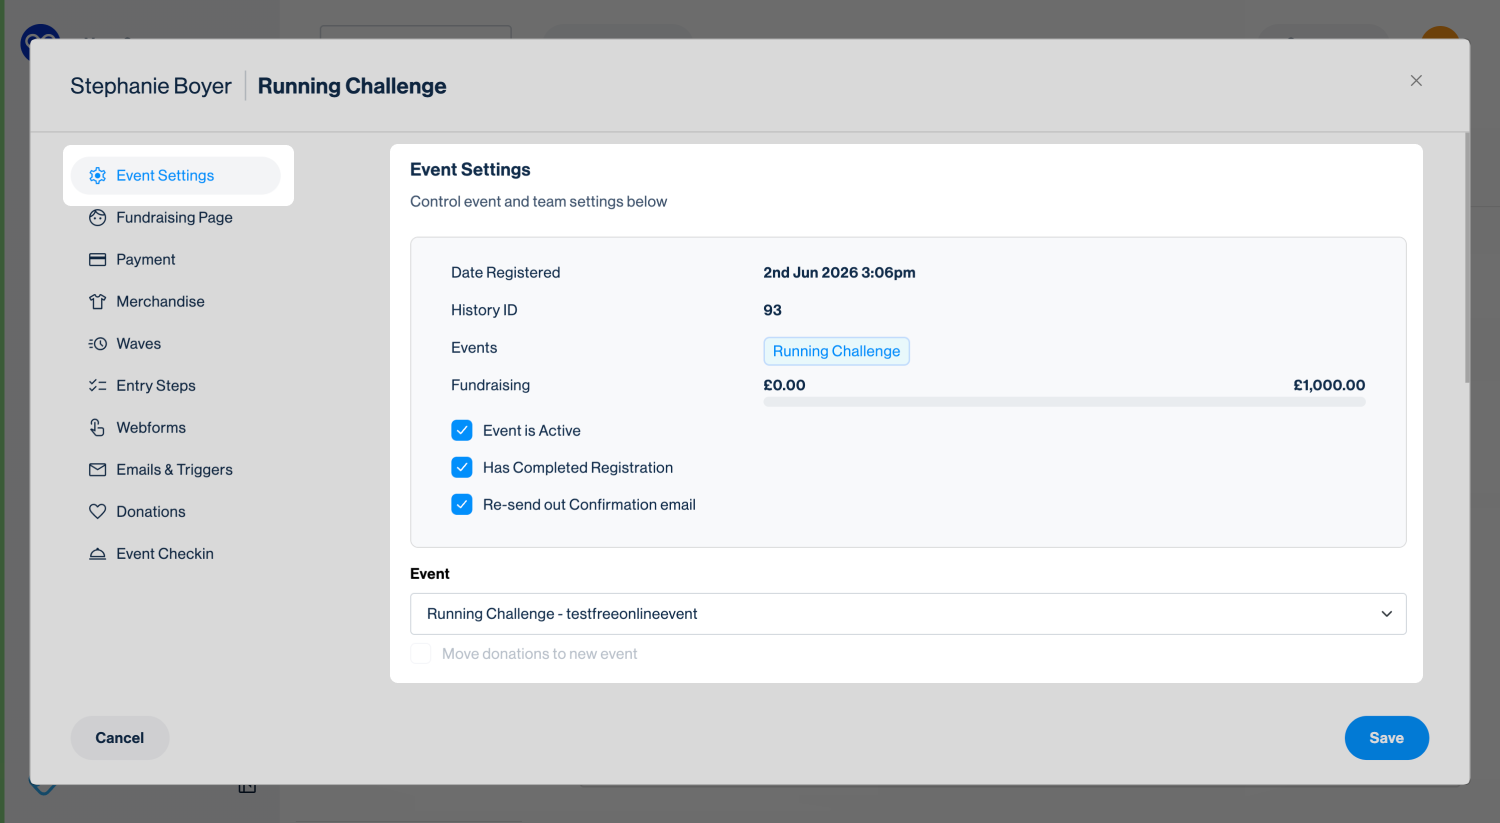
- In Event Settings, tick the following options:
- Event is Active: activates the entrant’s fundraising page or DIY Event page.
- Re-send Confirmation Email: sends the Registration Receipt (Welcome) email.
- 5
- Click Save.
To approve DIY Event entrants:
- 1
- In the side navigation, go to Fundraising, then Events, and select View DIY Events.
- 2
- Click the edit icon on the DIY Event you’d like to approve.
- 3
- Go to Event Details and change the Event Status to Live.
- 4
- Ensure Publish All Fundraising Pages and Send Confirmation Email are ticked.
- 5
- Click Save.
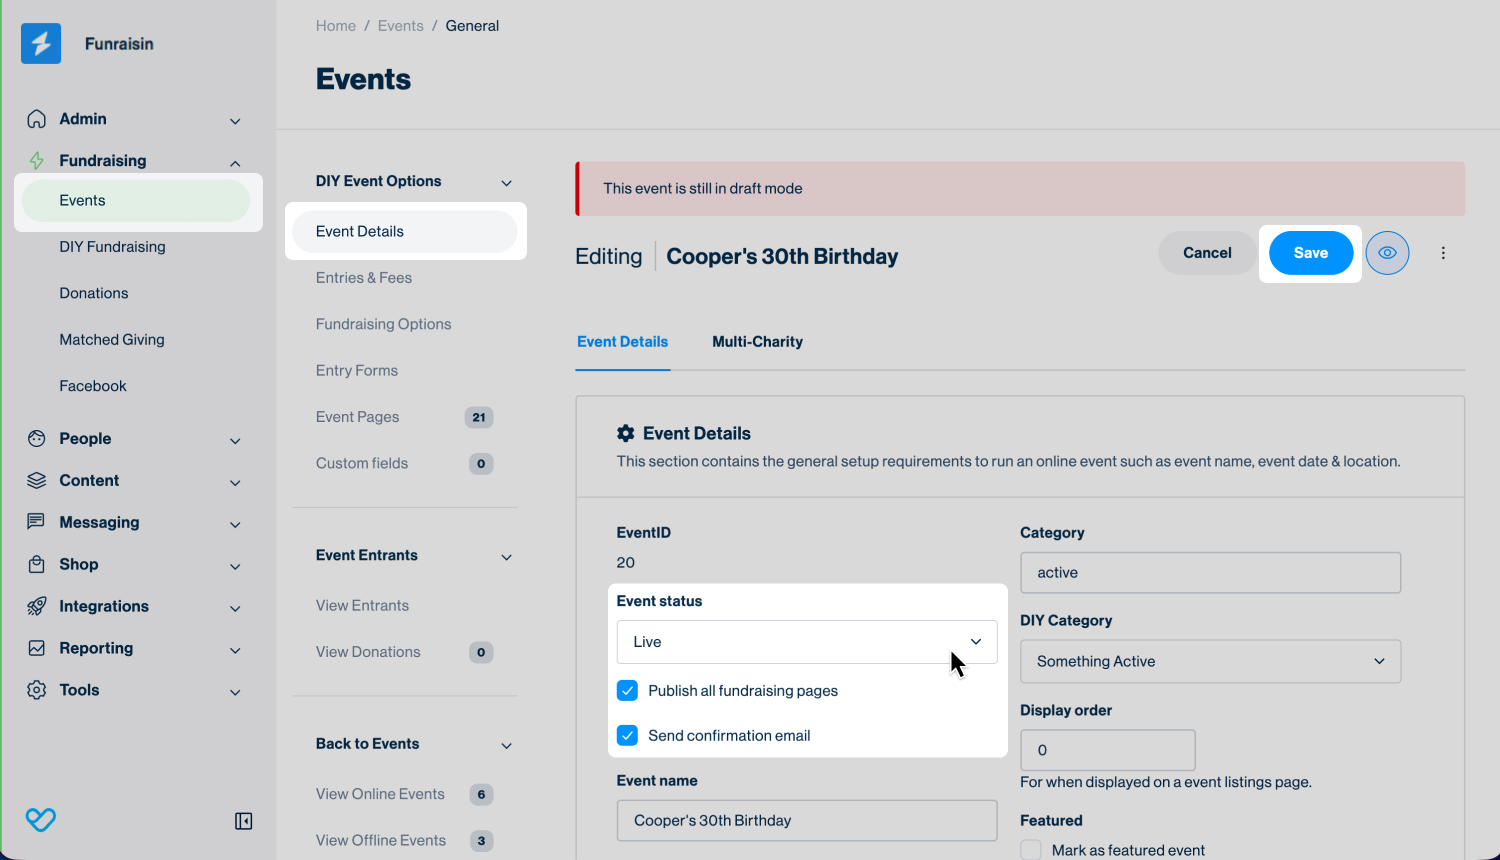
The above steps will set the DIY event fundraising page to Active.
Still need help? Check out our other Event support articles or reach out to the Funraisin Support team by logging a ticket through the Support Module in your platform.
Last updated: 14 Oct 2026
