

Donations: Donation Modal
For many organizations, maintaining a seamless supporter experience across their main website and fundraising activity is an important consideration. In some campaigns, directing supporters to a dedicated Funraisin donation page provides a focused, purpose-built environment for giving. In others, keeping the donation experience within an existing brand site can help maintain visual continuity and messaging at a key moment of intent.
When maintaining that on-site experience is the priority, a Donation Modal offers a way to do this without compromising on security, reporting, or platform functionality. It allows the donation form to appear directly within an external website, while still using Funraisin’s secure payment and reporting infrastructure behind the scenes.
This article explains how Donation Modals work, how payment behavior is managed, and how to create, customize, embed, and report on a Donation Modal within the platform.
What is a Donation Modal?
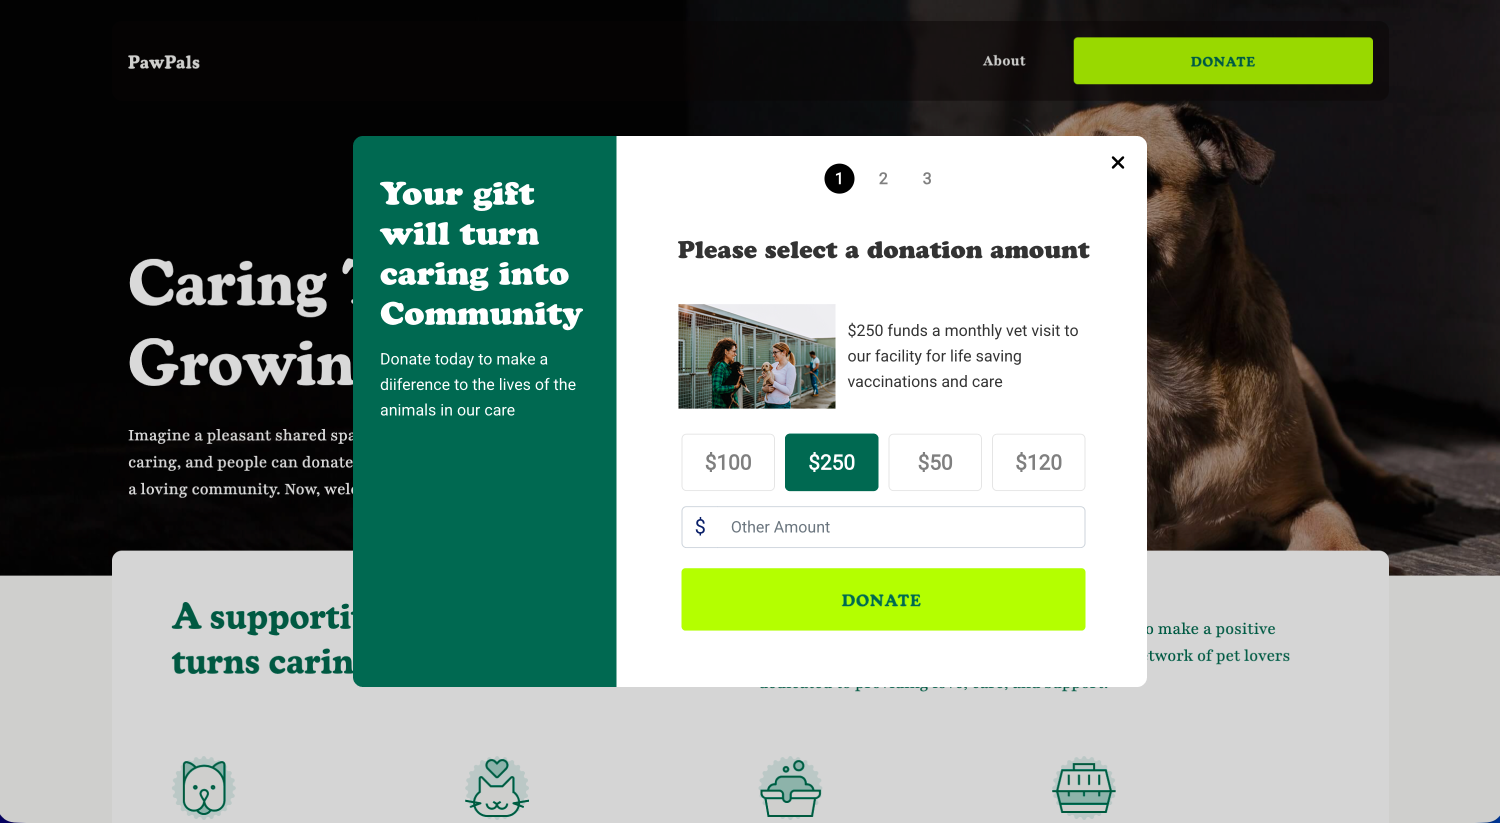
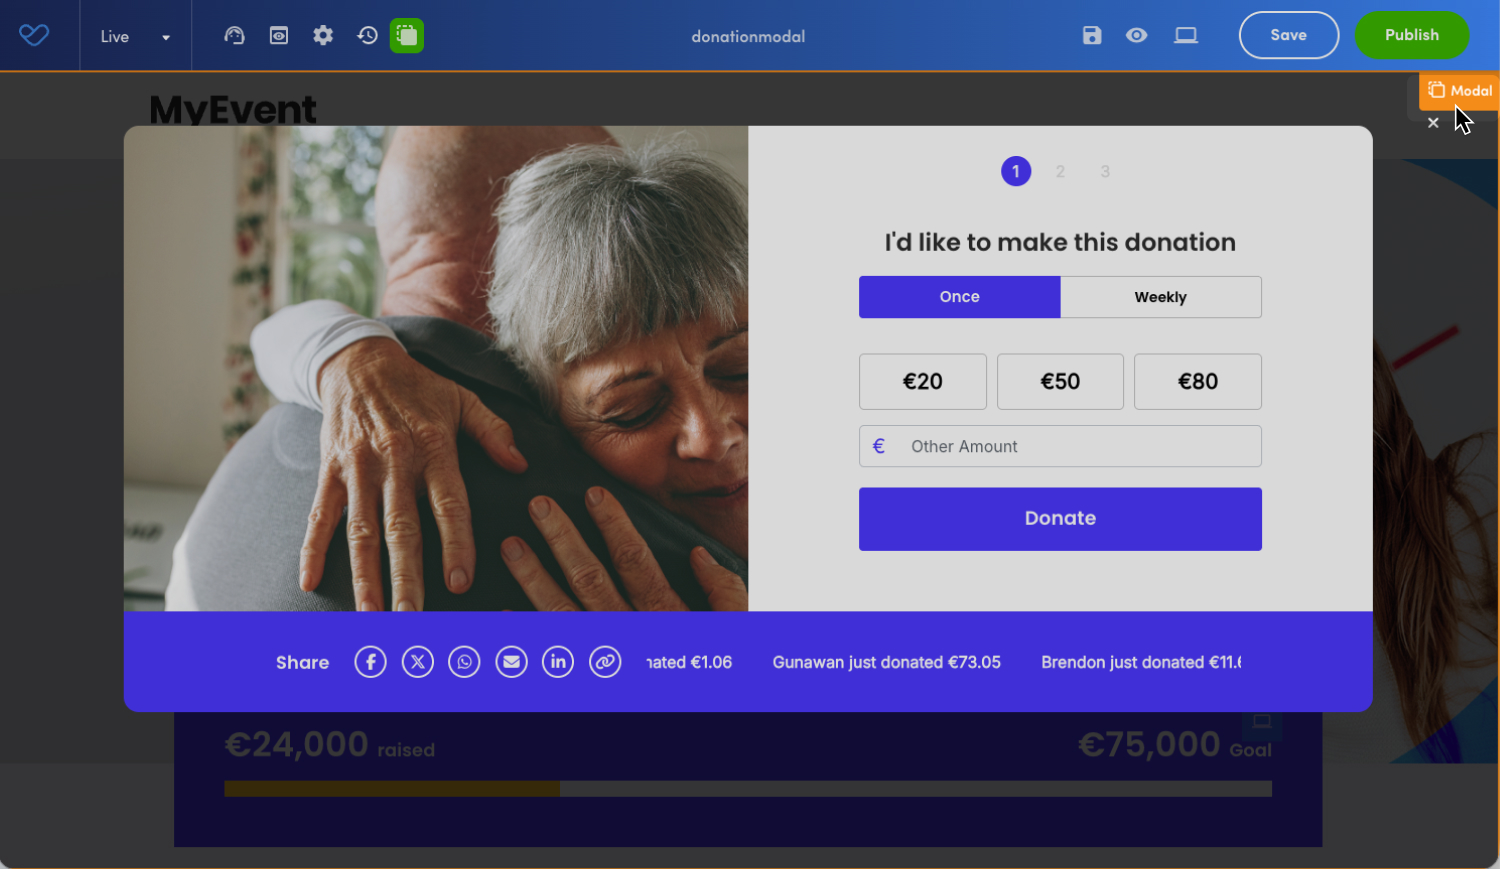
A Donation Modal allows you to embed a Funraisin-powered donation form directly on an external website, such as your organization’s main brand site.
Instead of directing supporters to a separate donation page, the form opens in a modal window over the existing page. This allows supporters to complete their donation without leaving your website, helping maintain brand continuity and reduce disruption in the giving experience.
The modal can be styled and configured to align with your branding and campaign messaging, including donation amounts, recurring options, form fields, imagery, and content. You can also incorporate dynamic elements such as progress bars or scrolling tickers to reflect campaign momentum in real time.
How a Donation Modal works
The Donation Modal is created from a standard donation page within the platform and configured using Visual Builder. In the page settings, Modal Mode can be enabled to display the page as an overlay instead of a standalone webpage.

Once the page is created, an embed code becomes available. This code can be copied and added to an external website.
Tip! The page must be published before the modal will function on the external site.
When added to a site, a Donate button is displayed. Selecting the button opens the donation form as an overlay on the same page.
After a donation is completed, a confirmation message is displayed and a receipt is sent to the donor. A copy of the receipt is also available to download from the confirmation window. The supporter can then close the modal and continue browsing the website.
A donation record is created and is available within standard reporting. Donations processed through the modal are attributed to the specific donation page it was created from, allowing you to report on and measure the performance of that modal page.
Payment Options
The Donation Modal uses the platform’s Stripe payment gateway. Available payment methods depend on the Stripe integration configured on the platform and the payment options enabled within the connected Stripe account.
If Stripe Elements is enabled, the full donation experience, including confirmation, takes place within the modal.
If Stripe JS is enabled, the confirmation step redirects the supporter to the standalone donation page rather than remaining within the modal.
Supported payment methods may include:
- Card payments
- Link
- Apple Pay
- Google Pay
- Direct Debit
The following payment methods are not currently supported within a Donation Modal:
- PayPal
- Venmo
- DAFpay
- iDEAL
- EFT
If these payment methods are required, a standard donation page should be used instead of a Donation Modal.
Tip! Availability of Apple Pay, Google Pay, and Direct Debit may vary depending on browser, device, and Stripe configuration. Additionally, if you are unsure which Stripe integration is in use on your platform, reach out to the Funraisin support team via the Support module in your platform.
Creating a Donation Modal
A Donation Modal is created from a standard donation page within Visual Builder. Once your page is configured, you can enable Modal Mode to display it as a modal on an external website or any content page on your Funraisin platform.
To create a Donation Modal:
- 1
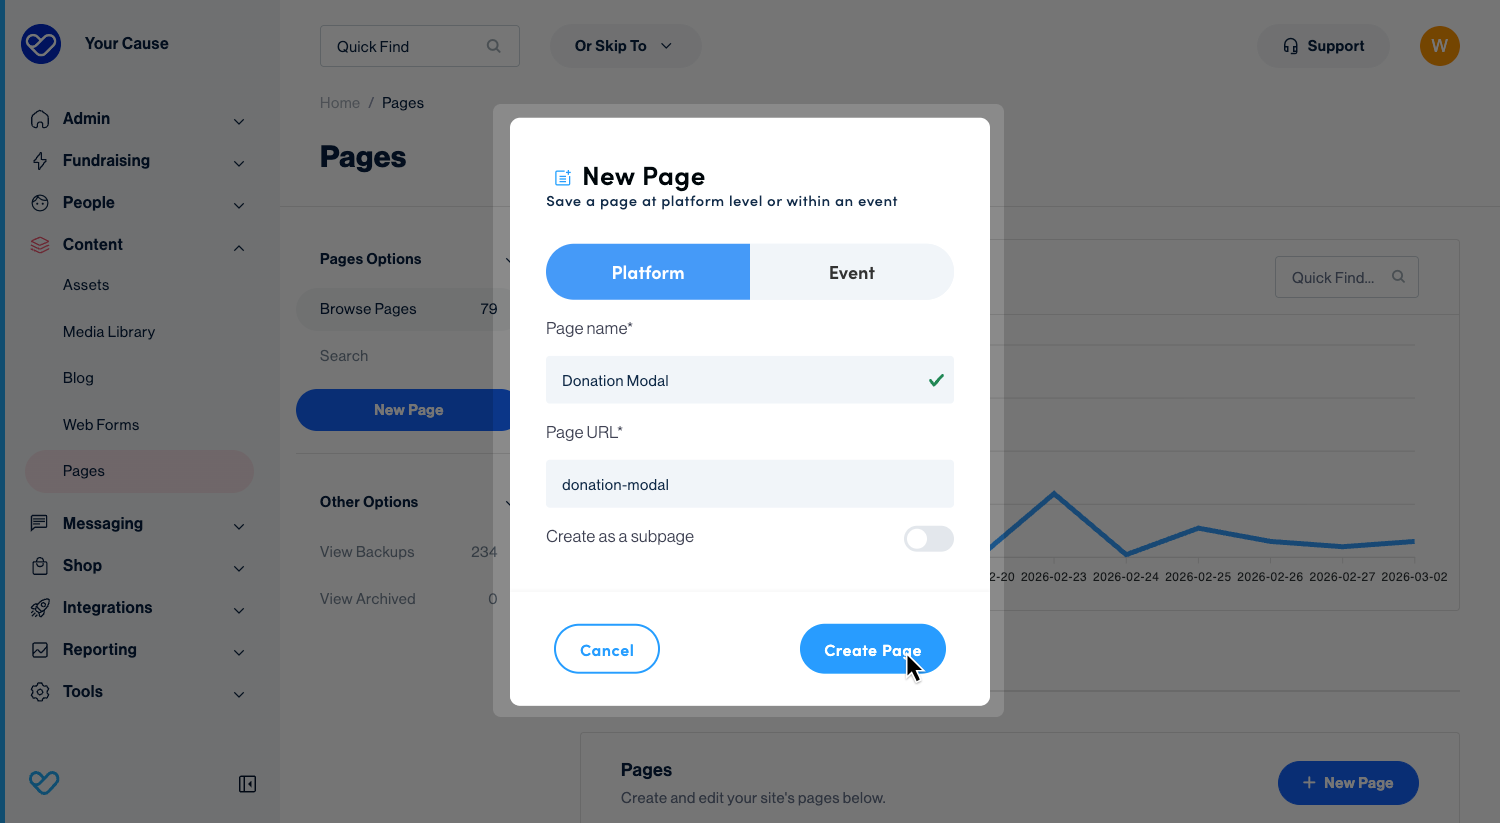
- In the side navigation, go to Content, then select Pages.
- 2
- Click New Page
- 3
- From the New Page pop up, choose blank page
- 4
- Add a page name. The page URL will automatically populate based on the page name, but this can be overridden if needed
- 5
- Click Create Page
- 6
- Within the Visual Builder view of your new page, hover over the page and click the green + to add a new Section
- 7
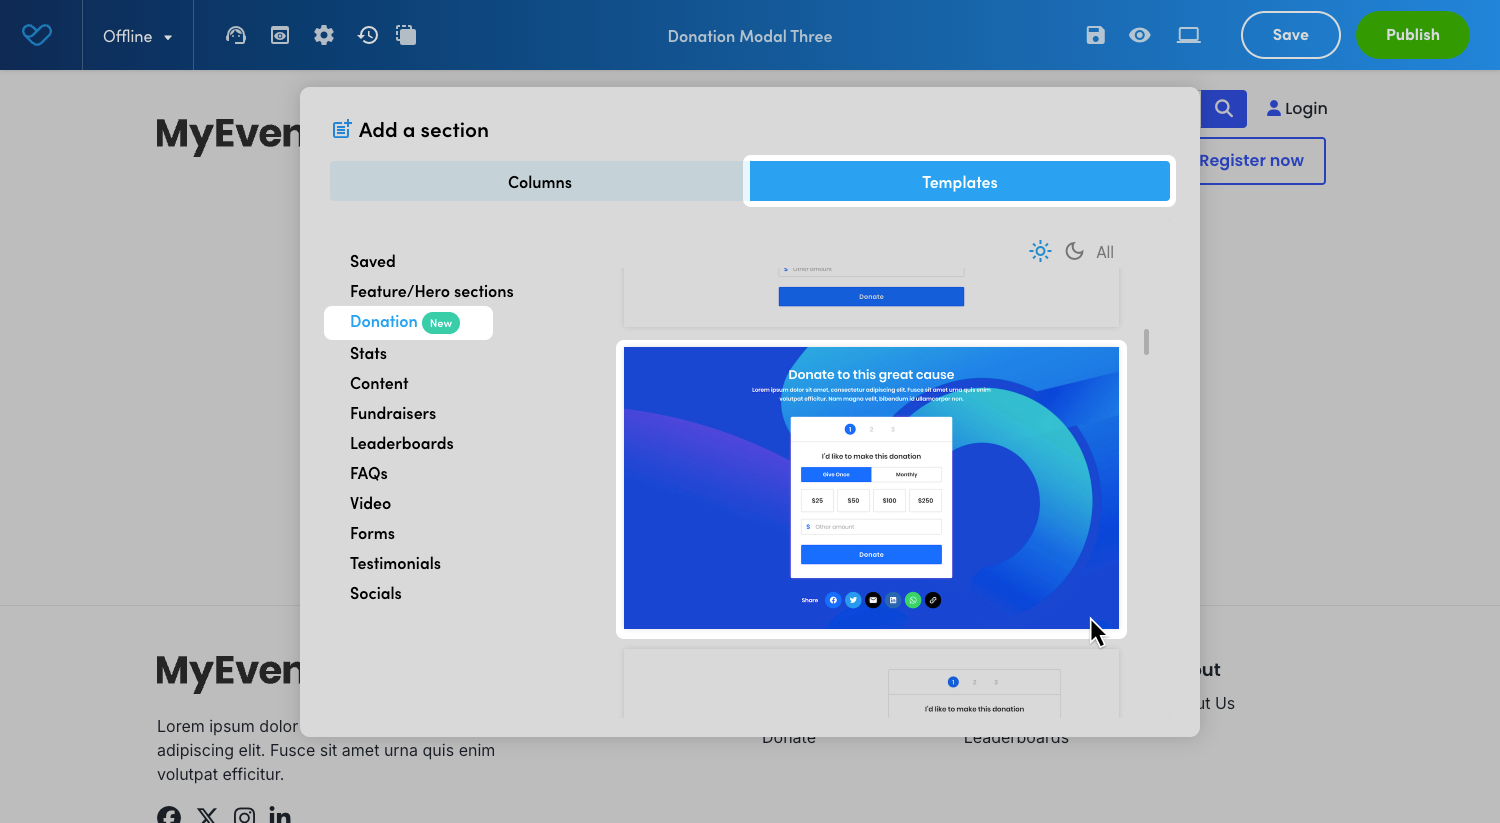
- To add a templated donation block:
- Click the Template tab
- Select Donation from the templates list to view available layouts
- Click the blue + on the template you want to use
- Click Save
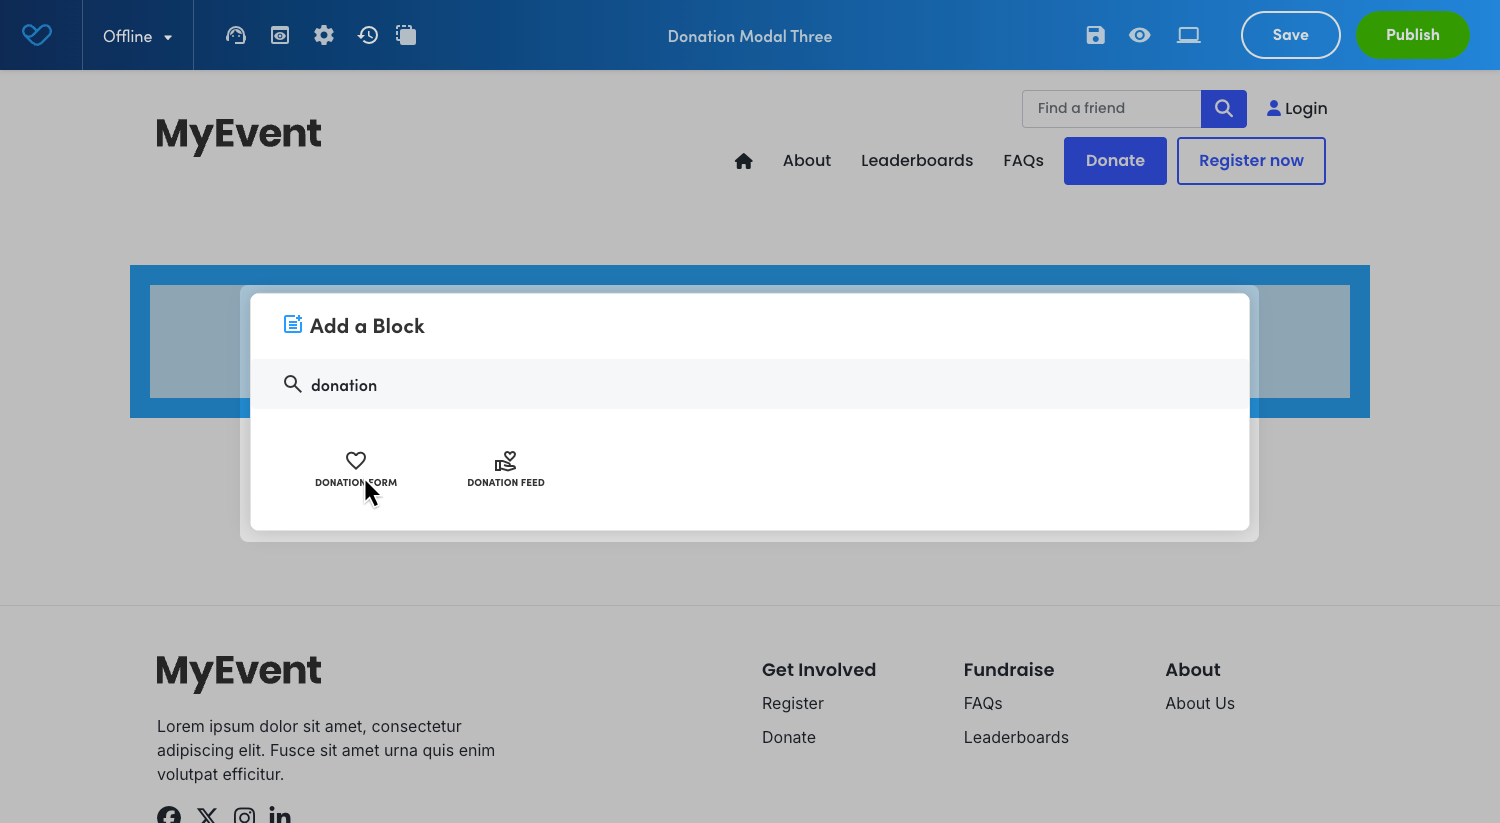
- Select your desired column layout
- Hover over the new column, click the blue +, and select the Donation Form block from the available Content block options
- Click Save
- 8
- From the Visual Builder toolbar, click the Modal Mode icon. This changes the page to a modal format
- 9
- Proceed to edit and customize your donation form and content as desired
- 10
- When ready, click Save, then Publish
Tip! You can deactivate the Header row on your new page by editing the header section and toggling Display Header > Off. By default header rows will not display in your final Donation Modal.
When in Modal Mode, use the Modal Mode icon in the Visual Builder toolbar to switch back to the standard page view.
An embed code is available as soon as the page is created. The page must be published before the modal will function.
Troubleshooting: If the modal isn’t displaying correctly, go to the admin view of the modal page and open Page Settings. In the Navigation & Display Options section, check that Display in lightbox is selected. If it isn’t, tick the checkbox, then click Save and Publish.
Customizing a Donation Modal
Once Modal Mode is enabled, you can adjust both the modal appearance and the donation form settings to match your branding and campaign needs.
Customization is managed through modal styling settings, donation form settings, and standard Visual Builder controls.
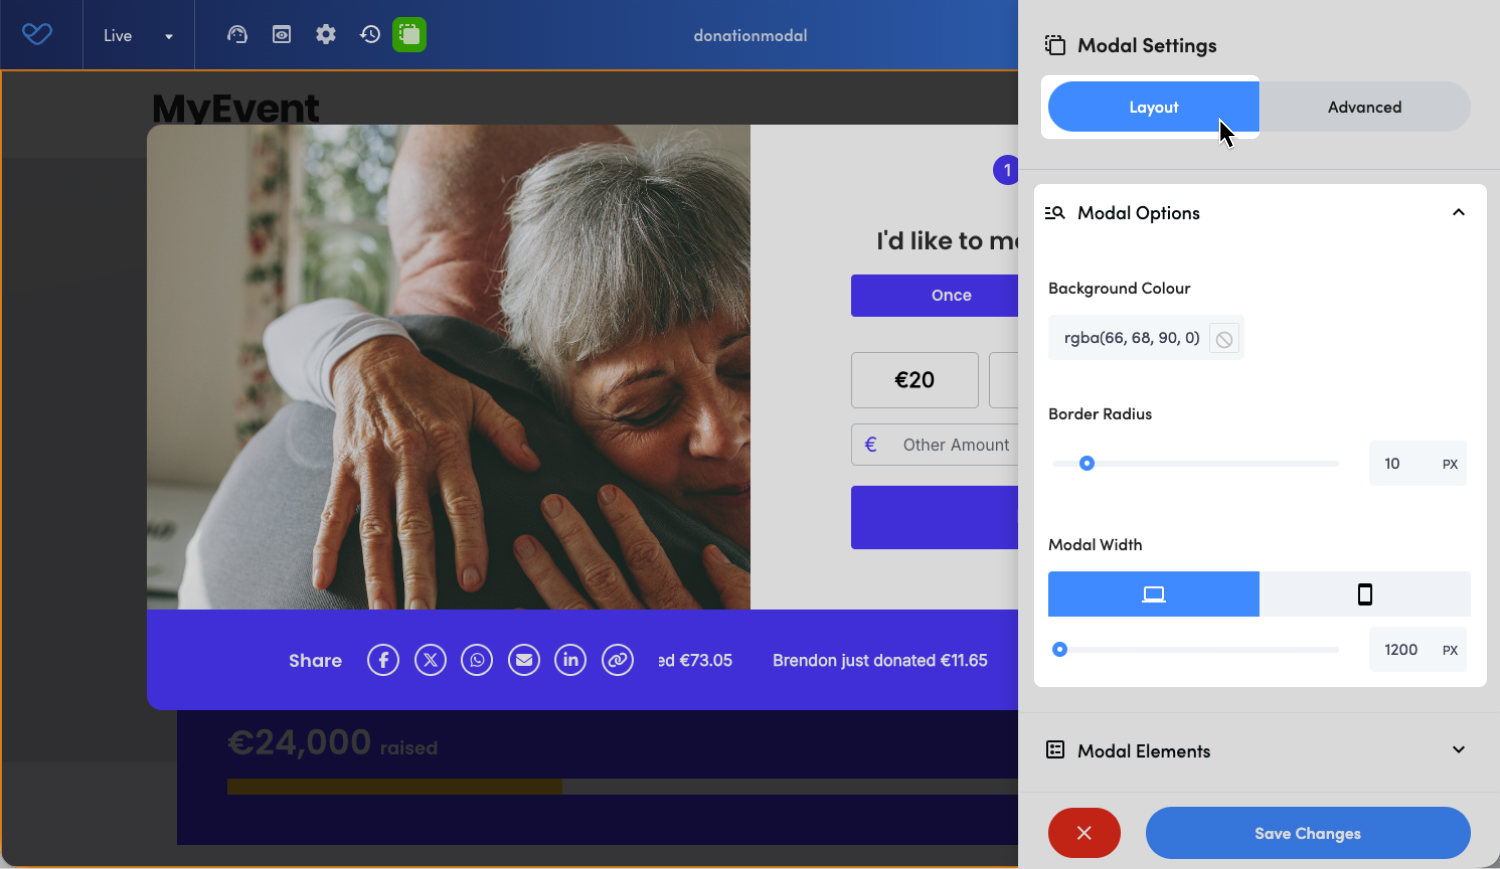
Modal Styling Settings
The modal settings allow you to configure the appearance and structure of the modal window.
To access the settings, when in Modal Mode, click the orange Modal edit icon in the top-right corner to open the modal settings.
Layout Tab:
- Modal Options:
- Background Color: Sets the background color of the modal.
- Border Radius: Controls how rounded the corners of the modal appear.
- Modal Width: Defines the width of the modal window. Use the desktop/mobile toggle to set different widths for each device type.
- Modal Elements:
- Close Button Position: Determines where the close button appears within the modal.
- Inside Modal: Displays the close button inside the modal container.
- Outside Modal: Displays the close button outside the modal container.
- Close Button Color: Sets the color of the close button icon.
- Close Button Position: Determines where the close button appears within the modal.
Donation Form Settings
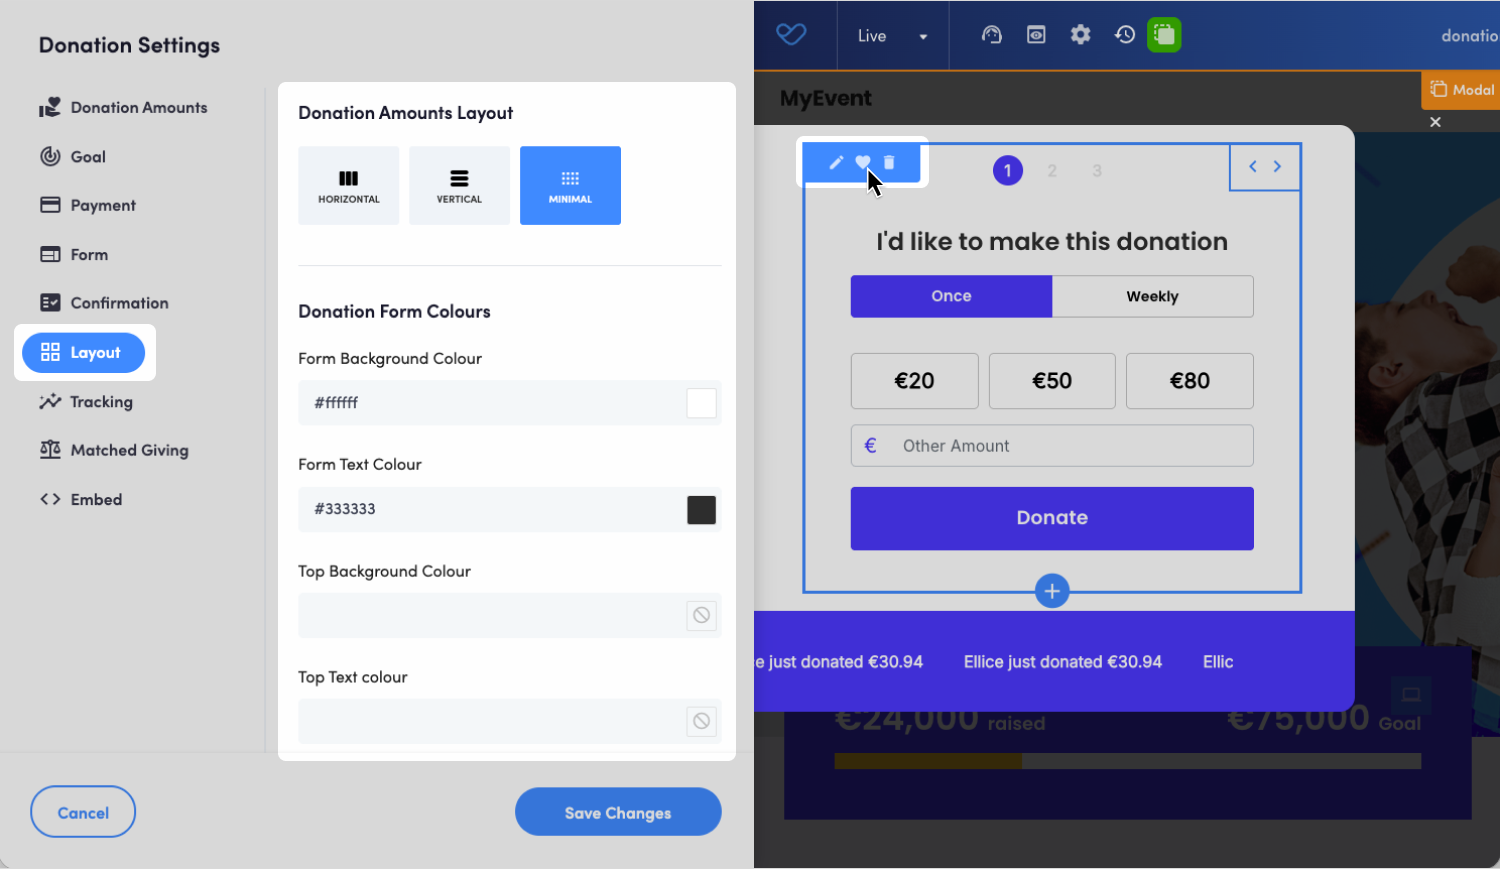
The Donation Form block within the modal can be configured in the same way as any standard donation page. To access the Donation form settings, hover over the donation block, then click the Heart Icon.
Most standard form options are compatible with Modal Mode, including:
- Donation amounts
- Recurring options
- Form fields
- Imagery and content
- eCards
For more information on Donation Form settings, see the support article: Donations: Donation Form Settings.
Tip! For North American platforms, Double the Donation is not available within a Donation Modal.
Visual Builder Styling
You can use standard Visual Builder tools to style the content and layout within the modal, just as you would on any other content page.
All block elements can be added and styled normally, allowing you to incorporate headings, text, images, and other content around the donation form.
Embedding a Donation Modal
Once your donation page is published with Modal Mode enabled, you can access the embed code and add it to your website.
To embed a Donation Modal:
- 1
- In Funraisin, open the published donation page in Visual Builder and ensure Modal Mode is enabled.
- 2
- Click the orange Modal edit icon in the top-right corner to open the modal settings.
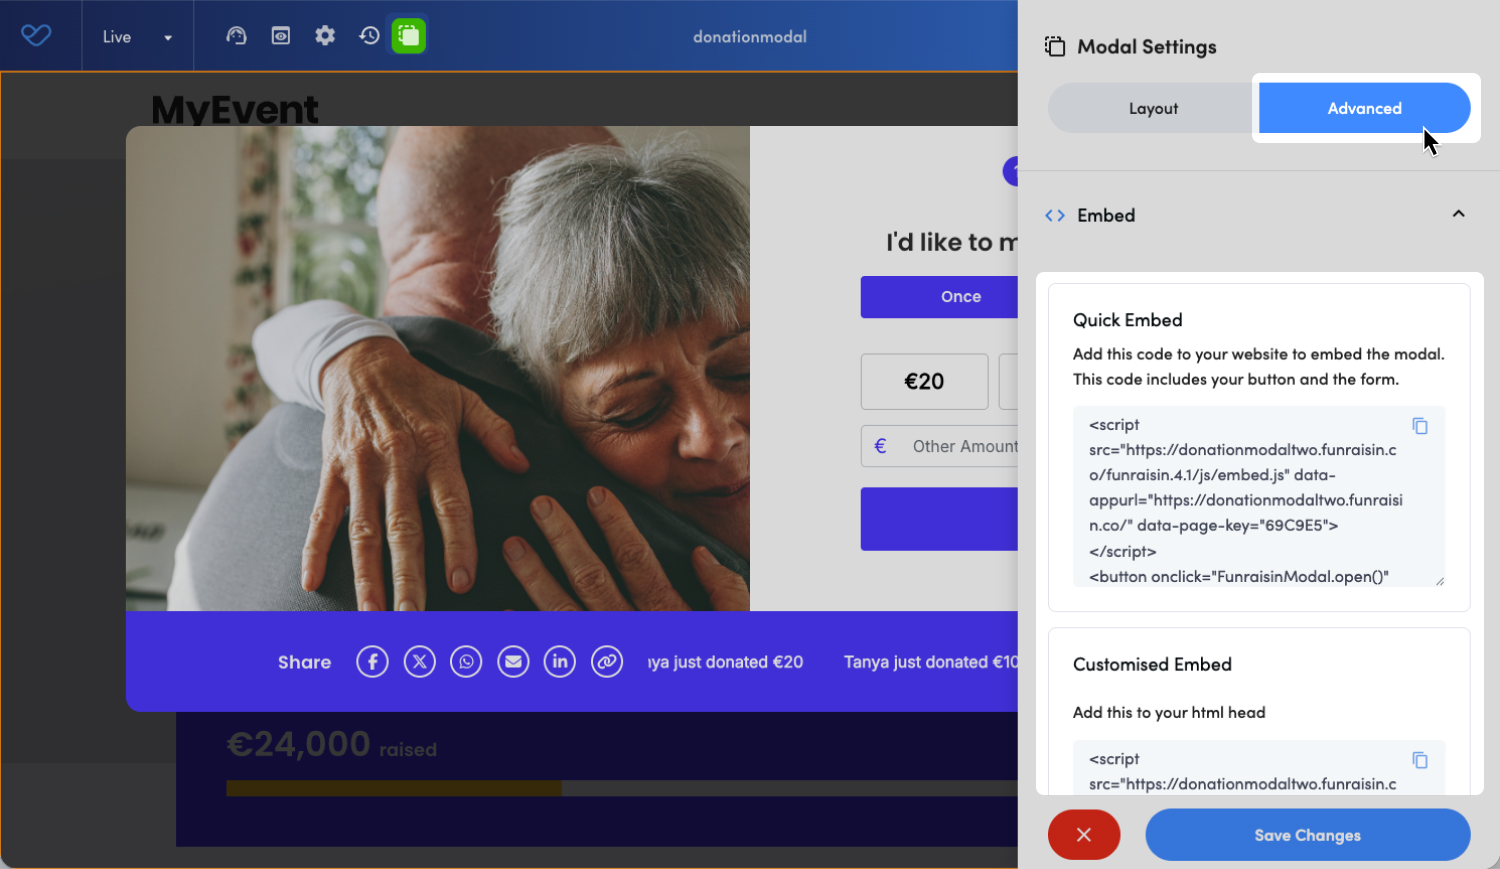
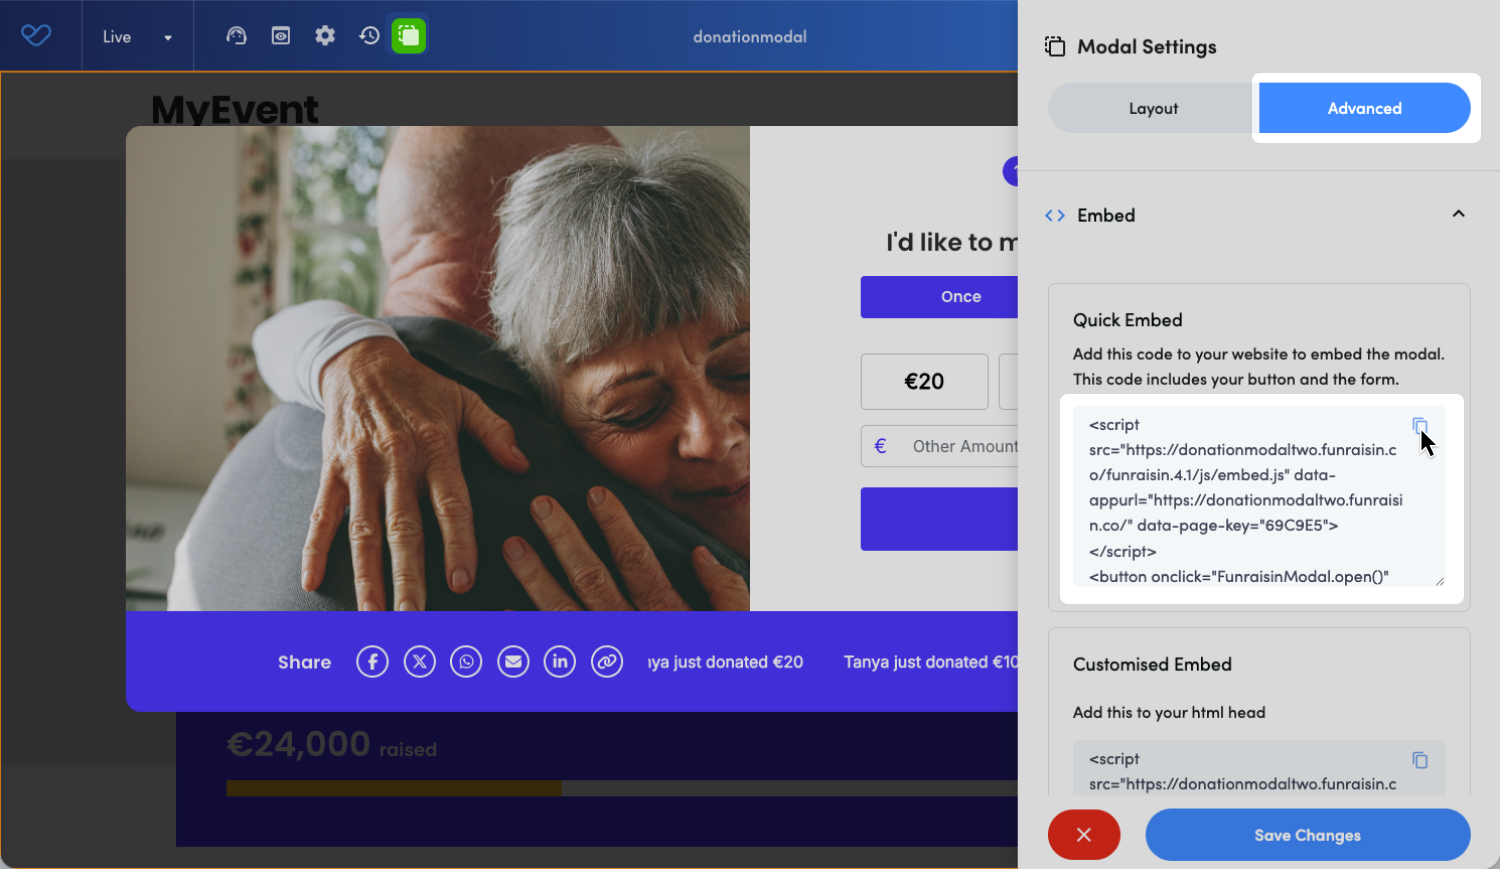
- 3
- Select the Advanced tab. This displays two embed type options:
-
- Quick Embed: Includes both the Donate button and the modal form within a single code snippet. This option is recommended if you want a simple setup with minimal customization.
- Customised Embed: Provides separate code for the Donate button and the modal form. This option is useful if you want to style or position the button independently within your website layout.
- 4
- Choose the embed type you would like to use and click the copy icon to copy the embed code.
- 5
- Add the embed code to the external website where you would like the Donate button to appear.
Depending on how the external site is built, the code may be added to a code block or directly into the site’s HTML. If you do not have access to edit the site’s code, you may need assistance from your web developer.
Once added, selecting the Donate button will open the donation form as a modal overlay on the page.
Updating An Embedded Modal
If you make changes to the donation page in Visual Builder, simply click Save and Publish.
The embedded modal will automatically reflect the latest published version. The embed code does not need to be updated or re-added to your website.
Customizing the Modal Button Styling
When adding the modal to an external site, the appearance of the modal trigger button can be customized to align with existing website styling, if required.
There are two recommended approaches:
- Option 1: Use the Customized Embed (Recommended): Apply existing website button styles and link the button to the donation modal. This approach provides greater flexibility and ensures consistency with the overall site design.
- Option 2: Modify the Button Class in the Quick Embed: Update the class attribute in the embed code after it has been copied to the website. This allows the button to inherit existing CSS styles.
Note: When embedding on an external site, the embed code must first be copied from Funraisin. Styling changes should then be applied within the website’s codebase. Changes cannot be made or saved within the Funraisin modal interface.
Troubleshooting Styling Issues
If button styling is not applying as expected, check the following:
- The site’s CSS is targeting the correct class
- Required attributes (such as onclick) have not been removed
If the modal does not open, revert to the original embed code and reapply styling changes carefully.
Confirmation and Receipting
After a donation is completed through the modal, supporters will see a confirmation message and receive an email receipt. Both the on-screen confirmation and the email experience can be customized.
By default, the transactional (automated) confirmation email sent depends on the donation type:
- One-time and first recurring donation: Receipt to Generic Donor
- Direct Debit donation: Direct Debit Donation
Transactional (automated) emails can be managedand updated in either the Messages Module or Automated Emails at platform level.
Customizing the confirmation screen and email
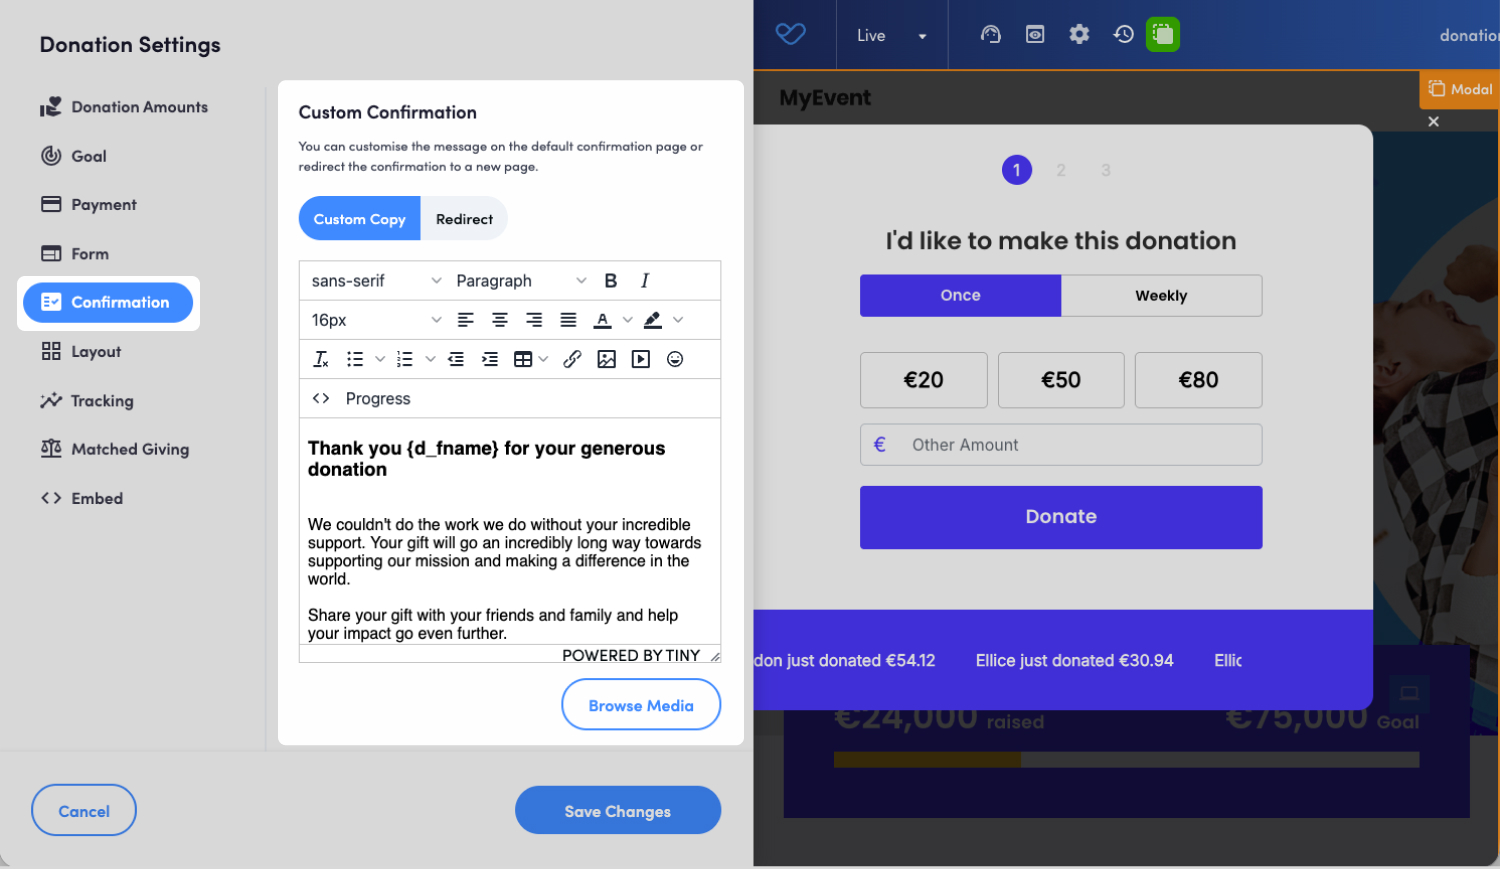
The confirmation screen message and thank you email can be customized within the Donation Form settings.
To customize the confirmation screen text or email:
- 1
- In Funraisin, open the published donation page in Visual Builder.
- 2
- Hover over the Donation Form block and click the Heart icon to open the donation form settings.
- 3
- Go to Confirmation. From here, you can:
-
- Add custom copy to the Custom Confirmation section to update the on-screen thank you message.
- Toggle on Custom Thank You Email. When the custom thank you email is enabled:
- The custom email will override the default Transactional (Automated) email.
- Select the email template.
- Add a subject line.
- Add customized email content.
The thank you email will include a copy of the donation receipt as an attachment.
- 4
- Click Save Changes.
- 5
- Click Publish to apply your updates.
Reporting
Donations processed through a Donation Modal are recorded and reported in the platform in the same way as standard donation page transactions.
These donations can be reported on using the Transaction and Donations data source types.
Still need help? Check out our other Donations support articles or reach out to the Funraisin Support team by logging a ticket through the Support Module in your platform.
Last updated: 14 Jul 2026
