

Fundraising dashboards
Customise the logged-in dashboard your entrants interact with from within their fundraising page.
What is it?
The dashboard is the logged-in area of your fundraising pages that your fundraisers, team captains and organisation captains can access. From the dashboard, fundraisers can update their details, manage donations, log their fitness and more.
Who is it most useful for?
Events where you'd like to provide more information or assets for fundraisers to interact with, but behind a logged-in area.
You may have your event up and running already, be planning your next event or are in the process of setting one up and want to add some unique user experiences within the entrant dashboard.
The general uses for custom dashboards we see are to:
- Display leaderboards for the event
- Display important messages
- Allow the entrants to edit webform submissions
- Ask additional questions after registration
- Provide assets and resources to download
This support article will cover:
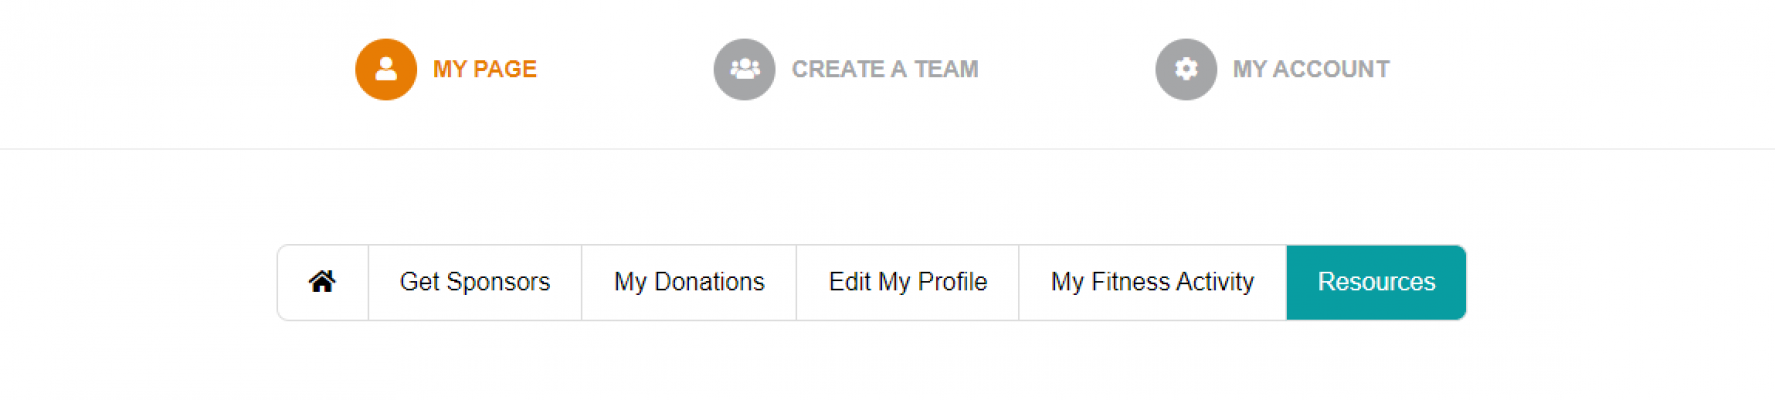
Below is an example of how the dashboard looks, with the individual pages defined along the top. Home, Get Support, My Donations and Edit my Page are default, but more pages can be added for a more personalised experience.
Understanding event pages
When within your event, click on the Event Pages button within the white middle navigation area. This will display all your event specific pages, but split into three sections.

Public Pages
These are event pages that anyone can see like the home page and event-specific donation pages.

Non-public pages
These are the pages that require the fundraiser to be logged in to see and are accessible from the fundraiser's dashboard. These will be set to a certain login type (Member or Team), these determine if they appear in the individual's dashboard or the team dashboard respectively.

System Pages
These are the pages relating to the functionality of the event such as for the registration flows, donations etc. We suggest not editing these as these are used for the functionality of the platform.

Viewing dashboard pages
To view a non-public page/dashbaord page you will need to log in as an entrant. Head to any fundraisers account currently active in your event and click the Login as this user button.

Now logged in, you can view the pages accessible via the dashboard. In order for a non-public page to appear in the dashboard, it has to have a navigation setting enabled, Display in sub nav. Edit the page and navigate to:
Settings (tab along the top) > Navigation & Display Options (second section in the page) > Tick Yes, Display on sub-nav > Save > Publish.
If the page does not appear within the dashboard, then you can still view it before making it available in the dashboard. The URL will be in this format:{site url}/login/view/{page url}.

Adding Content to Existing Pages
As we are wanting to add to the fundraiser's dashboard, we will be editing the Non-Public Pages. Let's add a message for the fundraisers to see once they log in by editing the Fundraiser Dashboard Homepage. This is the first page the entrant sees when they log in.

When you are editing any of the event pages, you will notice it looks like Classic Builder, so you are likely familiar with the process of adding content to the page.
Note that any content you add to pre-existing Non-Public Pages will sit above the systems template content that supports additional content.
Since we are adding a message to all fundraisers, let's put in a text block by clicking the text block row preset, edit the content to have the message you want to display, for demonstration purposes, we will put a welcome message. Save the update and hit Publish.

Adding New Pages
We will now add a new page to the fundraiser's dashboard. You may want to add a resources page for your entrants to download assets or have a webform that you used in the registration for your event you want entrants to be able to adjust afterward.
For this support article, we will show how to create a resources page for fundraisers to download assets such as posters or email signatures.
Head back to your event pages and scroll to the Non-Public pages section. Towards the top right is a blue + Add Non-Public Page button, click on it to start creating your new page.

When you create a new page, you will need to define the below settings -
Page Status: Set to live
Page Name: Give your new page a name
Page URL: Set a URL for this page
Page Type: Non-Public Page (login area only)
Protected Type: Choose whether it appears for individuals, teams or organisations
Scroll down to the navigation section and ensure you tick:
Secondary Nav: Yes, display on Sub-nav

Save the initial setup of the page to create it and be brought to the page editor.
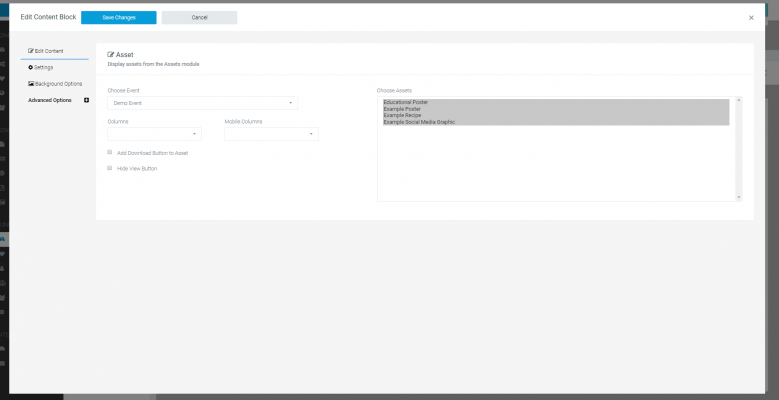
Like any other page, add the content you need. For this example, just a text block and an assets block.
Edit the content blocks to have a title and a brief description of the page.

In your asset content blocks, select the assets you want to display.
Publish the page to make the changes live.
You should be able to log in as an entrant and view the page on a URL like {site url}/login/view/{page url}

And that's it. You’re up and running with a customised fundraiser dashboard for your event.
If you’d like further help please pop in a support ticket from your Funraisin admin and our team will assist you.
