

Enabling Regular Giving
All platforms have the ability to set up regular giving on Donation/Crowdfunding pages as well as fundraisers pages. Donors can commit to weekly, monthly or yearly donations.
Regular giving is often considered the holy grail of Fundraising though it is also known to be one of the most difficult conversions to attempt when it comes to acquiring donors.
A typical fundraising campaign can receive generally around 20,000 sponsored donations for every million dollars raised, and although with sponsored donations the donor usually has a relationship with the Fundraiser rather than with the charity, most sponsored donors are rarely communicated to after a campaign to try and convert them into becoming a regular donor.
Regular giving can be set up on your platform for Donation and Crowdfunding pages, and also on Fundraisers page. You can choose to offer it as weekly, fortnightly, 4 weekly, monthly and/or yearly.
This support article will take you through the following:
Getting Set up
Donation & Crowdfunding pages using Classic Builder:
Firstly, you need to enable it on your donation or crowdfunding page. Edit the page, then navigate to:
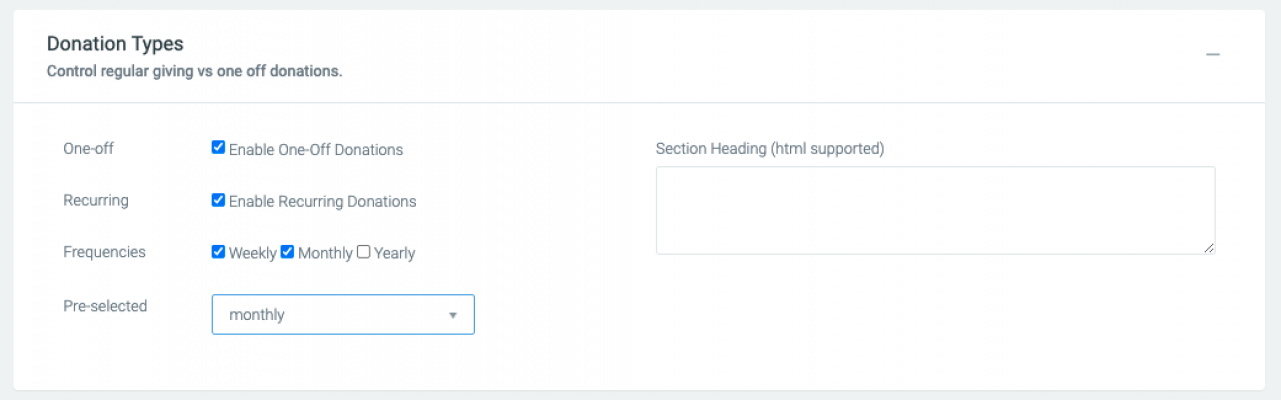
Donation/Crowdfunding Settings > Payment Settings > Scroll down to Donation Types.
Tick that you want to Enable Recurring Donations and tick the frequencies you want to offer. From the dropdown menu, you can also choose which option is pre-selected when a donor lands on the page.
You can also create unique dollar handle amounts for each of the frequencies. For example, your weekly suggested amounts could be $5, $10 and $15. Whereas your monthly suggested amounts could be $25, $50 and $75.
To set this up, within the page, navigate to:
Donation/crowdfunding settings > Dollar Handles
The below will appear, where you can edit the options available for each frequency.
Once updated, ensure you save and publish.

Donation & Crowdfunding pages using Visual Builder:
If editing using Visual Builder, hover over the donation section and click on the green pencil icon in the right-hand corner. The below panel will appear from the right. You can tick which frequencies you want available, and then expand Dollar Handles to set your suggested amounts.

How to enable Regular Giving for sponsored donations (donations on fundraisers pages):
To enable Regular Giving sponsored donations across all events, navigate to:
Platform Setup > Fundraising Options > Regular Giving > Regular Giving

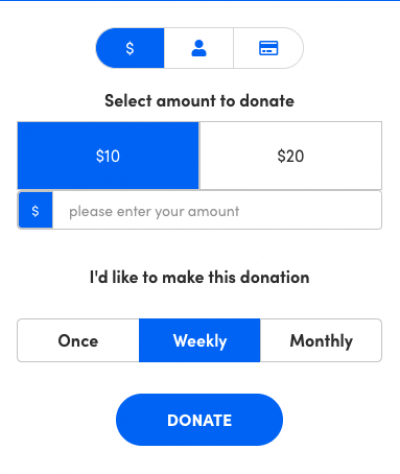
Choose what frequency options you would like to appear and hit Save. This will appear on the fundraiser's page like the below.
Alternatively, this can be set at event level within the event:
Donation Defaults > Regular Giving > Standard Regular Giving
Fundraising pages can also support fixed-term recurring giving. More information on this can be found here.
Emails
You can set up a receipt email that will only send for donors committing to regular giving on any of your pages.
Platform Setup > Automated Emails > Receipt to Recurring Sponsor (ID57).
Once enabled, the Receipt to Recurring Sponsor will apply to all fundraising pages using regular giving and send to a regular donor when making their first donation.
For generic donation/crowdfunding pages, you can set up the regular giving thank you email on the page level. Just navigate to:
Donation/Crowdfunding Settings > Thank You Email > Regular Giving Thank You Email (optional)
This email will only send to recurring donors from this page. If this email is not set up on the page, the regular givers who have signed up on this page will receive the usual Receipt to Generic Donor email.
At the event level, you can also customise the message of the Receipt to Recurring Sponsor specific to the event. Just edit the event and go to:
Advanced Options > Automated Emails > Add email > select Receipt to Recurring Sponsor as the email to override
If none of the above options are set up, then your recurring donors will receive the same receipt email as your one-off donors.
The Receipt to Recurring Sponsor will only trigger for the first donation that is made. There is the option to set up another receipt email to trigger for every subsequent regular donation. This is within:
Platform Setup > Automated Emails >Receipt to Scheduled Donor (ID 44).
This email will only trigger if enabled.
To ensure your donors keep their card details up to date, ensure Donor Card Expiry Reminder (ID3) is enabled within automated emails. This will trigger when your donor's card nears expiry and remind them to log in and update their card details. More information on how a donor can update their card details can be found here.
Managing Regular Givers
When a donor commits to becoming a regular donor, their initial donation will appear as a standard donation with the donation type of recurring and then a schedule will be created for any future transactions which will be stored in:
Donations > Scheduled Donations
The initial dashboard will allow you to see who the donor is, their donation frequency, how many transactions have been made to date, the number of errors that have been encountered when trying to process transactions and the schedule status.

How to Cancel or Pause a Regular giver
If you need to cancel or pause a regular donation, this can be done by navigating to:
Donations > Scheduled Donations > Browse Scheduled > edit the donor
Here you can Pause the donations if the donor wants to take a break, or Archive the donation to prevent any further transactions. You also have the option to change the frequency and date of payment.

Notifications for new regular givers
To be alerted as to when a new regular giver has been set up, you can create a Trigger email. Navigate to:
Platform Setup > Triggers
Here you can create a new trigger email, and choose to trigger when: 'Donor becomes regular giver'. You can then populate the email content and pull in personalisation tags. At the bottom of the page, you can choose for the trigger to only be sent to Admins, and specify which ones. Set the trigger to Active and Save.
The next time a donor commits to being a regular giver, you will receive the trigger email to alert you.
Understanding Failed Payments & Retries
When any scheduled donation fails to be processed we store the attempt along with the error message which you can access under:
Donations > Scheduled Donations > Errors
After the first unsuccessful attempt, we log an error and then retry 2 days later, if this fails then this is followed by another attempt 2 days after that. If these attempts fail, we try again 6 days after the initial retry. For monthly donations, a fourth attempt will be made 12 days after the initial attempt. You can also manually retry a failed attempt - navigate to the donation error record, where you'll find a section dedicated to payment retries under the error details tab.
In order to be PCI Compliant, all card data from regular givers is always stored in the payment source, so for card based regular givers the card data resides in Stripe, for PayPal regular givers the payment data resides in PayPal.
When a regular donor commits to making a regular donation we store a token from the payment platform (e.g. Stripe or PayPal) and then we use this to perform any future charge. Each regular donor goes into a schedule that can be accessed within each platform and it is where you can control things like the scheduled payment date, any transaction errors, credit card expiry, etc.

Reporting
The first donation made will create a donation record and a transaction record. This will appear in your donations report and also your transactions report. All subsequent recurring donations will only create a transaction record. Therefore, they will not appear in your donations report, but will appear in your transaction report.
You can also create a Scheduled Donations report which will pull in all subsequent donations that have been made after the first donation.
- Donation report: Only the first transaction will appear in your donations report.
- Transaction report: All donations will appear in your transaction report.
- Scheduled Donation report: A specific regular donation report that will pull through the second donation onwards.
- Scheduled Donation Errors report: This report will pull through any scheduled donations that were not processed. Specific fields for error messages can also be added to the report.
Advanced Questions
How does this affect Salesforce?
If you are using our standard Salesforce sync then each transaction will just come through as standard opportunities linked to the donor's contact record and also to the fundraiser for soft crediting.
What happens to payment errors?
When a scheduled payment fails for whatever reason, this is recorded along with the failure reason and it is then added to a schedule that will automatically retry to process the failed donation within the next 3 days.
What donation prefix will be applied to the donation record?
The first donation made will acquire the donation prefix that has been applied to the event or page. If none has been set, then it will pick up what has been set at platform level. The subsequent donations will not create a donation record, however will still have a PO number that will feed through to Stripe. This prefix will be the donation prefix set at platform level, e.g. DON123.
How do I find the subsequent related donations after the first donation is made?
The first donation made will create a donation record and a transaction record. Whereas the subsequent donations will only create a transaction record. However if you navigate to the donation record, on the left hand white menu is Transactions which will have a number next to it, indicating how many transactions have been made. Clicking into here will list out the transaction history, including the amount, date, PO number, Stripe reference and payment method.
What happens when a page or event is archived and a recurring donor is associated with it?
The recurring donations will not be affected, and will still continue to be processed.
How can you update the recurring donors card details?
You will need to find the recurring donors record within:
Donations > Scheduled Donations > Search
Once you’ve opened up their record, under the tab Card Expiry, you can update the card number and expiry date.
How can a donor access their receipts and update their card details?
A donor can log in by navigating to /donorlogin, e.g. mycause.com.au/donorlogin
Here they will be prompted to input their email address which will trigger an email to them. This email will contain a unique link taking them to their donor account. Once logged in, they can view and download past receipts, update their personal details and card details.
More information can be found in our Donor login process support article.
A donor's card has expired, but their donations are still being processed.
In order to process the payment, only the long card number is required by Stripe. Whilst a card may have expired, commonly a new card will have the same long number, and therefore the transactions should still process.
