

Platform navigation
Add and edit your site navigation to your platform to enhance your user journey. Or create a custom navigation at event or page level to create a microsite.
Navigation can be added to the platform to apply to your whole site, or updated at event or page level to create a more customised navigation.
Use options on the navigation menu to direct users to specific pages on the site or use custom navigation to help entrants maneuver through an event or a campaign.
Understanding the Site Navigation
Navigation on your site can be added at platform level, event level, page level or all three.
The platform level navigation is the default navigation which will show for every page and event unless overridden.
The event level navigation, if enabled, is used to customise the nav for a specific event. All content pages and fundraisers pages in that event will adopt that navigation.
The page-level navigation, if enabled is used to customise the nav for a specific page.
Default site navigation (that applies to every event unless overridden) is under Platform Setup > Site Navigation
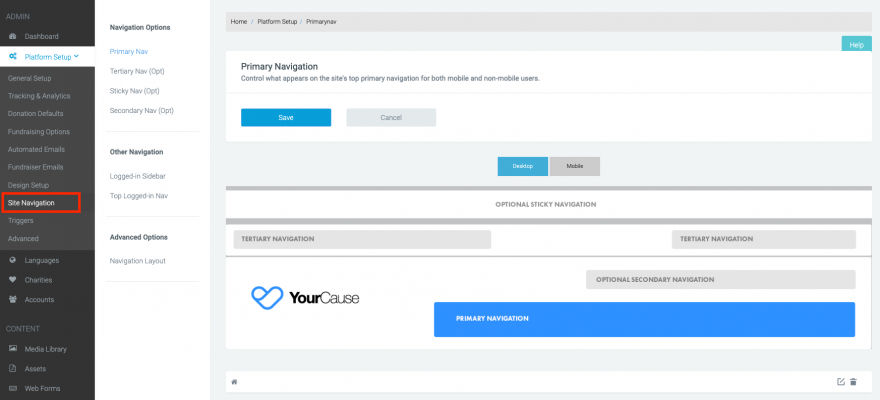
You will see four navigation options Primary, Tertiary, Sticky and Secondary Nav.
If you click into Navigation Layout, you can see how these four options appear alongside one another. You can also chose a different layout.

The navigation layout you select will be the same for every event. You will need to set up a Primary nav, but it is not mandatory to use the Tertiary, Sticky or Secondary nav
Front end Navigation views
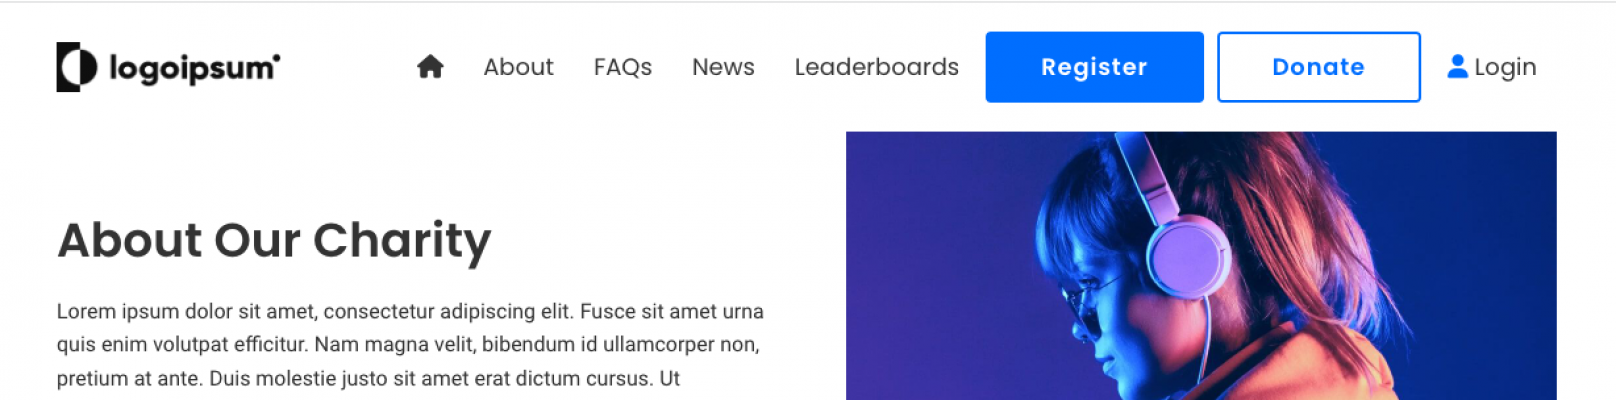
Primary Nav
Primary nav is where the bulk of your nav options will sit and is often used the most by users. It sits above the header, and you can house all your nav items in the Primary nav if you wish.

Secondary Nav
The secondary nav allows you to place nav items to sit above your Primary nav.

Tertiary Nav
The Tertiary nav sits above the Primary and Secondary, and is often used for login options, social icons and search bars.

Sticky Nav
The Sticky nav is used to add navigation options which will be visible at the top of the page when the user scrolls down. These often include items in the Primary nav and Secondary.
Setup Your Default Navigation
The default navigation set at platform level will appear on every event and page unless you add custom navigation on an event or page.
Decide which navigation you want to use (Primary, Tertiary, Sticky, Secondary) and select it. If you aren’t sure, the most common is the Primary nav, which puts the logo on the same level as your menu.
You will see:
- Options for Desktop / Mobile
- The navigation layout you have selected (if you haven’t selected one, the default will be showing)
- An option to add a new navigation option

Add options to navigation
You can add to any nav type by scrolling to the bottom and filling in the required information.

Nav Options:
- Label: how the option will display, e.g Leaderboards
- URL: the page URL or you can link directly to the page using the dropdown below
- Open as: select if you want the page to open in the same window or a new one
Style Options:
- Style: is where you can select how the option should display e.g. as text or a button
- Alignment: will allow you to left, right or default align the option
Advanced Options: (optional)
- Identifier: is where you can add an ID if you are using custom code
- Class: is where you can add a class for custom code
Once you've added a label and page to link to, simply save the option and it will appear in your list.
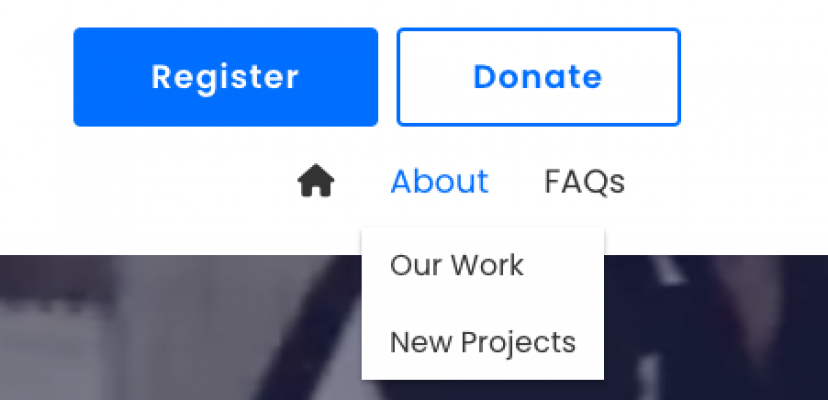
Display subnav
If you want to show a SubNav, tick Display a Subnav and then fill in the options below:

SubNav Type: choose between a Standard Dropdown or Mega nav. With the Mega nav you can use HTML to add buttons and images.
SubNav Source: select Manually Created to manually add Subnav options or select Linked to Pages to show pages assigned to the linked page.
Once saved, you'll have the option to add in the Subnav items.
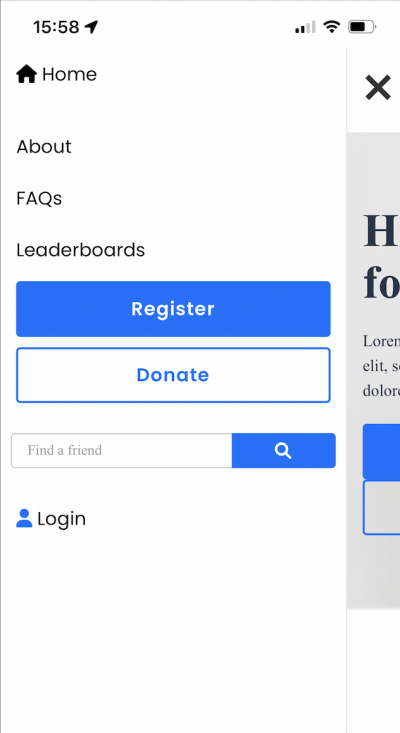
Mobile
By default, when setting up your navigation, you'll be adding to desktop. When editing the Primary nav, you'll also want to set up a version for mobile which includes your Primary nav items, but also any further options you're displaying with your Secondary or Tertiary.

Custom Navigation
You can enable custom navigation for events and pages to override the default navigation. You can navigate to the Custom Navigation by navigating to:
Event > Advanced options > Custom navigation > Enable
Page > Advanced options > Custom navigation > Enable
The options available in an events custom navigation are just like the options available at the platform level.

If you’d like further help, please pop in a support ticket from your admin, and our team will assist you.
