

Creating Donation and Appeal Pages
If you're running a themed appeal or would like to create a landing page for donations, you can set up a page that includes suggested dollar handles and a donation form.
New Visual Builder updates means you can now drop a donation block into any content page. This allows more flexibility when creating the layout of your page.
To create a donation or appeal page with the latest donation block module, please review this support article.
Donation and crowdfunding pages can still be created following the steps below.
Creating your page
When creating your donation page or appeal, head to:
Pages > +Create New Page button in the middle white menu
From the Page Template & Page Assignment options, select the Donation or Crowdfunding template, enter the name of the page, and assign the page to a parent page (most donation and appeal pages will be standalone so there's no need to assign a new donation page but can be if desired). Once done, save your page.
One-off, in memory, and regular giving donations are handled in your Pages module. You can create as many donation pages as you need for your seasonal appeals, always-on donation pages and more.
Continue on as you normally would with setting up your page with all the elements and styling you'd like (the header image, SEO metadata, the content itself which can appear above the donation form, etc).
You can edit your page using either Visual Builder or Classic Builder. The settings available are the same, but this guide will take you through both methods, starting with Visual Builder. If you'd rather use Classic Builder, click here to jump down to the instructions.
Visual Builder
When you first land on your page, you will only see a payment form and no placeholder dollar handles. Hover over the payment step, and click on the green pencil in the right-hand corner to open up your options to customise the page.
Donation
This section allows you to set your Donation Frequency, Dollar Handles and Matched Giving. Each sub-heading can be expanded and the settings changed.
Donation Frequency
Define if you'd like donors to be able to make one off, weekly, monthly, or yearly donations. You can also pre-select the chosen frequency for when donors land on the page.
Dollar Handles
Add in suggested donation amounts along with an image and information to explain what that amount will go towards supporting. If you've selected more than one donation frequency, e.g. one off and weekly, then you'll have the option to add different dollar handles for each frequency. You may want to suggest higher dollar handles for a yearly recurring donation, vs a weekly recurring donation.
Matched Giving
If enabled, you can choose your matched giver, define the receiver name on the page and add a countdown clock. More information on how to set up Matched Giving can be found in this support article.

Payment
This section is where you can choose your accepted Payment Methods, define Payment Settings, customise the Tax Receipt and add in GL codes.
Payment Method
Use the toggles to decide if credit card and/or PayPal is an accepted payment method. You can also update the section heading, which by default is called Payment Details.
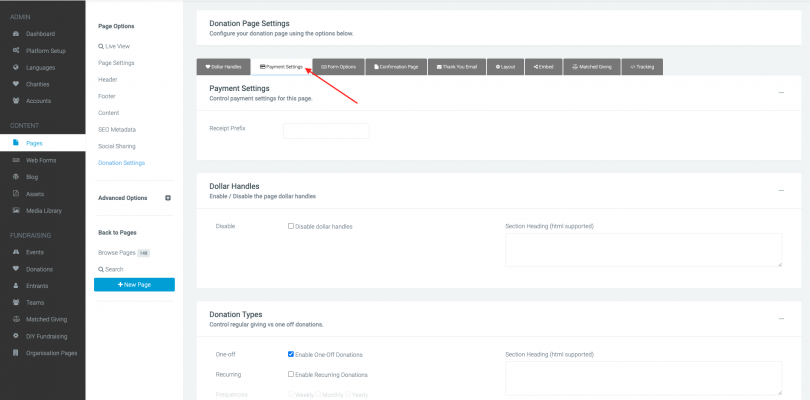
Payment Settings
Add in a receipt prefix which will ensure donations to this specific page are easily identifiable by their PO number. If you're using multi charity, you can also choose a charity from the drop down that donations will be assigned to.
Tax Receipt
Enable or disable receipts and update the primary descriptor if you'd rather it not to be defined as a Donation. You can also add four additional lines of personalised copy to the receipt.
General Ledger
If using GL codes, you can add in two.

Form
This section is where you can choose what data is captured when a donation is made. Some of the settings here will vary, depending on whether you're creating a Donation page or Crowdfunding page.
On a Donation page, you'll have the option to choose whether your form sits above or below the other content of your page. You can also add in a Search function, so potential donors can find their friend's specific fundraising page.
Next, you can define the personal data fields captured when making the donation and whether or not their mandatory, and also add in a marketing optin. The section heading defaults to Your Details, but can be updated.
A Donation page also allows you to add in In Memory/In Celebration options, and the ability to send a card.
If you have reCaptcha enabled on your platform, you can toggle security on.
And finally, you can pull in webforms from the Additional Fields drop down.

Layout
If creating a Donation page, you'll have an additional option whereby you can define the layout of the page. Examples of these layouts can be found in the Resources section.
Advanced
This section is where you can customise your confirmation page, thank you email and add in tracking to the page.
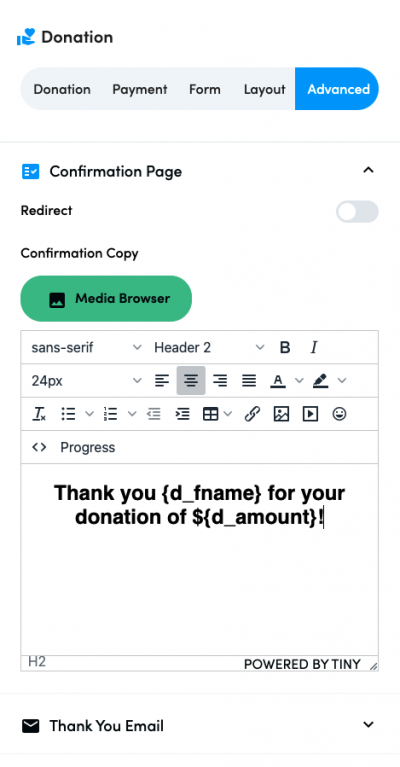
Confirmation Page
When a donation has been made, donors will land on a platform standard page. You have the option to either redirect them to another page, or customise the page they land on with copy and personalisation tags. E.g 'Thank you Tom for your donation of $20.'
Thank You Email
By default, donors will receive the email, Receipt to Generic Donor, (ID 31) which is set within Platform Setup > Automated Emails. However, you can create a custom email to trigger when a donation is made to this specific page.
Classic Builder
As you're using a Donation or Crowdfunding Template, when editing the page you'll now see the Donation Settings or Crowdfunding Settings option in your middle navigation. Click this and you'll see all the options within a donation page.
Dollar Handles
Add in your preferred dollar handles for one-off, weekly, monthly and yearly. If you're using regular giving and don't want different suggested dollar handles, then just add in amounts for one-off.

Payment Settings
This section is where you can choose your accepted Payment Methods, define Payment Settings, customise the Tax Receipt and add in GL codes.
Payment Settings
Add in a receipt prefix which will ensure donations to this specific page are easily identifiable by their PO number. If you're using multi charity, you can also choose a charity from the drop down that donations will be assigned to.
Dollar Handles
Disable dollar handles if you'd rather no suggested amounts appear.
Dollar Types
Choose whether to display one-off and/or recurring donations.
Payment Methods
Tick the methods you'd like to accept. More information on supported payment methods can be found here.
Tax Receipt
Enable or disable receipts and update the primary descriptor if you'd rather it not to be defined as a Donation. You can also add four additional lines of personalised copy to the receipt.
General Ledger
If using GL codes, you can add in two.
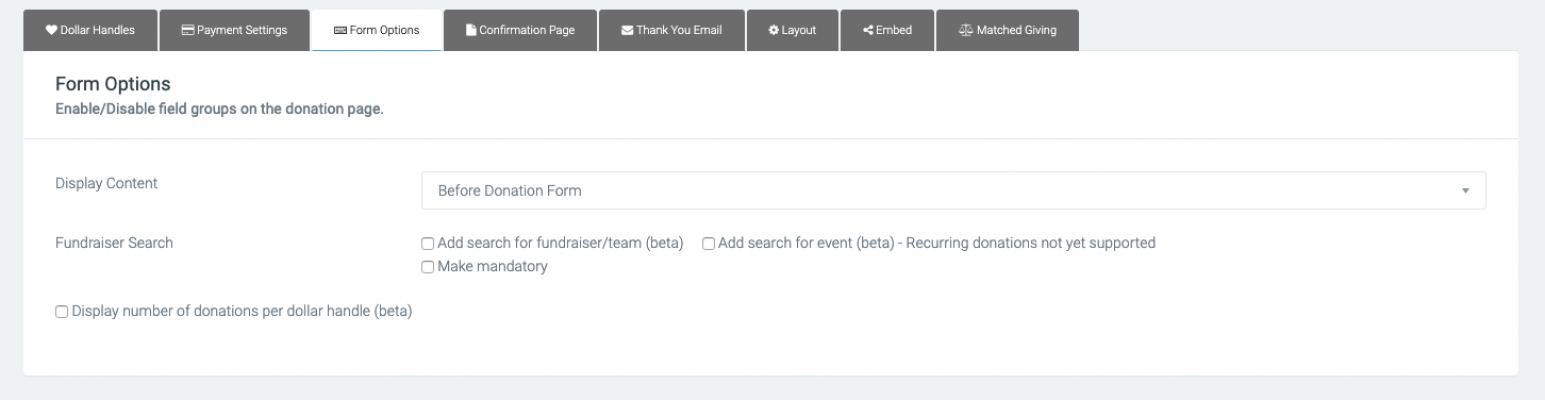
Form Options
This section is where you can choose what data is captured when a donation is made. Some of the settings here will vary, depending on whether you're creating a Donation page or Crowdfunding page.
On a Donation page, you'll have the option to choose whether your form sits above or below the other content of your page. You can also add in a Search function, so potential donors can find their friend's specific fundraising page.
Next, you can define the personal data fields captured when making the donation and whether or not their mandatory, and also add in a marketing optin. The section heading defaults to Your Details, but can be updated.
A Donation page also allows you to add in In Memory/In Celebration options, and the ability to send a card.
If you have reCaptcha enabled on your platform, you can toggle security on.
And finally, you can pull in webforms from the Additional Fields drop down.
Confirmation Page
When a donation has been made, donors will land on a platform standard page. You have the option to either redirect them to another page, or customise the page they land on with copy and personalisation tags. E.g 'Thank you Tom for your donation of $20.'

Confirmation Email
By default, donors will receive the email, Receipt to Generic Donor, (ID 31) which is set within Platform Setup > Automated Emails. However, here's where you can customise the thank you email donors will receive specific to the donation page they made their donation on. For example, if you're creating an end of financial year appeal, you may wish to style the email template and/or use specific copy relating to the end of financial year appeal in the confirmation email the donor receives. Choose the template you'd like to use and then edit the copy through the editor - remembering to use the personalisation tags as needed such as sponsor name and sponsor amount to personalise the email.

Layout Options
Layout Options allows you to choose from the various donation template layouts we have available. There are examples of how the layouts look here.

If you’d like further help please pop in a support ticket from your Funraisin admin and our team will assist you.
