

Fitness: Connecting Strava
Fitness activity can help create a stronger sense of progress, motivation, and connection throughout a fundraising campaign. For supporters taking part in walks, runs, rides, and other fitness challenges, being able to track and share activity can make participation feel more visible, rewarding, and community-driven.
Connecting Strava with Funraisin helps bring that activity directly into the fundraising experience, allowing supporter progress to remain active and up to date throughout the campaign journey.
This article walks through the full setup process, including creating a Strava account, subscribing to Strava, creating a Strava API application, increasing athlete limits, configuring the integration within Funraisin, and enabling activity syncing for fundraisers.
Important: This article is for organizations setting up the Strava integration for the first time. If Strava is already connected to the Funraisin platform and information is required about Strava's updated subscription requirements, refer to Fitness: Strava Integration Changes for the steps required to update an existing integration.
What is Strava?
Strava is a fitness tracking app available on smartphones, with support for syncing data from wearable devices such as the Apple Watch.
It allows users to record physical activities like running, cycling, and hiking, while also capturing GPS data to display activity routes on a map.
How Strava works with Funraisin
When connected, Strava automatically syncs activity data to a fundraiser’s profile within Funraisin.
This includes metrics such as:
- Distance
- Duration
- Steps (where available)
This activity is displayed and tracked on the fundraiser’s page, allowing supporters to see progress over time.
Activity also contributes to the fundraiser’s overall fitness stats and is reflected across fitness features such as progress tracking and leaderboards.
Once connected, activity syncs automatically from Strava without requiring manual updates, helping ensure fundraising pages stay current and accurately reflect progress.
Strava account, subscription, and API application
Connecting Strava to Funraisin is a straightforward process, but it does involve a few setup steps across both Strava and Funraisin.
To enable the integration, a Strava account must first be created, followed by a paid Strava subscription and a Strava API application. Athlete limits must also be increased to allow multiple fundraisers to connect their Strava accounts.
At a high level, the setup process includes:
- Creating a Strava account
- Subscribing to a paid Strava subscription
- Completing the Strava API application
- Increasing athlete limits
- Adding Strava API keys to Funraisin
- Submitting a support request to enable activity syncing
Each of these steps is outlined in detail below.
It's recommended to complete this setup in advance of launching a campaign. Once set up, the integration runs automatically with minimal ongoing management.
Creating a Strava account
The first step in enabling Strava is to create a Strava account. Once the account has been created, a paid Strava subscription is required before completing the Strava API application. Both the account and application are managed by the charity, helping ensure the integration can be maintained and updated by your team when needed.
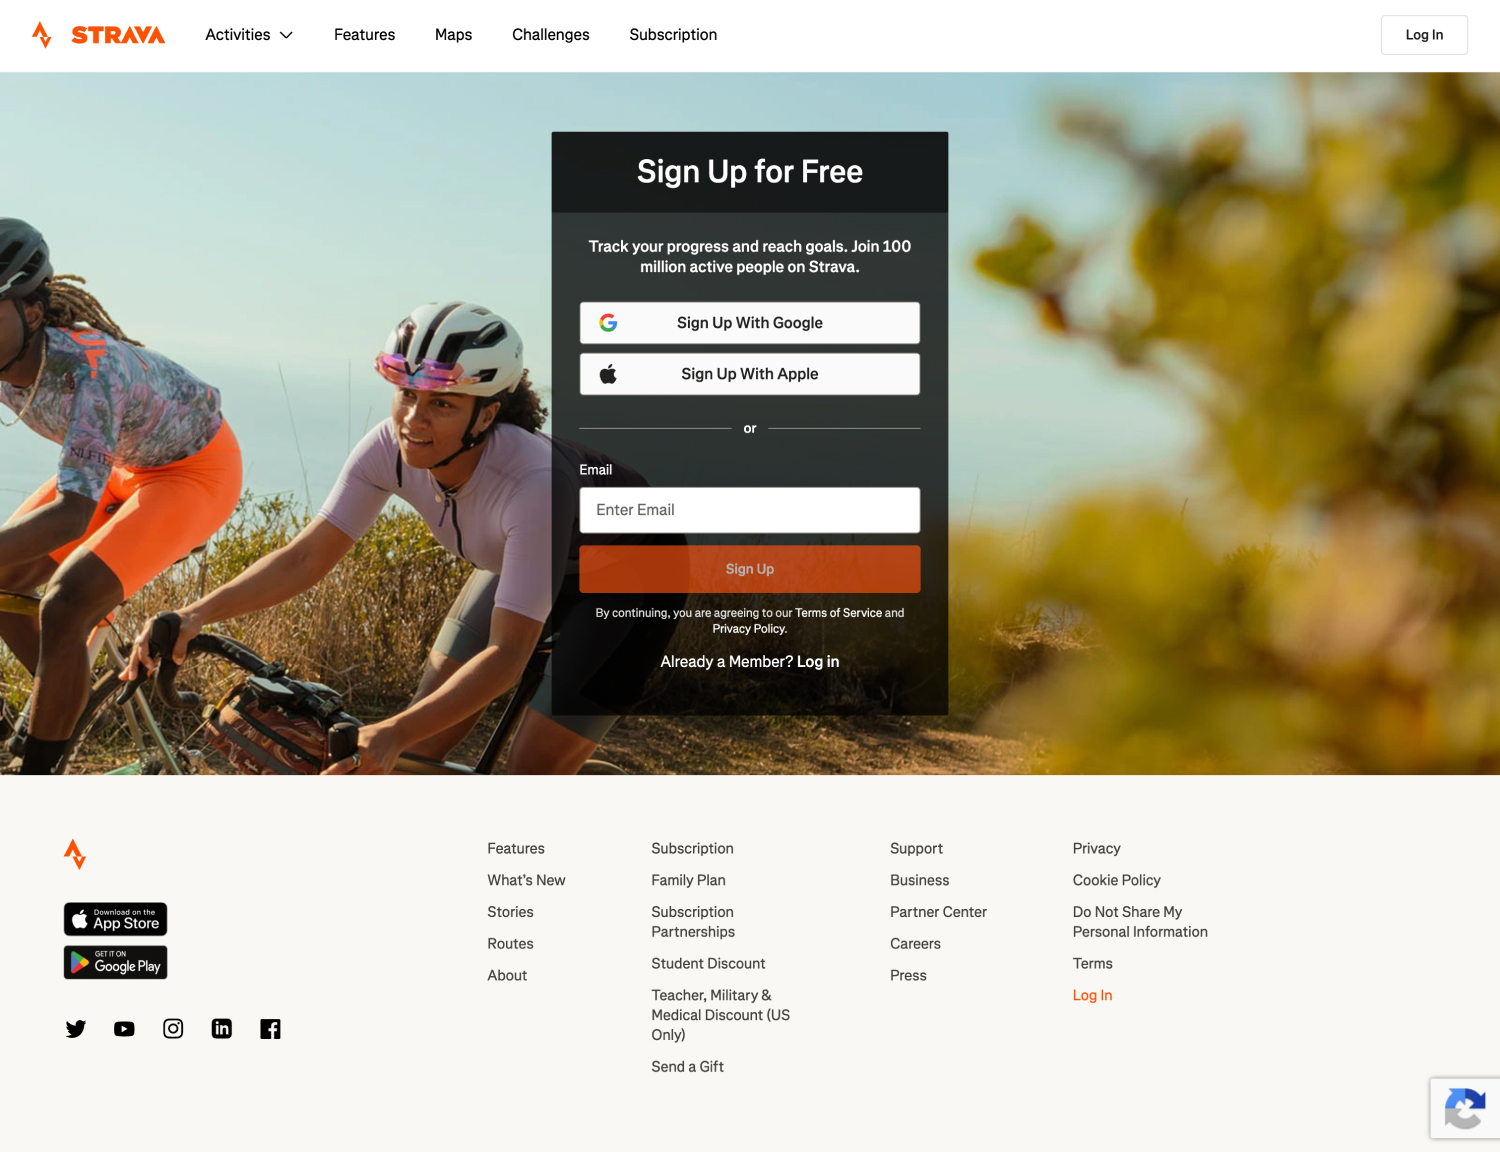
To create a Strava account:
- 1
- Navigate to https://www.strava.com/register/free
- 2
- Enter an email address and complete the sign-up process
Tip! Using a shared email address (for example, an info@ inbox) can make it easier for multiple team members to access the account if needed.
- 3
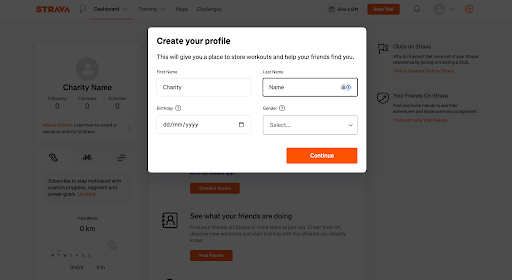
- Check your inbox and follow the email prompt from Strava to confirm the account. Once confirmed, complete the profile setup:
- Use your charity name for First Name and Last Name
- Enter any Date of Birth and Gender these are not used for the integration
- 4
- Skip the Suggested Friends step
Subscribing to Strava
A paid Strava subscription is required to use the Strava API with Funraisin. Without an active subscription, fundraisers won't be able to connect their Strava accounts or sync activity data with the platform.
Only one paid Strava subscription is typically required per organization. For organizations with multiple Funraisin platforms, the same subscription can often be used across multiple platforms, depending on how the Strava API applications are configured. If you're unsure which setup is right for your organization, contact the Funraisin Support team before subscribing.
The subscription should be purchased using the Strava account created in the previous section. Strava subscriptions are available in most countries, with pricing varying by region and currency. Current subscription pricing can be viewed on the Strava website before subscribing.
To subscribe to Strava:
- 1
- After confirming the Strava account and completing the profile setup, Strava may display a prompt to start a subscription. If prompted, follow the on-screen instructions to continue.
- 2
- If the subscription prompt is not displayed, navigate to https://www.strava.com and log in using the account created in the previous section, then select Subscribe in the top-right corner. Depending on the account, a Start Trial option may be displayed instead.
- 3
- Follow the prompts to select a Strava subscription.
- 4
- Select More Billing Options to choose between an annual or monthly subscription, if required.
- 5
- Enter the payment details and complete the subscription.
Strava API application
Once the Strava account has been created and a paid subscription is active, the Strava API application can be created. The API application provides the connection between Strava and your Funraisin platform, allowing fundraisers to connect their Strava accounts and sync their activity with the platform.
To create the Strava API application:
- 1
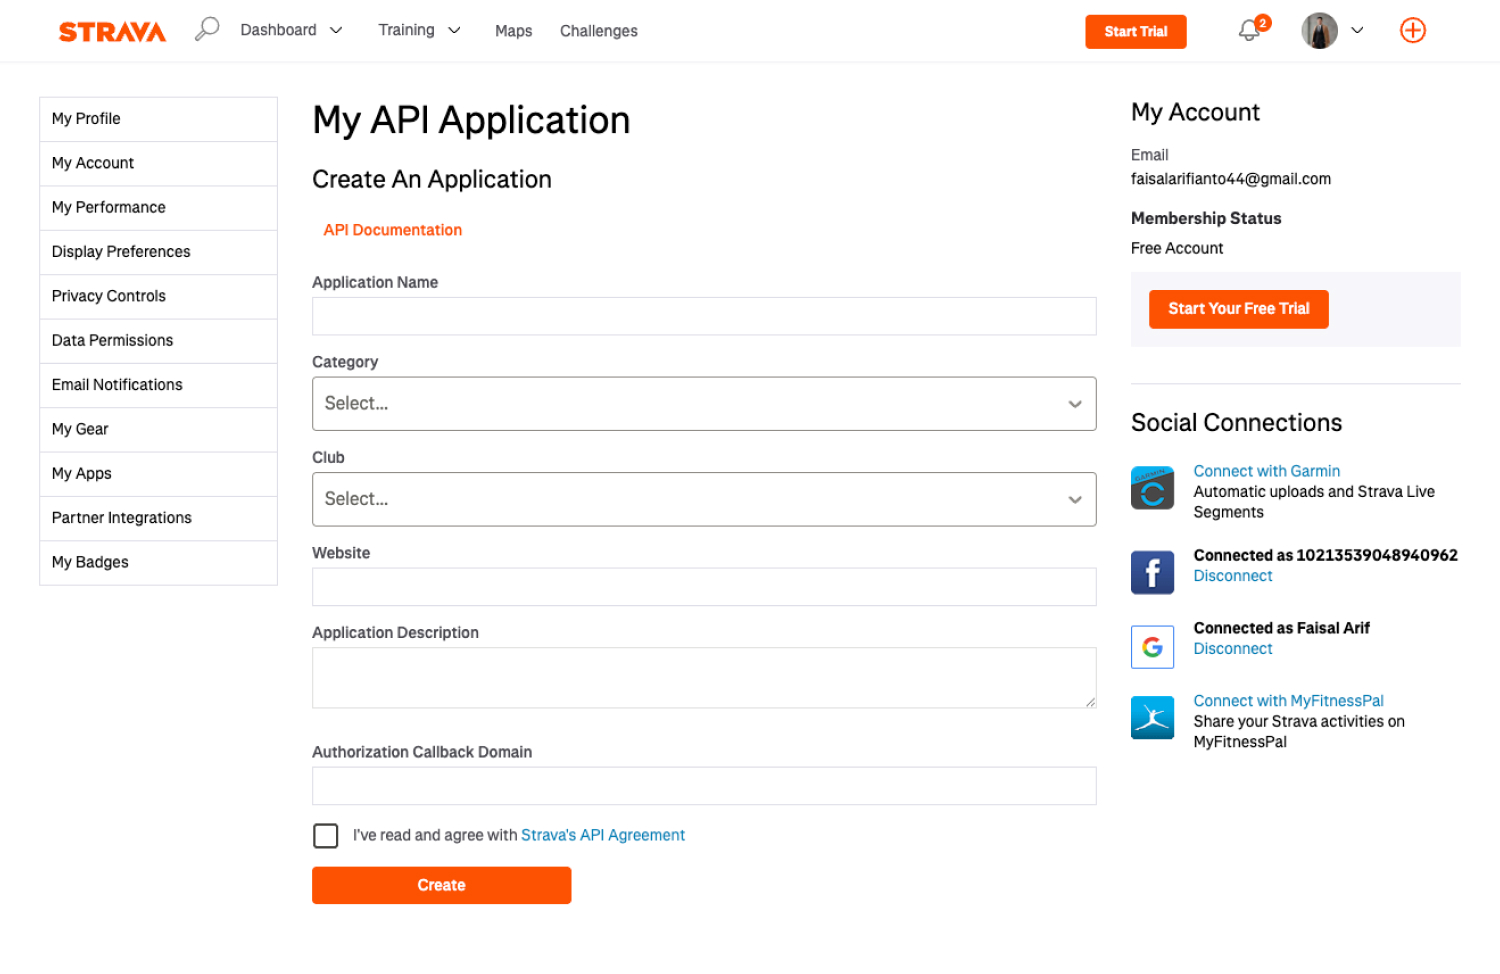
- While logged in to Strava, navigate to https://www.strava.com/settings/api
- 2
- Complete the application fields as follows:
- Application Name: This is the name fundraisers will see when connecting their Strava account. A clear name, such as the charity or platform name, is recommended. Avoid using event-specific names or adding dates, as the connection may be used across multiple campaigns on the platform.
- Category: Select Charity
- Club: This can be skipped or set as None
- Website: Enter your Funraisin platform's home page URL, including https:// (e.g.
https://www.yourcause.org) - Application Description: Example: Strava fitness tracking. This description is displayed alongside the application name to fundraisers during connection.
- Authorization Callback Domain: Enter your site domain without https:// or trailing slashes (e.g.
donate.yourdomain.com)
- 3
- Review the API Agreement and click Create.
- 4
- Upload a logo for the application. This logo is displayed alongside the Application Name and Application Description when a fundraiser connects their Strava account.
- 5
- Save the application
- 6
- Copy and securely save the following API credentials. These will be required later when configuring Strava in Funraisin:
- Client ID
- Client Secret
Tip! By default, a new Strava API application has a limited athlete capacity. The athlete limit will need to be increased to allow multiple fundraisers to connect their Strava accounts. This is covered in the next section.
Increasing athlete limits
A new Strava API application initially supports one connected athlete. The athlete capacity can first be increased to 10 through the Strava API Settings Dashboard without requiring review from Strava.
For more than 10 connected athletes, the API application must be submitted to Strava for review. Before submitting the application, a screenshot showing the Connect to Strava button within the fundraiser dashboard will need to be prepared.
To increase the athlete capacity to 10:
- 1
- Log in to Strava using the same account used to create the API application, then navigate to Strava's API Settings.
- 2
- From the API Settings Dashboard, increase the application's athlete capacity to 10.
- 3
- Save or confirm the changes as prompted by Strava.
Preparing to increase athlete limits
Before requesting an increase to the athlete limit, you’ll need to capture a screenshot from the fundraiser dashboard showing the Connect to Strava button. This screenshot will be included with the request to Strava.
To prepare and capture the required screenshot:
- 1
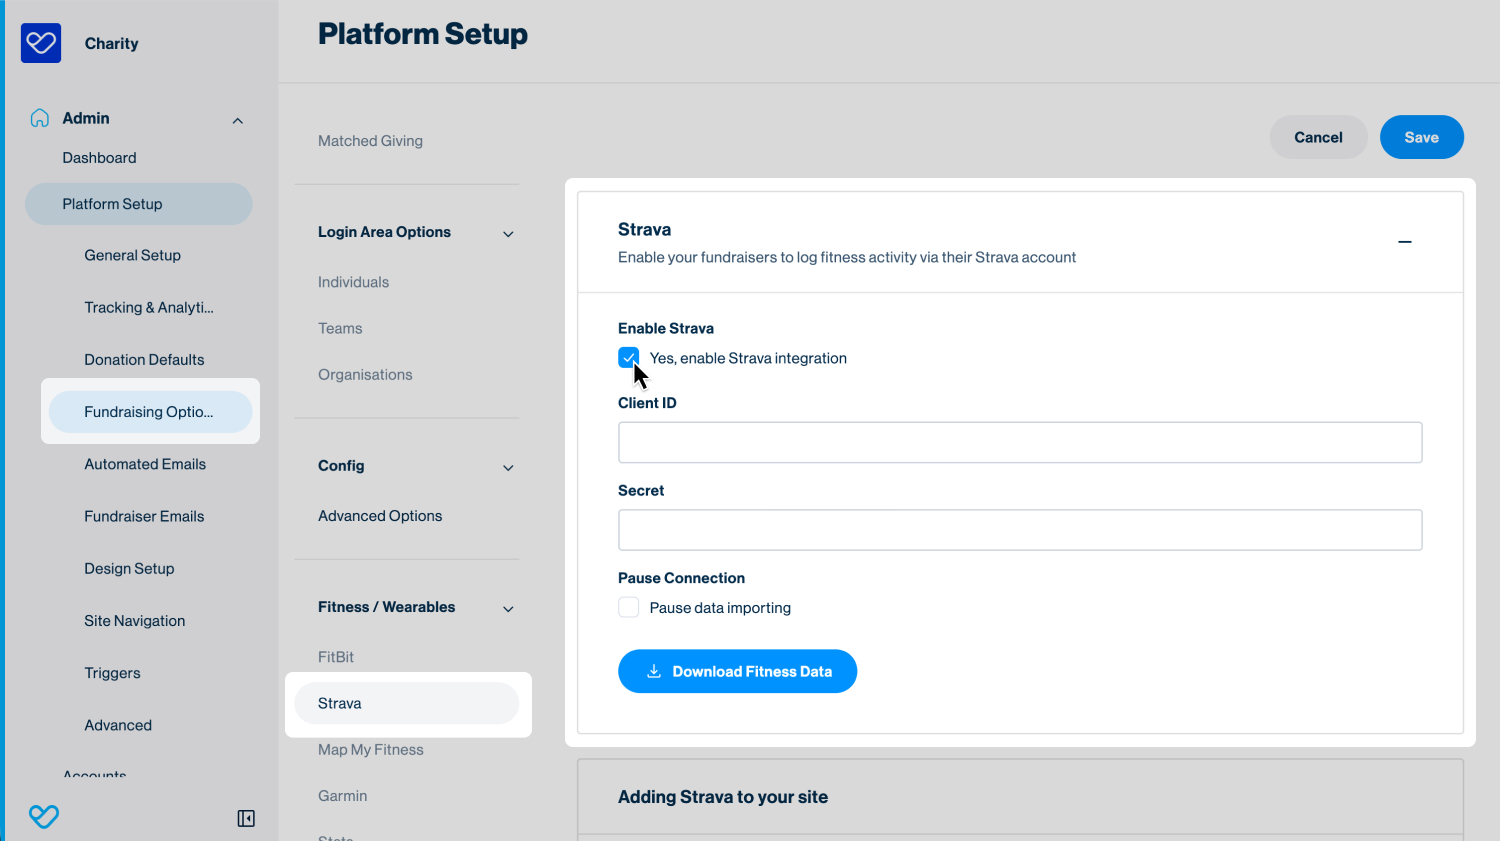
- Navigate to Admin > Platform Setup > Fundraising Options.
- 2
- From the middle navigation, under Fitness/Wearables, select Strava
- 3
- Under Enable Strava, select Yes, enable Strava integration, then click Save
Tip! The Strava API keys do not need to be added at this stage. Enabling the integration is only required to display the Connect to Strava button for the screenshot.
- 4
- Navigate to Fundraising > Events and click the edit icon for the event being used.
Tip! It’s recommended to complete this setup in a test event to avoid impacting live fundraisers.
- 5
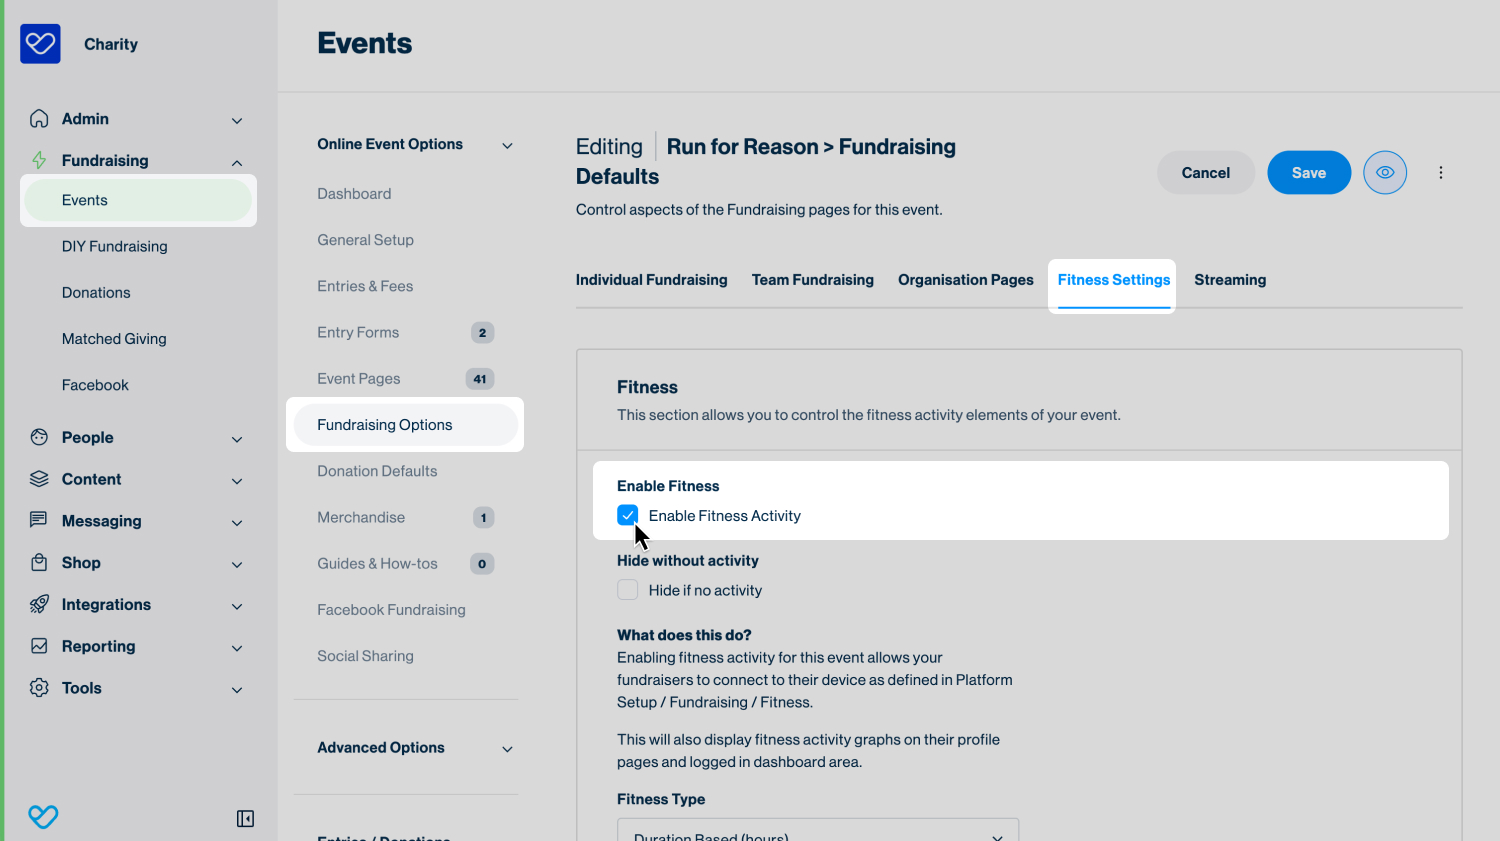
- Under Online Event Options, select Fundraising Options
- 6
- From the Fitness Settings tab, tick Enable Fitness Activity, then click Save
- 7
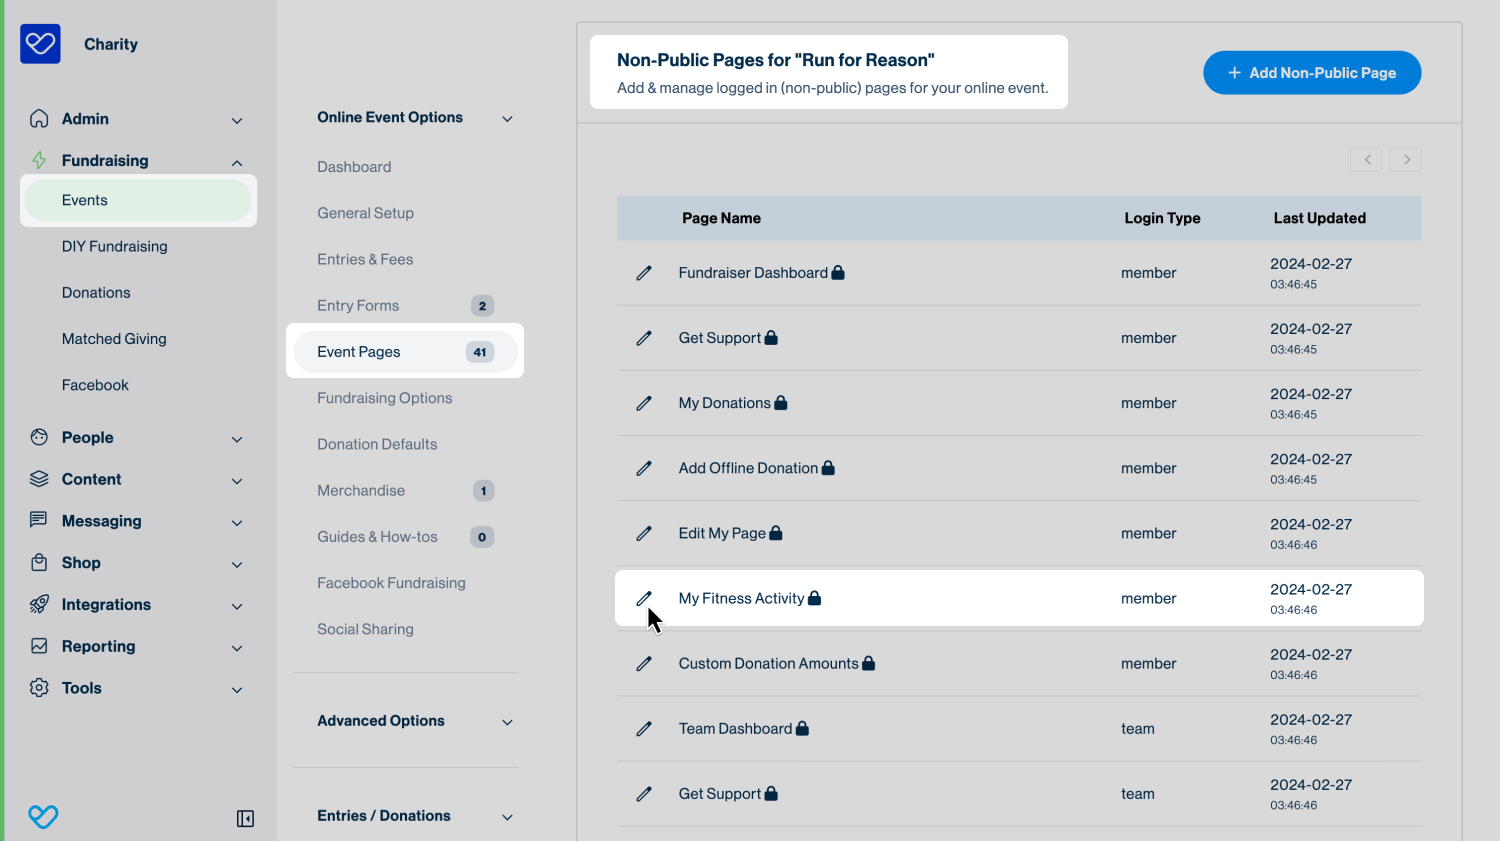
- Under Online Event Options, select Event Pages
- 8
- In the Non-Public Pages section, click the edit icon for My Fitness Activity
- 9
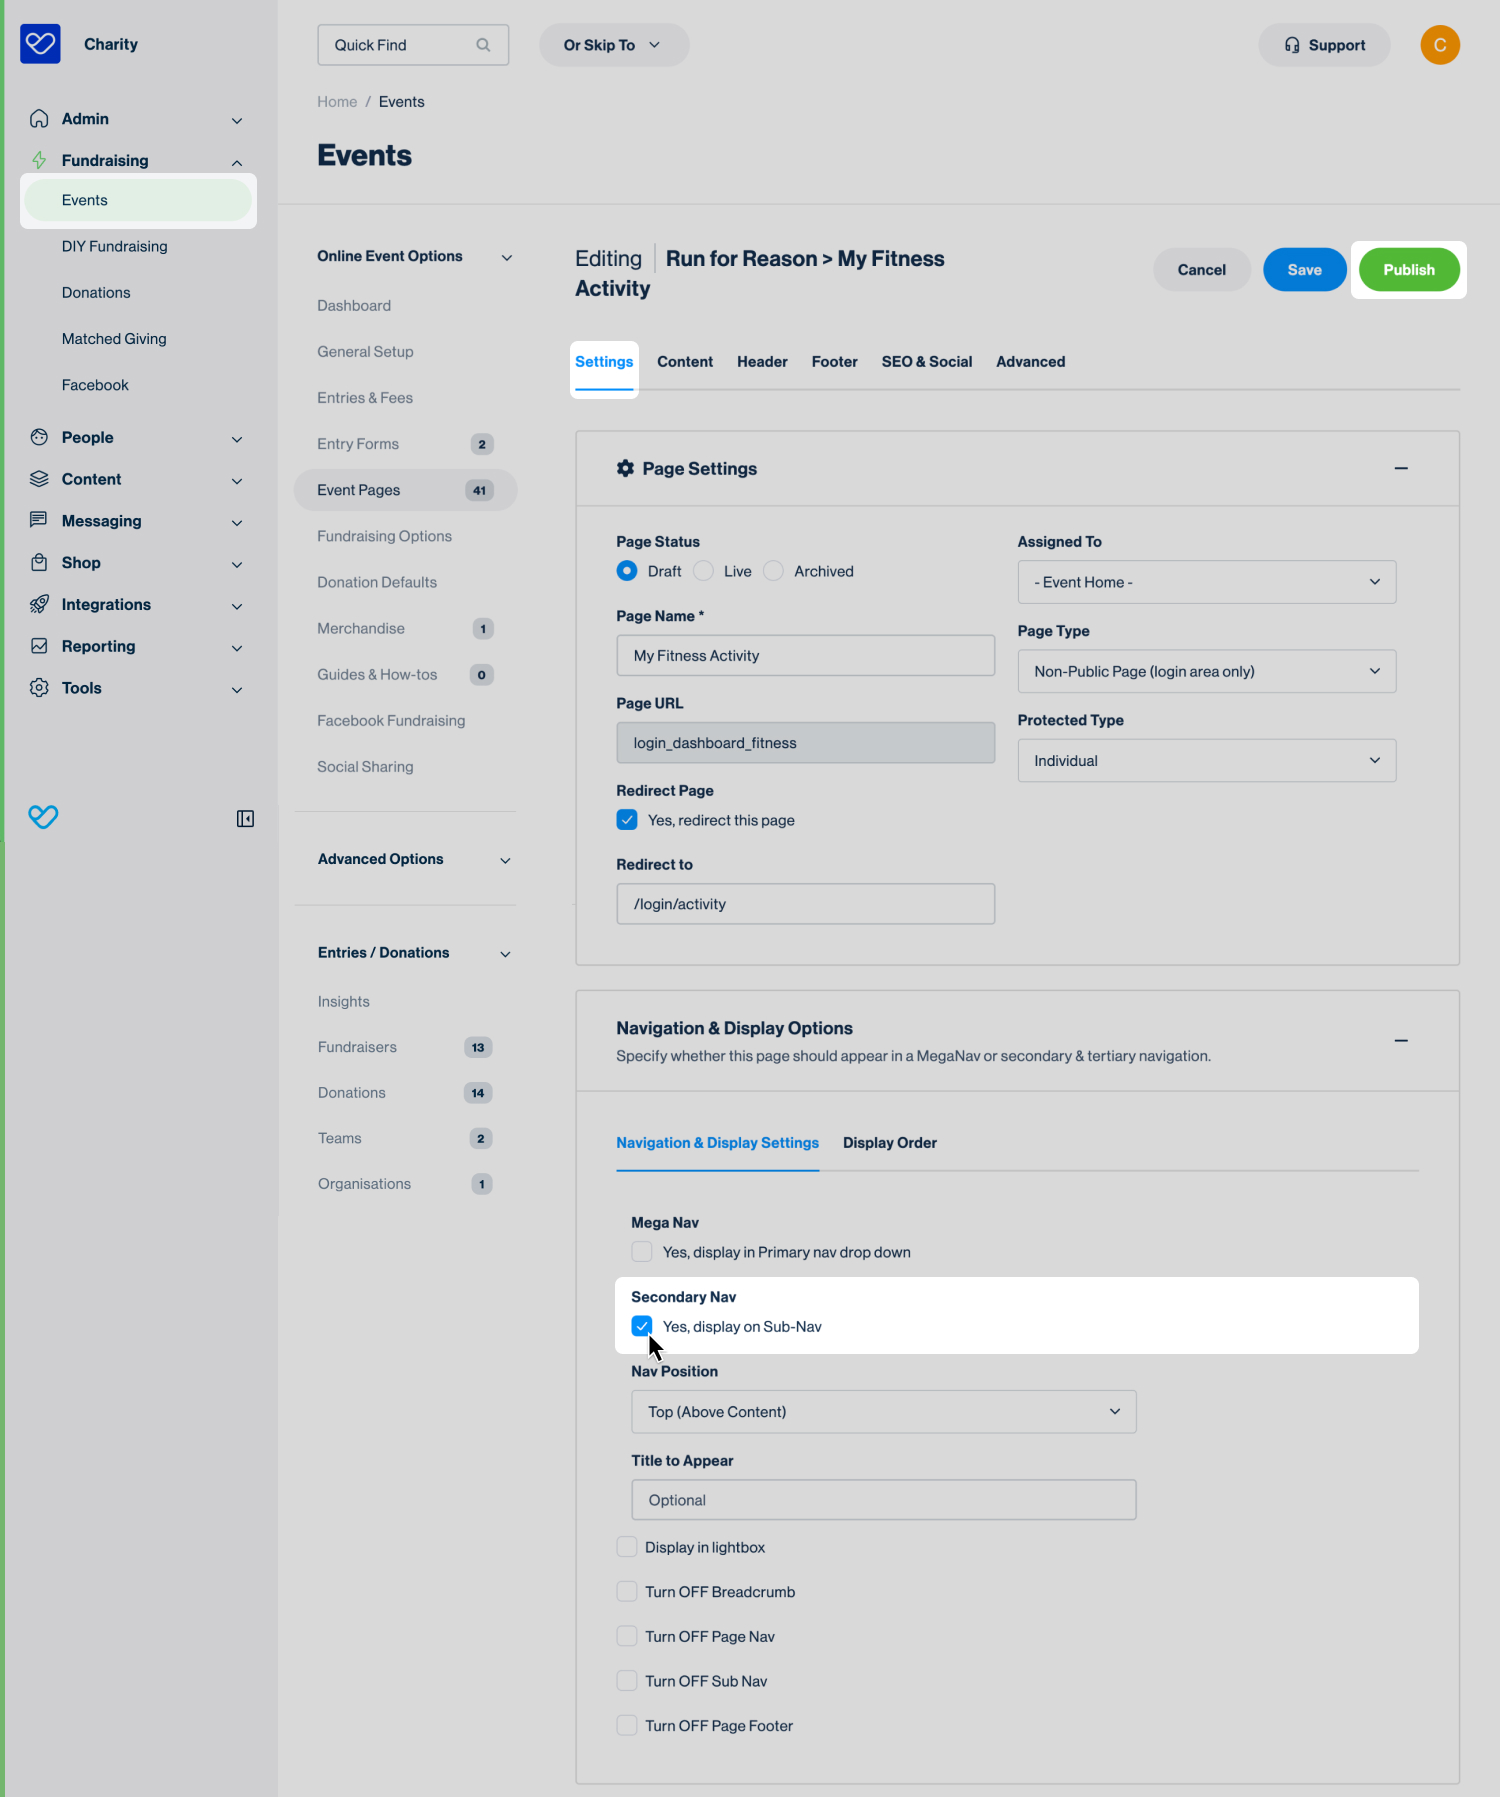
- On the Settings tab, under Navigation & Display Options, select Yes, display on Sub-Nav for Secondary Nav
- 10
- Click Publish
- 11
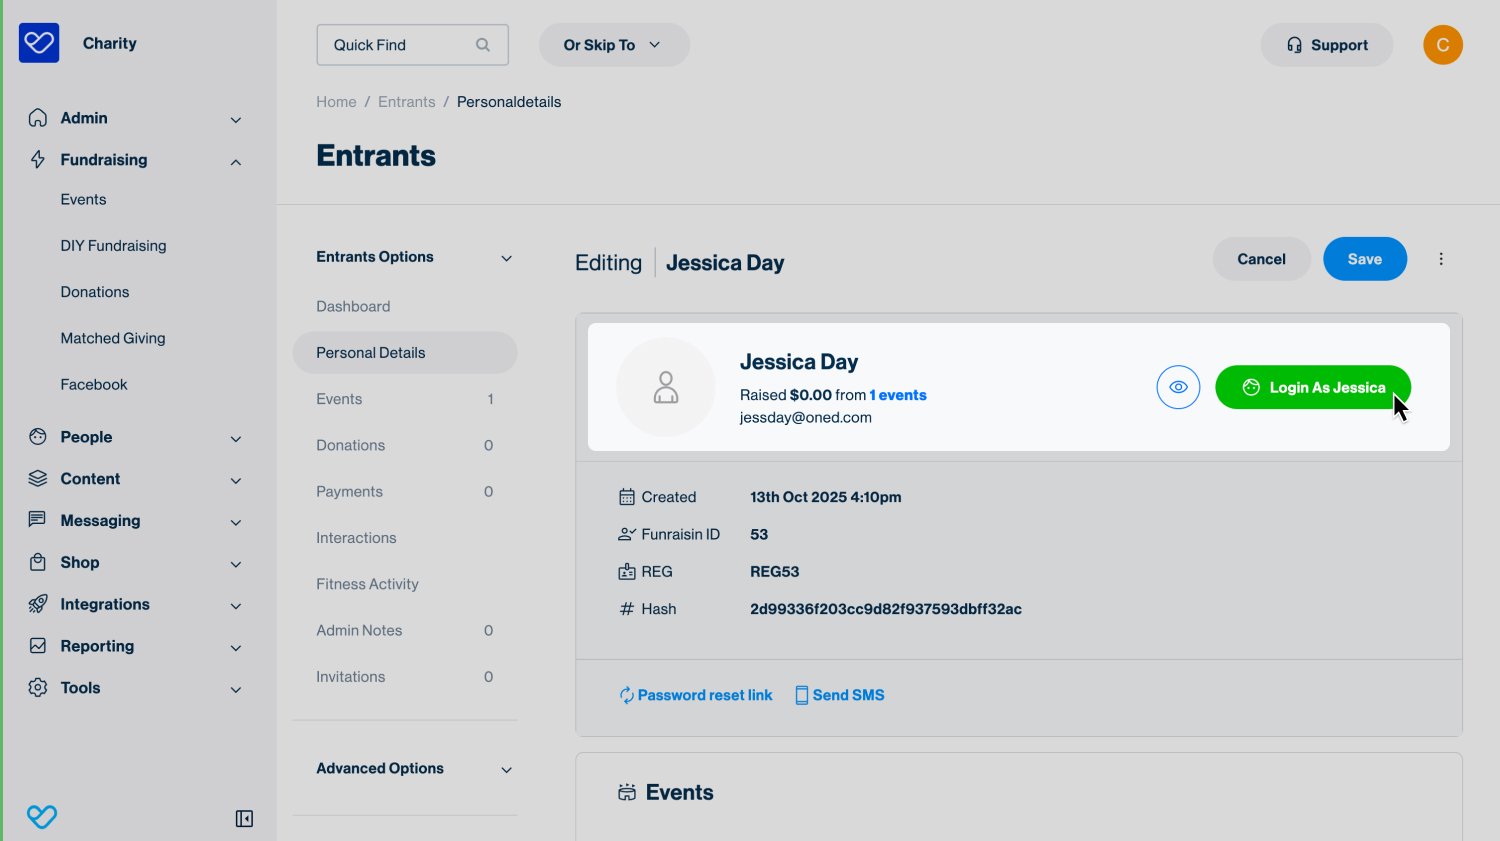
- Under Entries/Donations, click Fundraisers. If there are no active fundraisers for the event, register a test participant before continuing
- 12
- Click the edit icon to open an active fundraiser’s entrant profile, then click the green Log in as {entrant name} button.
- 13
- From the fundraiser dashboard, select the My Fitness Activity tab. The Connect to Strava button should now appear.
- 14
- Take a screenshot of the page, including the Connect to Strava button and page header where possible. This screenshot will be required when requesting an increase to the athlete limit.
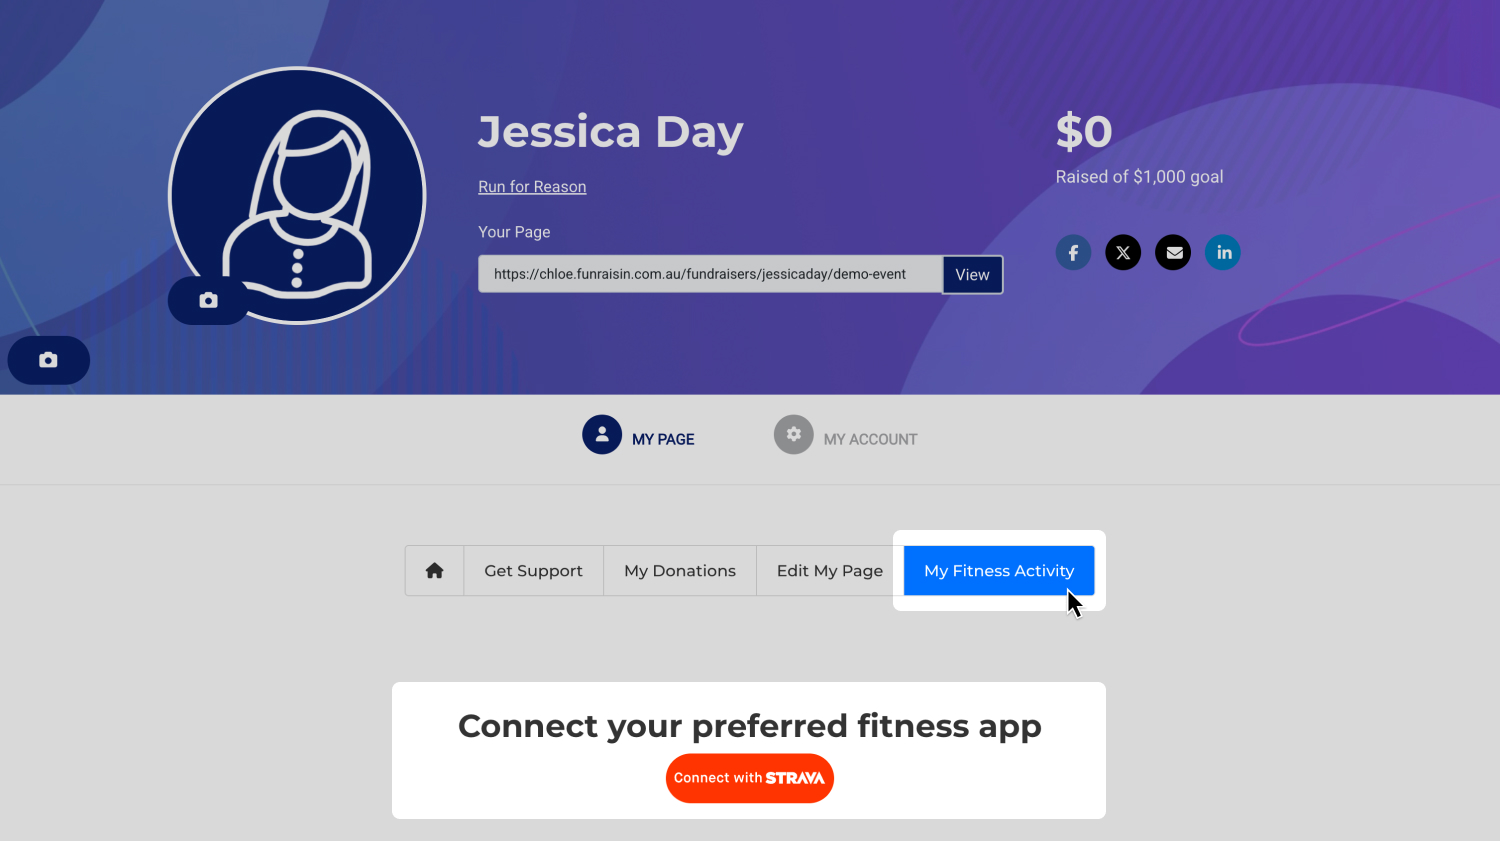
Important: After taking the screenshot, return to Admin > Platform Setup > Fundraising Options > Fitness/Wearables > Strava and disable Enable Strava. This helps prevent fundraisers from attempting to connect before the Strava setup process has been completed.
Applying to increase athlete limits
To allow more than 10 fundraisers to connect their Strava accounts, the Strava API application must be submitted to Strava for review. Increased athlete access is subject to approval by Strava.
Strava currently requires apps to reach the 10-athlete limit on the Standard tier before they can request additional capacity. Applications that have not met this threshold will be denied.
Therefore, you’ll need 10 users to connect to your Strava app before requesting an increase.
Before continuing, ensure the screenshot of the Connect to Strava button captured in the previous section is available.
To apply to increase the athlete limit:
- 1
- Navigate to https://www.strava.com and log in using the same account used to create the API application
- 2
- Open the Strava API Program Submission Form
- 3
- Complete the form fields as follows:
- First Name & Last Name: Enter the primary contact name
- Email Address: Use the email address associated with the Strava application
- Company Name: Enter your charity name
- Strava Client ID: Enter the Client ID generated when creating the application. This can be found at https://www.strava.com/settings/api
- Additional Apps: Leave this field blank
- Number of Currently Authenticated Users: Enter 1
- Number of Intended Users: We generally recommend entering 999. If you expect a higher number of connected users, you can enter 9999
- Application Description: Enter Allows Strava users to connect to Funraisin to aid in fundraising activities
- Support URL: This field can be left blank
- App Images: Upload the screenshot of the Connect to Strava button captured in the previous section
- 4
- Review the information entered, then click Submit
- 5
- Monitor the email address provided in the application for updates from Strava
Tip! Strava advises that the review process typically takes 7–10 business days. If additional information is required, the review may take longer. While the application is being reviewed, the remaining Funraisin configuration can be completed.
Configuring Strava on Funraisin
Once the Strava account, subscription, and API application have been set up, the integration can be configured within Funraisin. This involves adding the Strava API credentials to the platform and enabling activity syncing so fundraisers can connect their Strava accounts and share their activity.
Adding Strava API keys to Funraisin
The Client ID and Client Secret saved when creating the Strava API application allow Funraisin to securely connect with the application. Adding these keys enables communication between Strava and Funraisin and allows fundraiser activity data to sync with the platform.
To add the Strava API keys:
- 1
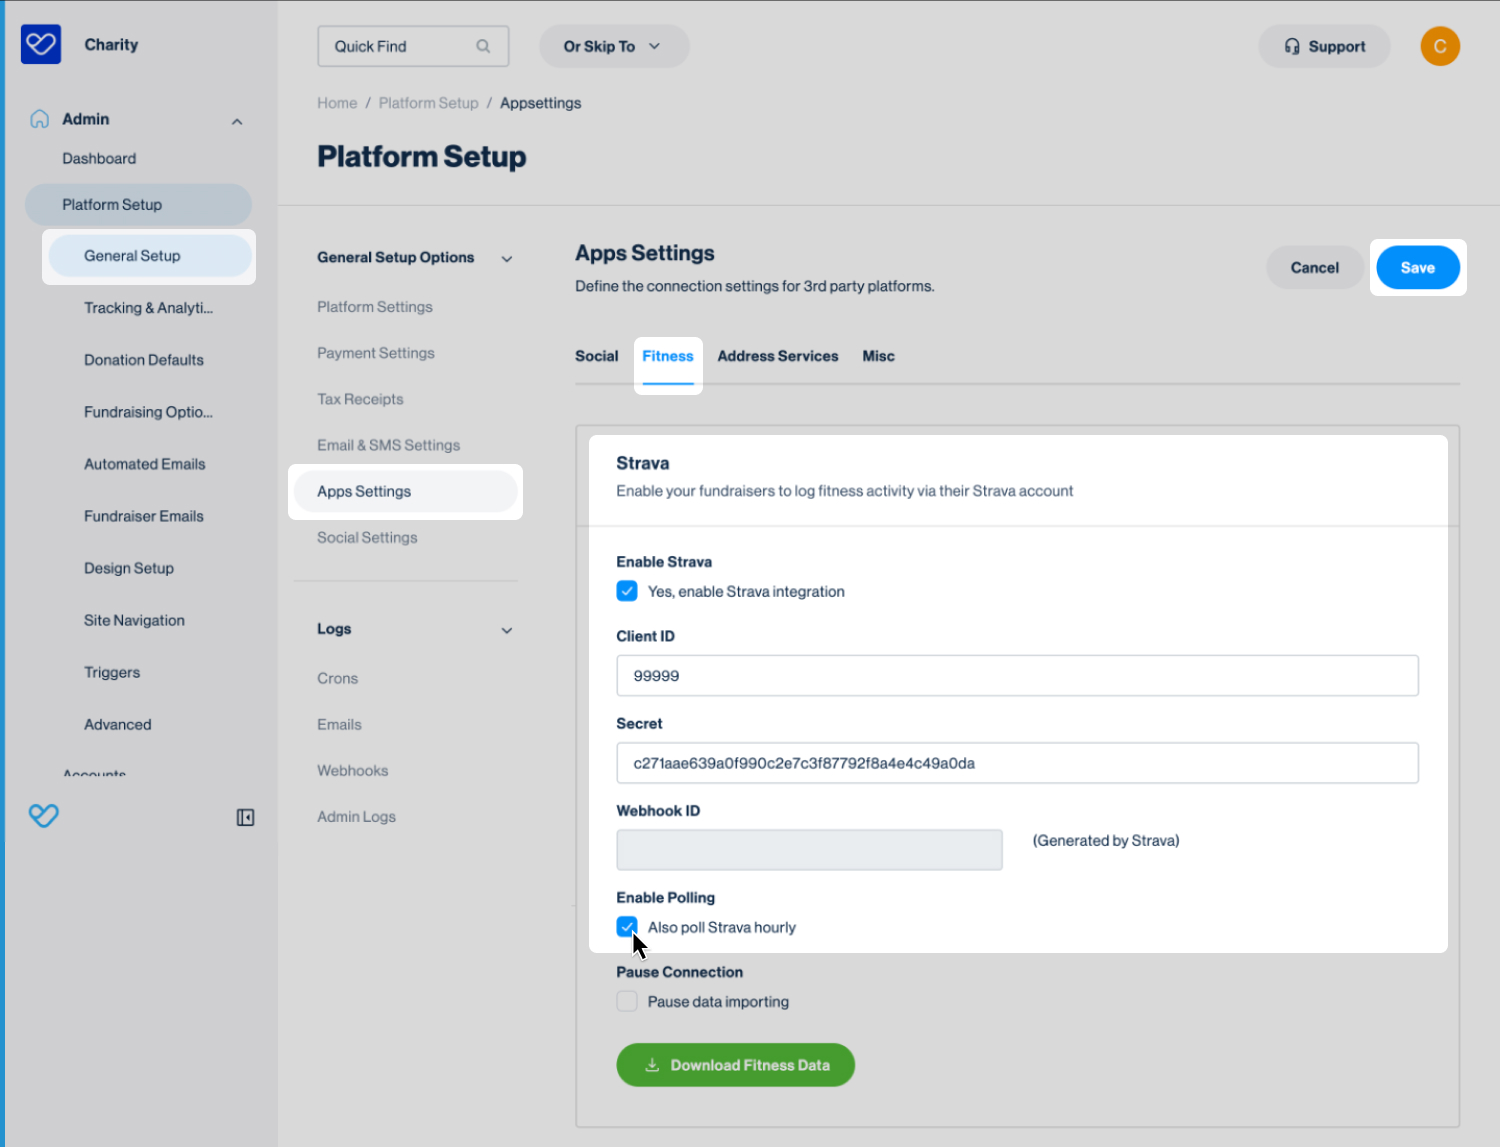
- Within Funraisin, navigate to Admin > Platform Setup > General Setup
- 2
- Under General Setup Options, select App Settings, then select the Fitness tab
- 3
- In the Strava section, tick Yes, enable Strava integration
- 4
- Enter the Strava Client ID and Client Secret saved earlier
- 5
- Under Enable Polling, tick Also poll Strava hourly
- 6
- Click Save
Activating Strava syncing
Once Strava has approved the request to increase the athlete limit, submit a support ticket from your platform with the subject line: Enable Cron for Strava Integration.
The Funraisin Support team will work with Engineering to enable automated Strava syncing on the platform.
Important: This work requires scheduling and may take up to 5 business days to complete after the request is submitted.
Making Strava available to fundraisers
Once the Funraisin Support team has confirmed that Strava syncing has been activated, Strava can be made available to fundraisers.
To make Strava available to fundraisers:
- 1
- Navigate to Admin > Platform Setup > Fundraising Options
- 2
- Under Fitness/Wearables, select Strava
- 3
- Under Enable Strava, select Yes, enable Strava integration
- 4
- Click Save
Testing Strava integration
Once Strava has been enabled and made available to fundraisers, we recommend completing a test to confirm the integration is working successfully.
To test the integration:
- 1
- Log in as an active fundraiser in an event with Fitness Activity enabled.
- 2
- Navigate to the My Fitness Activity tab.
- 3
- Click the Connect with Strava button to begin connecting the account.
- 4
- Follow the Strava connection flow to authorize the integration.
Tip! We recommend using a test fundraiser account where possible.
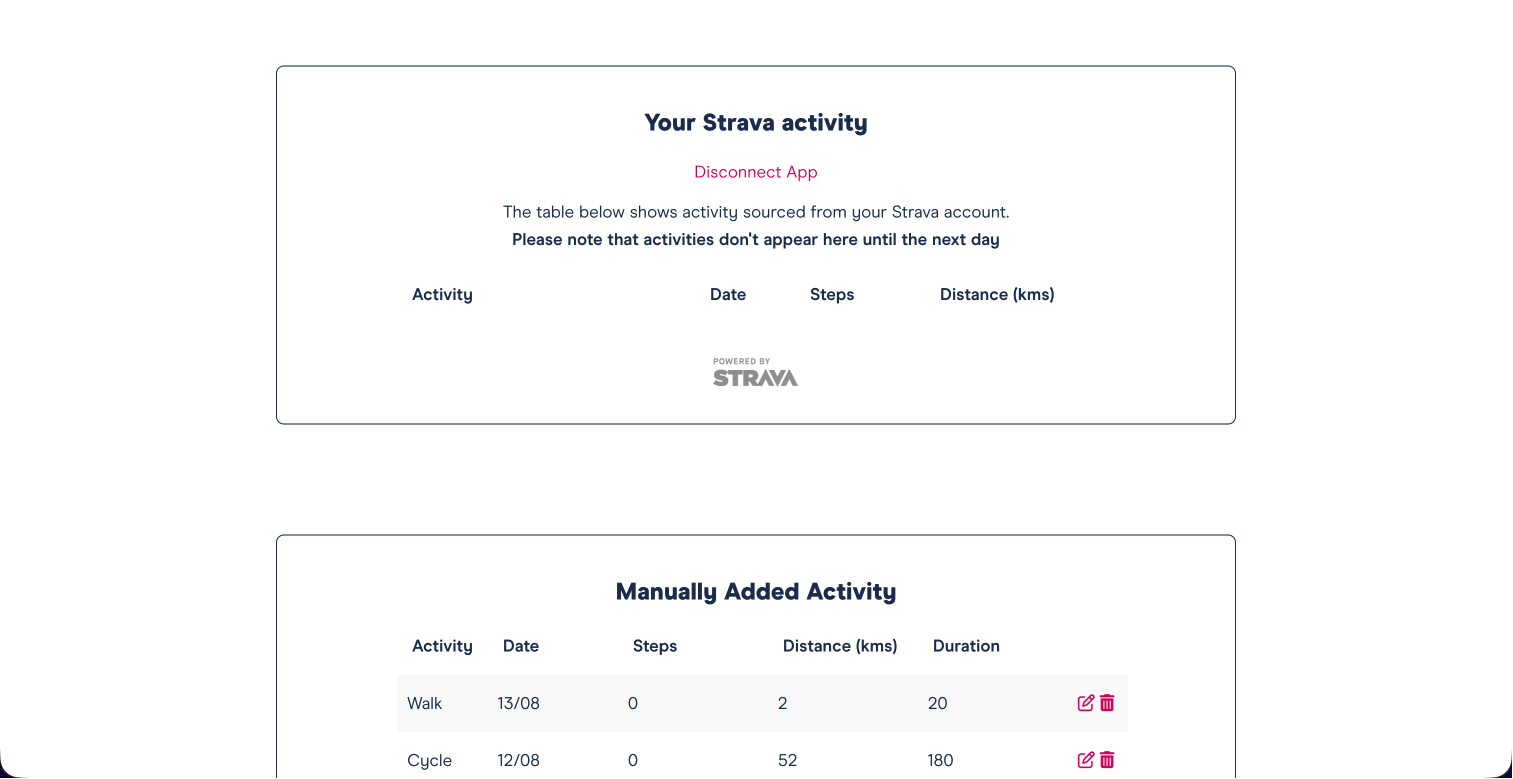
If the connection is successful, the fundraiser dashboard will display the connected Strava account and fitness activity details.
Still need help? Check out our other Integrations support articles or reach out to the Funraisin Support team by logging a ticket through the Support Module in your platform.
Last updated: 15 Oct 2026
